Printable Calendars + Planners 2016

calendars printable 2016 001calendars printable 2016 003calendars printable 2016 002

Calendars that are so pretty, I find myself using them as decor items around the house.

// this monthly one from The Anastasia Co (above, 1st pic)

// this minimalistic yearly calendar from Nordic Mojo (above 2nd pic)

// this lovely daily planner from Creators Couture (above, 3rd pic)

// this A5 planner inserts from Pengems

// this customisable monthly calendar from It’s Always Autumn

// this 3D calendar is available again from A Piece Of Rainbow

// this monthly planner from Landee See Landee Do

++ HAPPY 2016 & HAPPY PRINTING! ++

Turn Them Into Pretty Gifts : Recycled Glass Jars

messageinabottle005 messageinabottle004 messageinabottle002 messageinabottle006 messageinabottle007

Children’s Day is around the corner.  These “Message in a bottle” gift jars were made for Teachers’ Day last month.  I will be using the same idea to pack my Children’s Day gifts.

Simply gather some clean empty jars, thoroughly washed and air dried as you do not want strange mould growing inside them after a few days.  The only step left is to doll them up with labels, ribbons and the prettiest kind of message cards you can find.  Cover the lid with a squarish patterned paper or fabric and fasten with craft twine, this will complete the “handmade” look.

They will look real pretty as a set (photo 3 above) when bottles of a consistent size are used.  But this doesn’t really matter as they will be distributed to different recipients anyway.  The more important thing to note is that taller glasses are preferred, so that the message on the cards can be read easily without the lid wrapper obstructing.  The large 1kg Nutella bottles (photo 4 above) are the best for displaying messages with its wider body design.

You can gift the decorated jars as they are, like 3D greeting cards, or you can up the ante by filling them with goodies like sweets, chocolates or even small toys.  Just make sure that food items that are greasy or melt easily that could stain the message cards are packed in separate plastic bags.

DIY Journal Planner Printable – Sept to Dec 2015

printable sept to dec 2015 journal 001printable sept to dec 2015 journal 002

2015 is counting down to its final quarter.  Decided to bear an hour of sit-though to complete my DIY journal template for the rest of the year.  Anyway, the last three months of the year usually pass like a whirlwind, with final exams and holiday activities.  I might as well start the planning early.  I missed the August deadline but decided to play catch up, memories can be easily retrieved nowadays with digital trails left behind in the smartphone; whatsapp conversations, photo gallery etc.  Downloadable as a separate file here.

NOTES BEFORE PRINTING: While the PDF file is in A4 size, I design it with an A5 booklet in mind.  The entire Sept-Dec planner takes up 20 pages, but with the booklet layout, it fills up both sides on 5 sheets of A4 paper.  You can easily choose this under the “Page Sizing and Handling” options in the Printing menu.  Click on “Booklet” and then “Both Sides” under Booklet Subset option.  Preview to make sure that the printing take up only 5 sheets of A4 paper.

Monthly Journal Download Title

DIY Journal Planner Printable – July 2015

diy july 2015 journal template

NOTES BEFORE PRINTING: While the PDF file is in A4 size, I design it with a A5 booklet in mind.  The planner portion takes up only 5 pages (Page 2 to 6), but with the booklet layout, I inserted a front and back cover page (Pg1, Pg8), plus a random notes page (Pg7), to fill up both sides on 2 sheets of A4 paper.  You can easily choose this under the “Page Sizing and Handling” options in the Printing menu.  Click on “Booklet” and then “Both Sides” under Booklet Subset option.  Preview to make sure that the printing of the 8 pages document will now take up only 4 pages on 2 sheets of A4 paper.

Monthly Journal Download Title

DIY Journal Planner Printable – June 2015

diy june 2015 journal template 001 diy june 2015 journal template 002

School holiday officially starts today!  Start filling the journal with your holiday plans!

BEFORE PRINTING: While the PDF file is in A4 size, I design it with a A5 booklet in mind.  The planner portion takes up only 5 pages (Page 2 to 6), but with the booklet layout, I inserted a front and back cover page (Pg1, Pg8), plus a random notes page (Pg7), to fill up both sides on 2 sheets of A4 paper.  You can easily choose this under the “Page Sizing and Handling” options in the Printing menu.  Click on “Booklet” and then “Both Sides” under Booklet Subset option.  Preview to make sure that the printing of the 8 pages document will now take up only 4 pages on 2 sheets of A4 paper.

DIY – Calendar Makeover

calendar makeover 001calendar makeover 008
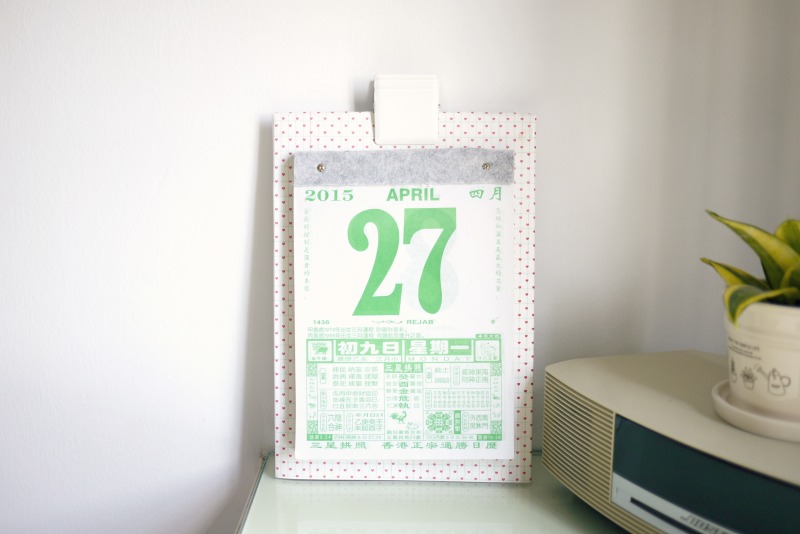
My daughter likes the old school style daily calendar, while I use the tear off sheets for scribbling random notes.  These wall calendars are usually free, and the daily chinese horoscope and quotes makes a pretty interesting read from time to time.  But the auspicious “Gong Xi Fa Cai” red frame is starting to look dated after Chinese New Year, as if I am still leaving behind some CNY decoration in the house, long after the festive celebration is over.

So I updated it with a few simple items:
1) a very thick A4 cardboard wrapped with patterned paper as backing,
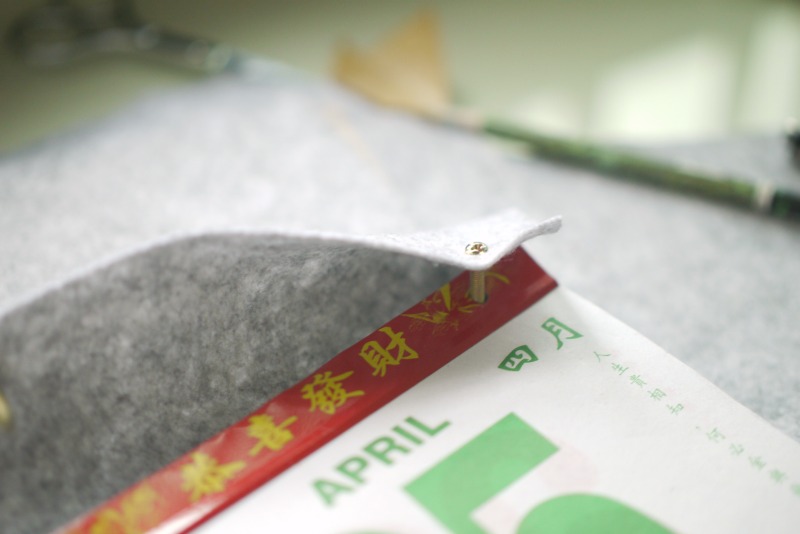
2) grey felt to cover the red metal frame, which I retain part of, as a tearing guide.
3) large white clip for design.

Here are some step-by-step photos that I took along the way :
calendar makeover001
(above) Original calendar design, I used a simple S-hook to hang it on the wall.  Not so nice.
calendar makeover 002
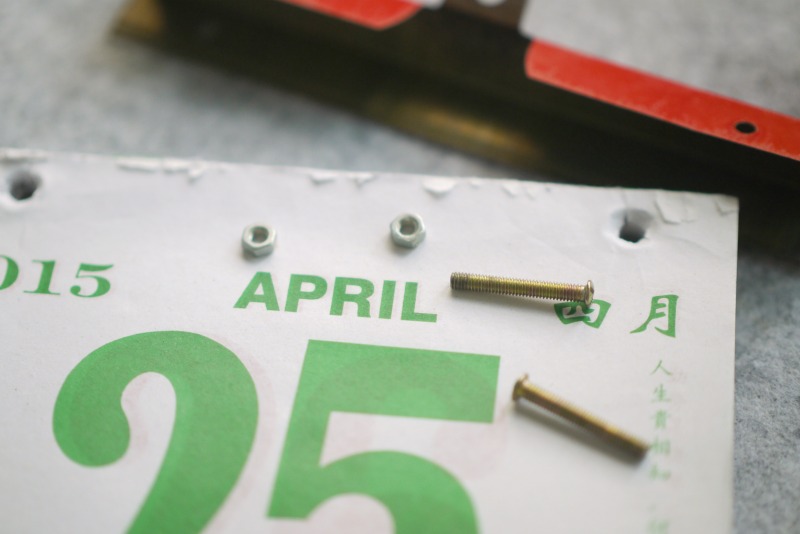
(above) Dismantle the calendar to separate the three components : calendar + screw and bolt + metal frame.
calendar makeover 003
(above) For brand new calendar, there is no need for this step.  But I have used this calendar for a few months, a big gap is left from the torn out section, so I cut the frame to retain just the front panel to use it as a tearing guide for the remaining months.
calendar makeover 004
(above) Align the grey felt over the metal tearing guide and poke a small hole on the felt over the calendar’s larger punch hole and slowly push the screw through the felt, metal sheet, and calendar.
calendar makeover 005
(above) The hole on the felt cannot be too big or the screw will simply go through it instead of binding the felt onto the calendar.
calendar makeover 006
(above) Mark the two spots on the thick cardboard where the calendar will be mounted on.  Poke a small hole and wrap the cardboard with decorative paper, make a small hole where the spots were marked earlier.  Push the screw through, and finally fasten with bolt.
calendar makeover 007
(above) How the calendar looks after completion.

DIY Journal Planner Printable – May 2015

diy may 2015 journal template 001

With school exams around the corner, I should have prepare this planner printable earlier and double it as a study planner.  But some last minute chores delayed the printing till today.  I can’t wait for at least 10 months of this to be completed, and then I will bind them like this.

BEFORE PRINTING: While the PDF file is in A4 size, I design it with a A5 booklet in mind.  The planner portion takes up only 5 pages (Page 2 to 7), but with the booklet layout, I inserted a front and back cover page (Pg1, Pg8), to fill up both sides on 2 sheets of A4 paper.  You can easily choose this under the “Page Sizing and Handling” options in the Printing menu.  Click on “Booklet” and then “Both Sides” under Booklet Subset option.  Preview to make sure that the printing of the 8 pages document will now take up only 4 pages on 2 sheets of A4 paper.