Red Dragon Fruit Bread Loaf

Red Dragon Fruit Bread Loaf // Mono+Co

The “ugly” red dragon fruits my mom bought were unbelievably good-looking!  According to her, fruit stores put up heavily discounted ugly or overripe fruit almost daily.  My mom always buys the ones on clearance because they are such a steal; the red dragon fruits were going for $1 each that day.

Red Dragon Fruit Bread Loaf // Mono+Co

The pink fruit makes great natural food colouring.  Since I make bread every other day, the flesh of the fruit seems a good addition to my bread recipe.

Red Dragon Fruit Bread Loaf // Mono+Co

I omitted eggs and milk to keep the recipe as basic as possible.   The dough reached windowpane stage effortlessly and did a lovely bulk rise.  After going through a second proofing, the bread looked very promising, tight gluten cloak and all.

Red Dragon Fruit Bread Loaf // Mono+Co

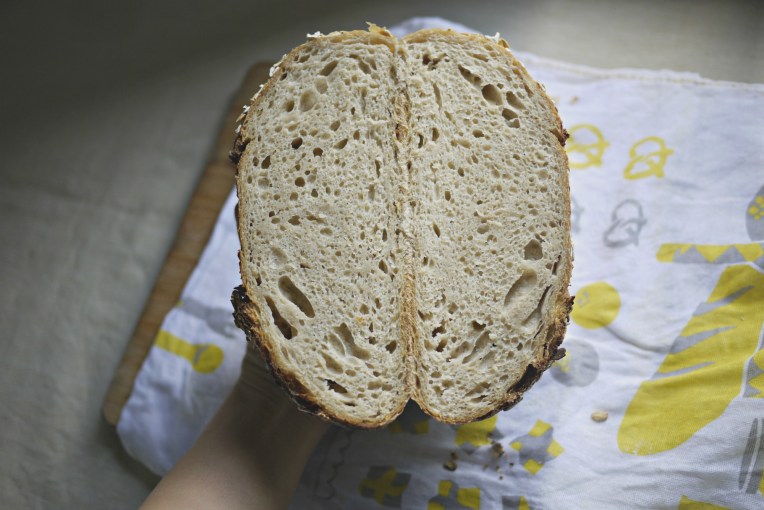
Its bright pink hue turned into a pastel shade after baking but still pretty.

Red Dragon Fruit Bread Loaf // Mono+Co

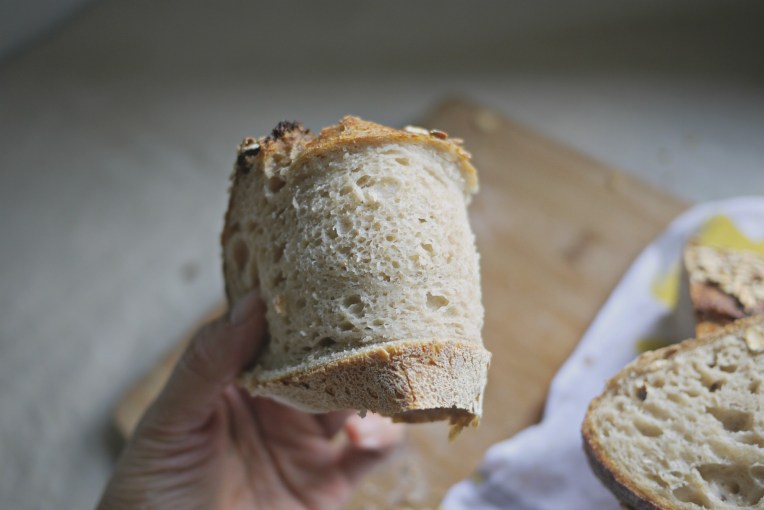
The crumbs are light and airy; not a dense loaf.  Specks of seeds made the bread look even more wholesome!

Red Dragon Fruit Bread Loaf // Mono+Co

My daughter, who normally doesn’t eat dragon fruits loves the pink bread slices.  Now that’s a pretty way to add the fruit to her diet!


Red Dragon Fruit Bread Loaf 

280g bread flour


130g red dragon fruit, mashed


1/2 teaspoon instant dry yeast


1/4 teaspoon sea salt


2 tablespoons raw sugar


30g water 
*
20g cold butter, cubed

* Do not pour all 30g water into the mixer bowl, add water bit by bit, watch the dough closely, stop once the ingredients form a rough ball.

In a mixer bowl, combine bread flour, red dragon fruit, instant yeast, sea salt, raw sugar, and water. Turn on the mixer with a dough hook attachment and knead these ingredients on the lowest speed (KA 1) till they come into a ball.  Continue to knead for 3 minutes, then stop the mixer and let the dough sit for at least 15 minutes.

Turn on the mixer again and knead for 1 minute before adding butter cubes one by one while the mixer is running on its lowest speed.  Keep kneading till there are no traces of butter left and the dough has reached windowpane stage.  At this stage, the dough will be extremely pliable and baby-bottom soft.

Leave the dough in the mixer bowl for its first proof of 60 minutes.  The dough will rise to double its volume,  punch down to deflate and transfer it to a clean worktop.

Flatten the dough to push out gas trapped inside the dough, either by hand or a rolling pin.  The dough is quite sticky, flour hands and worktop with flour to help with shaping.  Shape the dough into a log and place it in a greased bread tin, seam side facing downwards.  Let this sit in a draft-free place to rise for another 50-60 minutes.  Optional: dust flour on bread top.

When the bread has risen to the rim of the baking tin, bake in a preheated oven at 170C for 30 minutes.  Remove the bread from the pan immediately after baking, and let it cool on a rack completely before slicing or serving.

Store in an airtight container if not consumed immediately, to keep the loaf soft and the crumbs from drying out.

Make It: Oat Flour, Plus A Bread Recipe

The supermarkets put up rolled oats on offer quite often.  I get a 1kg-pack at around $5, which I then turn into plenty of breakfast granola because prepacked granola can be so expensive to buy!  Oat flour is another pantry item that is cheaper to DIY than getting store-bought ones.

Homemade Oat Flour // Mono + Co

There is only one ingredient needed to make oat flour: rolled oats.

Homemade Oat Flour // Mono + Co

And there is only one equipment you need to make oat flour: blender/ food processor.  You don’t even need to own one of those high-end blenders.  Mine’s a Sharp-brand; no-frills table-top blender and here’s the oat flour I made with it.

Homemade Oat Flour // Mono + Co

Blend rolled oats until you get a fine powder.  And that’s it!  Unbelievably easy right?  Transfer the flour to a container and use up in 1 month.  

Homemade Oat Flour // Mono + Co

Use your homemade oat flour to make bread, pancakes, waffles, muffins, and cookies.  I adapted my potato bread recipe by adding oat flour and shaping the dough into buns instead of a Pullman loaf.

Homemade Oat Flour // Mono + Co

Want to know the key to fluffy bread?  Knead the dough until windowpane stage.  That’s the stage when you can stretch and pull the dough thinly without tearing it easily.  Achieving this is important in breadmaking because that’s how you know the bread will expand and rise with a smooth and tight crust.

Homemade Oat Flour // Mono + Co

The buns turned golden brown in just 15 minutes, baked at 170C. 

Homemade Oat Flour // Mono + Co

To keep the crust soft, I brush oil on the buns immediately after they are taken out of the oven.

Homemade Oat Flour // Mono + Co


Oat Flour Potato Buns 

200g bread flour

20g oat flour 2 tablespoons milk powder, optional 
1/2 teaspoon instant dry yeast
 1/4 teaspoon sea salt
 2 tablespoons raw sugar
 100g mashed potato
 1 large egg, beaten **
 30-40g potato water ***
 20g cold butter, cubed

** I used large eggs that weigh 75grams with shell.

*** Potato water refers to the water that the potatoes were cooked in.  Cool it down to room temperature before using.

In a mixer bowl, combine bread flour, oat flour, milk powder, instant yeast, sea salt, raw sugar, mashed potato, egg, and water. Turn on the mixer with a dough hook attachment and knead these ingredients on the lowest speed (KA 1) till they come into a ball.  Continue to knead for 3 minutes, then stop the mixer and let the dough sit for 15 minutes.

Turn on the mixer again and knead for 1 minute before adding butter cubes one by one while the mixer is running on its lowest speed.  Keep kneading till there are no traces of butter left and the dough has reached windowpane stage.  At this stage, the dough will be extremely pliable and baby-bottom soft.

Leave the dough in the mixer bowl for its first proof of 60 minutes.  The dough will rise to double its volume,  punch down to deflate and transfer it to a clean worktop.

Shape into 12 x 40g buns and arrange them on a greased baking tray, proof for 50-60 minutes.

Bake in a preheated oven at 170C for 15 minutes until the buns are golden brown. 

Remove bread from oven and let them cool completely on a rack before storing in an airtight container.

One Recipe: Steamed Mantou, Oven-Baked Bread, or Slider Buns

One Recipe: Steamed Mantou or Baked Buns // Mono+Co

The soft and fluffy buns shown at the end of this video recipe looked unbelievable.  Really, how do you make steamed buns that look so golden-brown, like those baked in an oven?  My first attempt produced pale-looking steamed buns.

There is no water in the dough recipe; four eggs and 30ml of oil are the only liquids holding the rest of the dry ingredients together.

The bread dough rose very well, and the steam-cook process produced an excellent Mantou texture.

Soft fluffy crumbs, like those baked with tangzhong (roux) recipes!  But the colour of the crust is so different from the one in the video.  Was it because I did not use a cling-film to cover the dough when steaming?

I tried again, this time by baking the dough in the oven.

The colour is nice for a baked loaf.

When the base looks this good, you know the bread will be yummy as well.

My third attempt was to make slider buns with this recipe.  The specks you see on the buns are oat pulp that I added to the recipe.  I make oat milk at home and often need to recycle the oat pulp residue in baking projects.  If I am not baking, then I simply make oat porridge, which is the fast way to use up the pulp!

Bake them at 170C for 20 minutes, and you get squishy slider buns.

Add your favourite fillings, or enjoy them plain.

I store them in a covered cast iron pot.  The pot makes great bread containers!

So there you go, I have tried this recipe three times, each time making a different type of bread.

My verdict: I will use this recipe for steamed Mantou only, simply because I already have my preferred recipes for baking bread and buns.  But now I am getting curious if my favourite bread recipe can be steamed to become fluffy Mantou!


Steamed Mantou/ Oven-Baked Bread or Slider Buns

adapted from here
300g plain flour

4 eggs

1/2 teaspoon instant dry yeast

30g sugar

30g cooking oil

*Optional: I added 100g of oat pulp to the dough for my slider version.

In a mixer bowl, combine plain flour, eggs, instant yeast, and sugar. Turn on the mixer with a dough hook attachment and knead these ingredients on the lowest speed (KA 1) till they come into a ball.

Adding oil and keep kneading till the dough reaches window pane stage.  At this stage, the dough will be extremely pliable and baby-bottom soft.

Leave the dough in the mixer bowl for its first proof of 60 minutes.  The dough will rise to double its volume,  punch down to deflate and transfer it to a clean worktop.

Shape the dough to your liking (mantou, loaf, buns etc.) and place in a steam basket, bread tin or baking pan, depending on what you are making with the recipe.

Leave the shaped dough to rest for another 50-60 minutes.

To steam Mantou: Fill a pot with enough cold water for a 50-minute steaming process, as you should not interrupt the process by opening the cover halfway through to top up the water.  Place the buns in the pot and start steaming on high heat, once the water begins to boil, set timer to steam for another 40 minutes.  Mantou is best served warm, no need to cool down.  Store the balance in a sealed container.

To bake bread loaf: Bake in a preheated oven at 170C for 30 minutes.  Remove bread from bread tin immediately after baking and let it cool completely on a rack before slicing.  Store in a sealed container.

To bake slider buns: Bake in a preheated oven at 170C for 20 minutes, let it cool completely before storing in a sealed container.

Oat and Wholemeal Bread Loaf

Oat and Wholemeal Bread Loaf // Mono + CoOat and Wholemeal Bread Loaf // Mono + Co

The dry goods store ran out of plain flour so I went home looking for a wholemeal flour recipe to bake instead.

I ended up baking with this oat and wheat sandwich bread recipe but not before tweaking it with homemade oat flour instead of rolled oats.  Simply run the rolled oats/instant oats/oatmeal in food processor for a while until they become oat flour.  Instant, quick-cooking version or not, all works.  If you want them really fine, sift before using.  If not, simply dump everything like me into the recipe that calls for oat flour, I consider those larger bits as “additional fibre”.  I have been doing this for years, saving money and storage space for yet another pantry item.  Since it is so easy to make, I only make what I need to use up, nothing more.

Oat and Wholemeal Bread Loaf // Mono + Co

Back to the bread.  Another interesting thing I find about this recipe is that I can leave the dough to ferment in the fridge for up to 5 days.  Sounds like a good idea for Sunday breakfast.

Oat and Wholemeal Bread Loaf // Mono + Co

I knead the dough until window pane stage although the original recipe didn’t mention.  It’s my ticket to fluffy soft bread.

Oat and Wholemeal Bread Loaf // Mono + Co

I proof all my loaves in a 10 inch diameter pot with a glass cover, so I can see how much the dough has risen.  Before baking, I brushed the top with water and sprinkled some rolled oats for decoration.  But…..

Oat and Wholemeal Bread Loaf // Mono + Co

… the rolled oats topping seemed unnecessary afterall as they fell off while I sliced cooked bread.  I won’t mention this step in the recipe below.

Oat and Wholemeal Bread Loaf // Mono + Co

For some reason (low gluten flour as this article stated?) the bread slice was crumbly, but held together better significantly after popping it inside toaster for 2 minutes.  Come to think of it, I have never baked a bread without plain flour, most of my homebaked wholemeal bread is a 50/50 flour mix.  5-day fermentation is the next thing to try with this bread recipe.

Oat and Wholemeal Bread Loaf // Mono + Co


Oat and Wholewheat bread loaf

adapted from here

315g wholemeal flour
80g oat flour
1 teaspoon sea salt
2 tablespoon raw sugar
1 teaspoon instant dry yeast
1/2 egg
1 1/4 cup water
25g chilled butter, cubed

In a mixer bowl, place these ingredients: wholemeal flour, oat flour, sea salt, raw sugar, instant yeast, egg and knead with a dough hook attachment on the lowest speed (KA 1).  Slowly add the water with the mixer running, you may need more or less of the water stated in the recipe.  Watch the dough, when the ingredients come into a ball,  stop adding and turn off the mixer.  Let the dough rest for 15-30 minutes.

After resting the dough, start the mixer running on its lowest speed again to knead the dough for 1 minute, before adding cubed butter, one by one.  Knead until the dough reaches window pane stage, this is when the dough becomes very smooth and elastic, and starts to pull away from the sides of the bowl.  Remove the bowl from mixer, cover and bulk rise for 1 hour.

After an hour, the dough should rise and increase its volume, punch it down to release the gas, and transfer to a clean work top.  Flatten the dough to push out gas trapped inside the dough, either by hand or a rolling pin. If the dough is sticky, flour hands and worktop to help with shaping.  Shape the dough into a log and place it in a greased bread tin, seam side facing downwards.  Let this sit in a draft-free place to rise for another 50-60 minutes.

Bake in a preheated oven at 170C for 30 minutes.  Remove the bread from the pan immediately after baking, and let it cool on a rack completely before slicing or serving.

Store in an airtight container if not consumed immediately, to keep the crumbly loaf from further drying out.

Save

Save

Save

Save

Save

Save

Save

Pumpkin Shaped Buns

Pumpkin Shaped Buns // Mono + Co

Fall or not, pumpkin puree is a great addition to bread recipes throughout the year as they make loaves and buns pillowy soft naturally.  I will spare my family from another bread loaf for breakfast and shape these buns into tiny pumpkin lookalikes by using butcher twine/cooking string from Daiso to section the ball dough into 8 sections.  Once the dough balls expand through the strings, they will form pumpkin shaped buns after baking.  Pity these strings cannot be reused since bread pieces got stuck onto them during the rising and baking stage.  I had to discard them after making these buns.

Pumpkin Shaped Buns // Mono + Co

The extremely warm room temperature lately made the dough rise faster than usual, took it just 40 minutes for the first rise and 20 minutes for final proof.  The higher room temperature in my kitchen also seemed to make the dough wetter than usual after adding chilled butter cubes and didn’t look like it was reaching anything closer to window pane stage after 15 minutes of kneading.  I tried lowering the dough temperature by placing ice packs around the mixing bowl while it was running.  I previously tried with a towel soaked with ice water and it worked out beautifully; the dough reached window pane stage in no time.  But these reusable ice backs are even more convenient.

Though the ice packs can be easily made with a ziplock bag and water, I have quite a number of these reusable ice packs stashed inside my freezer.  Alway frozen, always ready.  They are super handy when packing cold food or shopping for chiller items, and unlike the homemade ones, these won’t leak.

Pumpkin Shaped Buns // Mono + Co Pumpkin Shaped Buns // Mono + Co Pumpkin Shaped Buns // Mono + Co Pumpkin Shaped Buns // Mono + Co

To serve, remove the strings carefully without tearing the soft buns apart.  I stick a clove on top of each bun to make them look even more like pumpkins.

Pumpkin Shaped Buns // Mono + Co Pumpkin Shaped Buns // Mono + Co

I also used ready made red bean paste from Daiso as fillings but you can home make some pumpkin fillings like this for more festive cheer.


Pumpkin Shaped Buns

recipe yields 8 buns

200g plain flour
80g wholemeal flour
1 teaspoon instant dry yeast
2 tablespoons raw sugar
1/4 teaspoon sea salt
120g steamed pumpkin, pureed
1/2 beaten egg**
2 tablespoons milk powder ***
50g water
20g cold butter, cubed
red bean paste as filling
8 cloves, for garnish

** I usually add 1 whole beaten egg (70g without shells), but the warm weather made it difficult to work with a wet dough, so I added just half of the beaten egg.  If you prefer to add the entire egg to save the trouble of not knowing what to do with the other half (I usually add more eggs and cook omelette), adjust the water added subsequently accordingly.

*** I am in the midst of replacing our household fresh milk consumption with milk powder in order to cut own on the number of plastic bottles and milk cartons we are sending to the recycling bin weekly.  If you don’t have milk powder, simply omit it and replace water with fresh milk.  I wouldn’t recommend buying a bag of dry milk powder just to use 2 tablespoons if you already have fresh milk at home.

In a mixer bowl, combine all the dry ingredients: plain flour, wholemeal flour, instant yeast, raw sugar, salt, and milk powder, into a uniform mixture.  Add pumpkin puree, beaten egg and start the mixer knead with a dough hook attachment on its lowest speed (KA 1).  Add water slowly and stop the mixer when all the ingredients come into a rough ball, you might need lesser water than the amount stated in the recipe, depending on the moisture level of the pumpkin puree, watch the dough and adjust accordingly.  Let the dough rest for 15 minutes.

After resting the dough for 15 minutes, start the mixer running on its lowest speed again to knead the dough for 1 minute, before adding cubed butter, one by one.  Knead until the dough reaches window pane stage, this is when the dough becomes very smooth and elastic, and starts to pull away from the sides of the bowl.  Remove the bowl from mixer, cover and bulk rise for 40 to 60 minutes.

To test if the dough is ready to be shaped, poke a hole in the center with a floured finger, the dent should not bounce back if the bulk rise is completed.  Once the dough is ready, punch down the dough to deflate it, and transfer it to a clean work top.

Divide the dough into 8 equal parts.  Roll each portion into a ball, flatten it and place a tablespoon of red bean paste in the center. Wrap up the filling with the dough, seal it tighly shape it into a ball.

With seam side facing downwards, tie a long string across the bun like this and place it on baking tray lined with parchment paper.  Let this sit in a draft-free place to rise for another 20 minutes.

Bake in a preheated oven at 160C for 20 minutes.  Remove the bread from the pan immediately after baking, and let it cool on a rack completely.  Remove string, place a clove on top of each bun as decoration before serving.

Store in a covered container if not consumed immediately, to keep the crumbs from drying out.

Save

Save

Save

Save

Save

Oatmeal Porridge White Pullman Loaf

Oatmeal Porridge White Pullman Loaf // Mono + Co

I like how oatmeal porridge in this recipe made the sourdough bread really soft, so I added 135g of it to my bake today.  I probably need to add more if I want it to be as soft and fluffy as the ones I bake with steamed taro or steamed white rice.

Oatmeal Porridge White Pullman Loaf // Mono + Co

Oatmeal Porridge White Pullman Loaf // Mono + Co


Oatmeal Porridge Pullman Loaf

for oatmeal porridge:
100g boiling hot water
35g instant oatmeal

290g bread flour
1/2 tablespoon instant dry yeast
1/4 teaspoon sea salt
2 tablespoons raw sugar
1 large egg **
80g water
25g cold butter, cubed
topping: 2 tablespoons rolled oats

** I use a large egg weighing 70g.

To prepare oat porridge, mix hot water to instant oatmeal and stir until a thick consistency is formed. Leave it aside to cool completely.

In mixer bowl, combine bread flour, yeast, salt, and sugar well with a hand whisk.  After the dry ingredients are mixed, add cooled  oatmeal porridge, beaten egg and half of the water.  Start the mixer and knead on its lowest speed (KA 1) .  If the ingredients do not come together into a ball, slowly add more water, once a ball dough starts to form, stop adding water.  Turn off the mixer and let the dough sit for 15 minutes.

After 15 minutes, start the mixer again and knead for 1 minute before adding cubed butter, one by one.  Knead this until the dough reaches window pane stage; when the dough becomes very smooth and elastic.  Remove bowl from mixer and bulk rise this for 1 hour.

Punch the dough down and transfer it to a clean work top.  Shape the loaf and place in greased pullman bread tin, seams side facing downwards.  Let it rise in a draft-free place for 50-60 mins.  Before baking, spray the bread top with a fine mist of water and sprinkle rolled oats on top evenly.

Bake in a preheated oven at 170C for 30 minutes. Remove the bread from the pan immediately after baking, and let it cool on a rack completely before slicing or serving.

Store in an airtight container if not consumed immediately, to keep the loaf soft and the crumbs from drying out.

Save

Save

Save

Cooked Rice Pullman Loaf

Cooked Rice Pullman Loaf // Mono + CoCooked Rice Pullman Loaf // Mono + Co

Leftover rice is quite common in my kitchen.  In fact, I will sometimes cook extra for dinner with the intent to turn them into a fast 5-minute fried rice the next day.  Boiling leftover cooked rice with water to make instant porridge is another great idea since the time taken for grains to turn soft is greatly reduced.

This white rice Pullman loaf recipe is a new keeper.  I simply altered a favorite taro bread recipe with leftover cooked rice, out from the oven came a light and fluffy loaf.

I will be baking another loaf later.  This time, I will be cooking the rice for making the bread first, preparing extra for dinner which will be kept warm in a thermal pot until meal time.

Cooked Rice Pullman Loaf // Mono + Co Cooked Rice Pullman Loaf // Mono + Co


Jasmine Rice Pullman Loaf

100g cooked white rice
240g plain flour
1 teaspoon instant yeast
2 tablespoons raw sugar
1 egg **
80g water ***
1/4 teaspoon sea salt
28g cold unsalted butter, cubed

** I used egg weighing 57g with shells
*** You may need more or less of the water stated in the recipe, depending on the flour type and hydration level of the cooked rice.

Blitz cooked rice with as little water as possible with a hand blender, just enough to make a smooth paste.  Add this paste to plain flour, instant yeast, raw sugar, beaten egg, and half of the water into a mixer bowl.  Start the mixer to knead with a dough hook attachment on the lowest speed (KA 1).  Slowly add the remaining water with the mixer running, when the ingredients come into a ball,  stop adding and turn off the mixer.  Let the dough rest for 15 minutes.

After 15 minutes, sprinkle the sea salt on the dough.  Start the mixer running on its lowest speed again to knead the dough for 1 minute, before adding cubed butter, one by one.  Knead until the dough reaches window pane stage, this is when the dough becomes very smooth and elastic, and starts to pull away from the sides of the bowl.  Remove the bowl from mixer, cover and bulk rise for 1 hour.

After an hour, the dough should rise and increase its volume, punch it down to release the gas, and transfer to a clean work top.  Flatten the dough to push out gas trapped inside the dough.  The dough is quite sticky, flour hands and worktop with flour to help with shaping.  Shape the dough into a log and place it in a greased bread tin, seam side facing downwards.  Let this sit in a draft-free place to rise for another 50-60 minutes.  When the bread has risen to the rim of the baking tin, brush some milk on the surface.

Bake in a preheated oven at 170C for 30 minutes.  Remove the bread from the pan immediately after baking, and let it cool on a rack completely before slicing or serving.

Store in an airtight container if not consumed immediately, to keep the loaf soft and the crumbs from drying out.

Save

Save

Save

Save

Save

Save

Save

Save

Sweet Milk Bread Loaf

Sweet Milk Bread Loaf // Mono + Co

This is baked with the same straight dough recipe that I use for making sugar topped pull apart buns.  Instead of baking in a rectangular cake pan, I divided the dough into 6 portions and arranged them in a bread tin to be proofed into a loaf.

Sweet Milk Bread Loaf // Mono + CoSweet Milk Bread Loaf // Mono + Co  Sweet Milk Bread Loaf // Mono + Co

The dough rose beautifully to reach the brim in less 60 minutes.  Simply adjust the baking time 5-8 minutes longer at the same oven temperature.

Sweet Milk Bread Loaf // Mono + CoSweet Milk Bread Loaf // Mono + Co  Sweet Milk Bread Loaf // Mono + Co

Save

Save

Oat Porridge Sourdough

Oat Porridge Sourdough // Mono + Co Oat Porridge Sourdough // Mono + Co Oat Porridge Sourdough // Mono + Co

Great recipe if you are thinking of baking a softer sourdough bread.  Oat porridge did the magic here.  For so long, I have been adding different types of root vegetable puree into my bread dough knowing that they help to make my Pullman loaves and buns really fluffy.  No chemical bread enhancer, no packaged dough conditioner, just steamed vegetables, how natural and nutritious does that sound?

So when I heard that there is a sourdough recipe out there enriched with oat porridge that makes it softer, of course, I want to try it.  See how soft it turned out.

Oat Porridge Sourdough // Mono + Co Oat Porridge Sourdough // Mono + Co

I used instant oatmeal to make the porridge instead of cooking rolled oats porridge over the stove.  I also stick to baking my dough cold straight from the fridge and shaping my loaf just before baking.  As for the rest of the instructions, I followed to a T, down right to coating the crust with rolled oats and giving the top with 4 snips with scissors to create that “zipper” look.


OAT PORRIDGE SOURDOUGH

adapted from the perfect loaf

for oatmeal porridge:
250g boiling hot water
125g instant oatmeal

75g fed starter
350g+12g+12g water
350g of plain flour
150g whole wheat flour
10g sea salt

To prepare oat porridge, mix hot water to instant oatmeal and stir until a thick consistency is formed. Leave it aside to cool completely.

In a large mixing bowl, add fed starter to 350g of water and stir with a wooden spoon to mix well.  Next, add plain flour, whole wheat flour, and mix with hand to form a dough with no dry flour is visible.  Cover the bowl and leave this aside for 60 minutes.

Sprinkle sea salt over the dough and pour the remaining 12g water on top, and mix the salt, water into the dough by hand using squeezing action.  The dough by now will appear very stretchable and doesn’t stick to the side of the bowl.  Leave this aside for 30 minutes, cover the bowl with a lid or tea towel.

After 30 minutes, incorporate oatmeal porridge to the dough in 4 separate additions,  with each addition, folding the dough so that the porridge get mixed as uniformly as possible. The remaining 12g water can be added bit by bit if the dough feels too dry. You may not need to use up all the remaining water, stop once the dough feels wet enough since the oatmeal porridge is also providing hydration to the dough.

Do a series of turns 6 times at 30 minutes interval.  With each turn, reach the dough from the bottom of the bowl and pull it up to tuck it to the opposite side of the bowl.  Turn the bowl and repeat for another pull-stretch-tuck action for about 3 more times till one round is completed.  Rest for 30 minutes and repeat this again till you complete 6 sets.

By the end of the 6th turn, cover the container and put the dough into the fridge for overnight retardation.

When ready to bake, preheat the oven to 250C.  Take out the dough from the fridge and shape the cold dough tightly into a ball, while remaining careful not to break up too much of the air pockets that has built up inside the dough.  Invert the dough onto a tray of rolled oats to coat the top part of the bread.  Place the dough inside a floured dutch oven pot seam side downwards.  To score, hold a pair of kitchen scissors almost parallel to the surface of the bread, making 4 snips across the top to create a “zipper” look.

Cover the pot and put it into the preheated oven bake for 40 minutes.

After 40 minutes, remove the cover, reduce the oven temperature to 220C and bake for another 30 minutes.

Cook on rack completely before slicing.  I waited for 4 hours, as recipe suggest the bread need a longer “setting” time due to its higher hydration.

Save

Save

Save

Save

Save

Save