DIY Kaffir Lime Shampoo

Getting used to the routine of a full-time-working-mum means jam-packing my weekends with column-writing/ volunteering/ baking/ DIY projects.  This schedule leaves me with little time to try out new DIY projects, only those that are simple enough made it to my to-do list.

Luckily, my life-changing shampoo is one of those easy to make ones; a mixture of tea seed/ camellia powder and water.  I can hardly call it a “project” when all I do is combining two ingredients in a bottle and ending the two-step instructions with “shake to mix well.”  But it still amazes me how something so simple AND affordable ($4.90 for 1kg) balances my oily scalp when no commercial shampoo can do so.  I wouldn’t describe my current hair type as silky smooth but at least no longer limp and greasy.

The only thing I miss most from using commercial shampoo is a headful of great smelling hair after stepping out from the bathroom.

That’s why DIY kaffir lime shampoo intrigued me since the citrus fruit produces a beautiful fragrance.

I first stumbled upon the recipe via this 10-minute clip, but I could not find kaffir limes.  I realised much later that this ingredient, common in Thai cooking, is sold by the florists in the wet markets.  This is because customers buy them along with flower offerings as kaffir limes are believed to ward off evil spirits and bring good luck.  How interesting!

After a thorough scrub-clean with salt, boil to cook them in a pot filled with enough water to submerge the fruit.  I make a small fresh batch weekly with 6 to 8 big sized kaffir limes.  This usually costs me around $2.  After 15 minutes of cooking, the peel turns yellowish, and the fruit is cooked to soft.  Quarter the limes with scissors and transfer the entire pot contents, fruit and water, to a blender jar.  I don’t have a countertop blender, so I use an immersion blender.  Hence, I simply pour everything to a narrower but taller beaker to make sure my immersion blender blades are fully submerged during use.

Blend for a few minutes until you get a relatively smooth mixture.

This is not technically speaking not smooth enough, but it is the best my immersion blender can achieve.  A counter-top blender can probably produce a creamier version.

Next, I strain the mixture to yield a smooth and creamy “shampoo”.

Then I strain the pulp residue further with a cheesecloth/milk bag, no wastage.

Bring the “shampoo” to boil again to sterilise, cool it completely and transfer to a squeeze bottle.  Store in the fridge.

I add the pulp to my compost pot, hoping to produce organic fertiliser for my sweet basil plants.

To use, dilute shampoo with water (I use 1 part shampoo 4 parts water)  and massage to dry scalp, rinse thoroughly.  This shampoo doesn’t lather like commercial shampoo. Add one to two drops of castile soap to the mixture if you are not used to it, then slowly reduce or remove the soap altogether after a few weeks.

More on kaffir limes:

// this post by the Permaculture Sydney West has a long list of uses for kaffir limes

// this kaffir lime marmalade

// make kaffir lime tarts

// the leaves!

All these make me want to grow my own kaffir lime tree!

Zero Waste Decor for Chinese New Year 2018

Today is the second day of Chinese New Year.  I can already forsee that there will hardly be much decoration waste to discard when the celebration is over.  We are happily reusing most of the decorative items from previous years and I use a lot of tassels like these to inject a Chinese new year feel into almost anything around the house.  Everything gets stowed away rather than being thrown away, and since they are not that elaborated, they don’t take up much space in the store room either.  As long as I can practice self-control when it comes to pretty wicker hamper baskets!

Zero Waste Decor for Chinese New Year 2018 // Mono + Co

// reused : vase, tassel, mini wooden peg with bird motif, grey jute string, patterned origami paper.
// new : baby’s breath in pink, to be dried and added to my dry flower collection.

Zero Waste Decor for Chinese New Year 2018 // Mono + Co

// reused : hamper basket, artificial peach blossom from hamper deco, tassel, red packets
// new : mandarin oranges.  When all the exchanges are done after the new year visits, the fruits will be eaten, the peels to be soaked in white vinegar to make an citrus infused all-purpose cleaner.

Zero Waste Decor for Chinese New Year 2018 // Mono + Co

// reused : a pair of door couplets and 3 “福” wall decorative images, since I refrain from buying zodiac specific ones.

Zero Waste Decor for Chinese New Year 2018 // Mono + Co

// reused : red packets from last year turned into lanterns this year, and tassels.

Zero Waste Decor for Chinese New Year 2018 // Mono + Co

// reused : umeshu glass bottle-turned-vase for a bouquet of artificial flowers, also pre-loved.

Green Monday : Reusing Used Candles

Green Monday : Reusing Used Candles

I collect these used candles in blue, yellow, and red from parties as they are a waste to throw away after just 1-2 minutes of use.

Since most DIY candle tutorials online like this and this are all about simply melting the wax followed by adding colour or scent to the end product, I thought I could do the same with the discards I gathered.

Green Monday : Reusing Used Candles

This tutorial that melts the wax directly inside mason jars hits the right note with me: messy wax residues in pots and utensils are a pain to clean up.  I separated the candles from their wicks, placed them in a glass jar and proceeded to melt them in a water bath.

The colours from the candles combined to produce a purple shade end product, to which I added lavender essential oil as a scent to match its appearance.

Green Monday : Reusing Used Candles

After trying out the method with a portion of the candles that led to a successful light-up session, I am ready to use up all my stash to fill the jar.

Green Monday : Reusing Used Candles

I also reused a wick from one of the candles.  Once I have too many used candles, now I have too many wicks.

Green Monday : Reusing Used Candles

Hopefully, this little one will bring some cosy feel to my home.  I am extremely late on this Danish Hygge concept since I have only very recently read the 2 little books of “Hygge” and “Lykke”, back to back, by The Happiness Research Institute.  I can’t be more inspired to add elements of fun/warmth/togetherness/cosiness/happiness to my everyday life!

Green Monday : Reusing Used Candles

Tea Seed/ Camellia Seed Powder, 5 More Ways

Tea Seed/ Camellia Seed Powder, 5 More Ways // Mono + Co

I wrote here how I started looking for tea seed powder to replace chemical dishwashing detergent and ended up loving it even more in my bathroom here as my shampoo and facial scrub.

Tea Seed/ Camellia Seed Powder, 5 More Ways // Mono + Co

When mixed with water, it can produce just the right amount of bubbles to look like a detergent.  In fact, it degreases effectively without that slippery feel of commercial soaps that requires lots of water to rinse clean.

Tea Seed/ Camellia Seed Powder, 5 More Ways // Mono + Co

I have since found the perfect container to upcycle into a handy shaker bottle that dispense just the right amount of powder for dishwashing.  The raisin tub I was using previously is dispensing baking soda now.

One of my main concern when switching to tea seed powder is its short shelf life.  It is best to use up within three months after the bag is opened, according to the packaging instructions.  Going by how little is required to wash my hair and the dishes, I need to have more uses for it to use up 1 kg packet every 3 months.

Here are some uses I have found so far :

Tea Seed/ Camellia Seed Powder, 5 More Ways // Mono + Co

// Makeup Brush Cleaner. Since tea seed powder has anti-bacterial properties, I started using it to replace diluted liquid castile soap to clean my makeup brushes.  I simply mix 1 heap teaspoon of powder with water in a small glass and run the makeup brush back and forth in the glass to release the makeup, grease etc.  Rinse the brush and repeat to ensure that it is completely clean of makeup.  Wrap the brush with a clean cotton towel and squeeze to dry the bristles slightly.  Hang brush with hair facing downwards to air dry.

Tea Seed/ Camellia Seed Powder, 5 More Ways // Mono + Co

// Fruit and vegetable cleaner.  I got this idea when I saw commercially produced fruit and vegetable cleaner made with tea seed powder.  I have only used it on fruit and vegetables with peels like apples, grapes (still attached to stalks,) zucchini, carrots, etc. I soak them in tea seed powder and water solution for 10 minutes before rinsing clean.  Tea seed powder is not edible, so it is important to rinse the fruit and vegetables clean after soaking.

Tea Seed/ Camellia Seed Powder, 5 More Ways // Mono + Co

// Cooking oil plastic bottle cleaner.  If you have tried washing plastic containers stained with oily food, you will know how difficult it is to degrease them for recycling.  The oil somehow finds a way to cling really well onto the plastic surface and I often find myself running it with soapy water at least 3 to 4 times before getting them squeaky clean for recycling.  Imagine the amount of water required to wash and rinse the cooking oil bottle.  I end up discarding these plastic bottles instead of recycling them.

Not anymore.  I mix tea seed powder with a small amount of water to form a thick paste and rub it all over the bottle. I cut open the container to washing the inner wall.  Then I add more water to rinse and degrease at the same time.  The above photo shows how much water I used in total to degrease the bottle, less than 300ml, not bad for such an oily plastic container.

Tea Seed/ Camellia Seed Powder, 5 More Ways // Mono + Co

// Pastry brush cleaner.  Again, tea seed powder shows its powerful degreasing properties with just one wash and one rinse.  I simply run the powder all over the greasy silicone bristles and add some water to form a thick paste, rub clean the silicone bristles and rinse.  Squeaky clean once again.

Tea Seed/ Camellia Seed Powder, 5 More Ways // Mono + Co

// Pesticide for plants.  I found this use stated here, here, here, so far only use once and the plants are still surviving.

On Packing (Almost Zero Waste) Toiletries For A Short Trip

On Packing (Almost Zero Waste) Toiletries For A Short Trip // Mono + Co

Packing my toiletries a short trip means shuttling between the bathroom and the kitchen to refill my containers with mostly my DIY-ed products.  Here’s what I brought along for a brief vacation recently.

On Packing (Almost Zero Waste) Toiletries For A Short Trip // Mono + CoOn Packing (Almost Zero Waste) Toiletries For A Short Trip // Mono + Co

++ Body scrub ++

A mixture of Himalayan pink salt + crushed rose petals + dried lemongrass (from teabags) + few drops of avocado oil mixed with few drops lemongrass essential oil.  This doubles up as my room fragrance as I leave the jar open uncovered inside the room throughout my stay.

On Packing (Almost Zero Waste) Toiletries For A Short Trip // Mono + Co

++ Night Repair Facial Oil Capsules ++

Nothing complicated, these capsules are the same Evening Primrose Oil capsules that I take orally once a day, but they work great as well for my skin when applied topically as facial oil.  I am really thankful for my non-sensitive skin.  I have tried avocado oil, sweet almond oil, and walnut oil so far with no clogging or allergic issues.

Bring along a pair of small scissors to cut a small hole on one end of the capsule.  I like to use this oil overnight after a day’s exposure to sun, grime and dirt.  I use up less than half of a capsule for whole face and neck, so the balance goes to soften my hands, cuticles and elbows, basically wherever I like.  It has a distinctive oily smell that some might find unpleasant, I usually mix it with lavender essential oil at home but for traveling sake, I choose to apply it sans additional fragrance so that I can just count and bring the exact number of capsules.  Talk about convenient travel pack!

On Packing (Almost Zero Waste) Toiletries For A Short Trip // Mono + Co

++ Facial Oil for Day ++

What is the difference between this facial oil and the night one?  Fragrance.  I added a few drops of carrot seed , lavender and geranium essential oil to avocado oil and store them in a tiny glass dropper bottle.  Scent is really subtle, do not expect it to last like commerical fragrance but that’s all it takes to perk up my vacation mood in the morning before heading out to explore the city.  I prefer smelling the street food than overpowering perfume anyway.

On Packing (Almost Zero Waste) Toiletries For A Short Trip // Mono + Co

++ Bar Soap ++

I did not make this soap, it’s Chandrika brand from India.  Compared to commercial body shampoo, I prefer soap bars as they use less plastic as packaging.  These bars made with vegetable oils are wrapped individually in paper (feel waxed though) and then packed in a paper box that I usually send for recycling.  Although the ingredient list stated talc and artificial color #CI 12700, #CI 64565 , the rest of the ingredients look naturally derived.

Bar soaps make a terrible mess when they are accidentally left sitting in an undrained soap dish.  I usually keep them in a drawstring bag handsewn out of wash cloth and hang the pouch with the soap bar inside to drip dry after shower.  The pouch also adds extra exfoliation during shower time.  Best part is when the soap has been reduced to a smaller piece, I simply pop a new bar into the bag and the smaller piece will be eventually used up as well, contained inside the bag this way, no more losing loose bits of soap, zero wastage.

On Packing (Almost Zero Waste) Toiletries For A Short Trip // Mono + Co

++ Tea Seed Powder Shampoo ++

I wrote about how I have been using this powder here.  Also used it to wash my reusable cutlery and lunchbox in the hotel room after a day of rejecting disposable ones.  I wasn’t that successful everywhere, and had to wash those that I can’t reject in time with tea seed powder (my defacto dish washing detergent at home) before bringing them back home for reusing/recycling.  But that’s a story for another day.

On Packing (Almost Zero Waste) Toiletries For A Short Trip // Mono + Co

++ Bamboo toothbrush & Baking Soda toothbrushing powder ++

Powder packed in a reused mask sample container.  Make sure to wipe dry the horse hair bristles on the bamboo toothbrush (very important step as natural material is especially susceptible to mold) before covering and wrapping with sheets from tear off calendar as shown below.  I use the same calendar sheet to wrap and pack the toothbrush back home.

On Packing (Almost Zero Waste) Toiletries For A Short Trip // Mono + Co

++ Make-up Kit ++

A fan of light makeup (rather the lack of skills for it,) I brought only the minimal number of cosmetic items along.  If you can recognise, the plastic container is actually a dehumidifier box from Daiso that I “diverted” from my camera cabinet for just a few days.

// make up brushes : I used the same calendar paper for wrapping my bamboo toothbrush to pack my make up brushes as well, one for powder foundation to make skin look more even, and another for applying blusher.

// face power : I buy only the face compact power refill that comes in a clear plastic box packaging.  The plastic box actually closes with a snap, this design allows me to do away with the standard container with mirror, making it even more compact.

On Packing (Almost Zero Waste) Toiletries For A Short Trip // Mono + Co

// blusher : that tiny glass jar from Bonne Maman jam contains my blush powder, previously in compact form but cracked when I accidentally dropped it from a height.  I have since crushed the broken pieces into fine power and store them in the jar.  Applying is slightly tricky, take slightly more time to avoid pick up too much color with my brush.  As a result, I ended up wash my blusher brush more often to get rid of color build up over time, resulting in a more hygenic blusher brush to use.  I won’t tell you how often I wash this brush previously. 🙂

// make up remover : brought along a handy tube of coconut oil.  After the face is free of make up, I wash again with tea seed powder to remove the grease.

On Packing (Almost Zero Waste) Toiletries For A Short Trip // Mono + Co

Toiletry bag : All items fit nicely in a clear bag that used to be a men’s cotton tee-shirt packaging.

Do you have any other good zero-waste toiletry packing tip/ habit to share?

Homemade 2-Ingredient Lip Balm

Homemade 2-Ingredient Lip Balm // Mono + Co

These are a breeze to make, under 20 minutes was all it took after I finished experimenting with my wood butter.  I am using the same recipe as my wood butter : 3 parts coconut oil and 1 part beeswax.  Even this ratio is measured by eyeballing given the tiny batch I am making.  My yardstick for a successful lipbalm recipe is down to earth realistic: as long as the mixture hardens to a balm consistency at room temperature, I won’t frown over a few millilitres differences, not when everything is made of natural ingredients.

If you are interested, this beeswax to oil ratio guide seems to suggest that 1-3 is a good mix for balms.  In fact, on days when I can’t locate my chapstick, I simply smear some oil on my lips and I am good to go.

Homemade 2-Ingredient Lip Balm // Mono + Co

Adding coconut oil is a good idea here in Singapore since it stays in liquid state at room temperature, so the lip balm will be softer to apply.  If you prefer to perfume your lip balm with essential oils, neutral smelling carrier oil like almond and avocado oil will be a better choice.

Homemade 2-Ingredient Lip Balm // Mono + CoHomemade 2-Ingredient Lip Balm // Mono + Co

I mix and heat oil and beeswax in this tiny glass measuring beaker from Daiso.  The beeswax turns solid quickly after the beaker has been removed from water bath.  I am fighting against time to fill the container with the mixture, while the pouring stream starts to solidify.  It is therefore not a good idea use a tall and large mason jar that will end up with lots of solidified wax at the sides during transferring.  This 100ml beaker therefore seems to be the perfect size for my homemade skincare treats.  The spout also helps pouring the mixture into the narrow lipstick tube easier without the need to buy a tiny funnel.

I have some previously diy-ed cocoa butter beeswax lotion that are still way to hard to apply and taking forever to use up.  I will be melting a portion of it with a suitable carrier oil in this beaker to reconstitute into a lotion,  I think my dry feet will thank me.

5 Pantry Items As Natural Bath And Beauty Products

5 Pantry Items As Natural Bath And Beauty Products // Mono + Co

Through the course of switching to more eco-friendly body and skin care products with less packaging, I discovered a few gems in my kitchen.  Here are 5 that have become my must-haves in both the kitchen and bathroom.

++ Baking soda : This has so many uses around the house that I have been buying the larger 1.81kg box from Arms and Hammer in paper packaging instead of getting those 100g plastic bottles from the baking supplies aisle.  Occasionally, discount stores offer the 454g pack at $1.  I will add a teaspoon here and there for its clarifying and exfoliating properties.  It makes a great foot soak too, for removing feet odours especially from after wearing not so well ventilated covered shoes.  Brownie points for its paper packaging that can be recycled.

++ Organic raw honey : With the 1kg tub going slightly above $20, this is even cheaper than my gentle facial cream cleanser which isn’t even organic.  Do honey’s natural anti-bacterial and anti-inflammatory properties sound like a good idea for a cleanser?  While commercial brands of facial cleanser add honey as one of the many ingredients on the list, I am going for the 100%-honey-and-nothing-else method to clean my face when I don’t wear makeup.  I first learned about plain raw honey as cleanser from a local skincare entrepreneur at an eco-event.  Nothing to mix or cook, simply smear a thin layer of raw honey over damp face, leave it for 10 minutes and rinse off.  The first few attempts left a long trail of ants on my bathroom basin and counter, I now know better to rinse using more gentle action with less messy splashes.  I use only about half a teaspoon each time so the 1 kg tub would have last me really long if I hadn’t used it as food in the kitchen.

5 Pantry Items As Natural Bath And Beauty Products // Mono + Co

Until I can find a bee farm here, I will definitely end up with a plastic container after I finish up the honey.  I am starting a habit to reuse plastic type with recycling symbol #5 (Polypropylene or PP) instead of throwing them into the recycling bins since they are of stronger nature, able withstand higher temperature and thus has more potential for reuse.  As opposed to #1 (PET) from bottled water and disposable food containers which should not be reused and can be easily avoided by bringing own water bottles and lunch boxes.

The tub from honey happens to be a PP5, so off with ideas to reuse the nice looking translucent container.  The handle makes it a convenient non-hot-food storage container, like this honey lemonade I made with “ugly” lemons I bought off the shelves on discount.

++ Apple Cider Vinegar : I religiously start my mornings with a warm mug of water mixed with a tablespoon of ACV.  ACV is also my go-to ingredient for homemade facial toner after diluted with either plain filtered water or brewed green tea.

5 Pantry Items As Natural Bath And Beauty Products // Mono + Co

The ACV comes in 2 sizes and I buy whichever is on sale.  The larger empty glass bottle is reused as a water pitcher at home, reminding me to keep myself hydrated throughout the day.  I have kept aside 2 of the smaller size version, waiting for a perfect aha moment to reuse them.  Glass recycling is not as lucrative anymore anyway, so I might as well reuse these glass bottles instead.

++ Coconut oil : I bought coconut oil a few years back to make granola with a sweet smelling whiff of coconut, but the oil has since doubled up as a makeup remover.  I used to buy makeup remover with mineral oil to take off water-proof mascara, though I no longer wear mascara, this oil-in-make up remover thing got stuck with me.  While harboring thoughts of making my own makeup remover to save some moolah sent me to the kitchen pantry where my huge jar of coconut oil sat.  An earlier oil cleansing method attempt which I tried with coconut oil was brushed off as too troublesome since I ended up with the chore of preparing a pail of hot water and a greasy washcloth in the laundry.  However, the attempt taught me that coconut oil is indeed a very effective natural makeup remover.  So now, instead of going through the whole oil cleansing ritual, hot towel and all, I only rub the oil over my face to dissolve the makeup and wash away the grease and makeup with diluted liquid castile soap.  I did not come up castile soap + coconut oil recipe on my own, though I think the method of separate application is.  It actually came from a few sources (here and here) that gave instructions on how to diy makeup remove pads, I simply remove the need to buy (and discard) cotton pads and come up with my own 2-step cleansing process, talking about adapting for zero waste.

++ Tea seed/ Camellia seed powder : This year, I am adding tea seed/ Camellia seed powder to my growing list of natural body and skin care ingredients.  The powder was first acquired, after a long search, as a dishwashing detergent alternative that I have written earlier.  I am not sure why I had to have a hard time looking for this product here in Singapore, given its effective cleansing properties, affordable pricing and its popularity in Taiwan and Hongkong.  Camellia oil, on the other hand, is easily available in health shops here, marketed as a cooking oil that has an even higher oleic acid than olive oil.  The Japanese and Koreans also add the oil to their skincare regime.
5 Pantry Items As Natural Bath And Beauty Products // Mono + Co

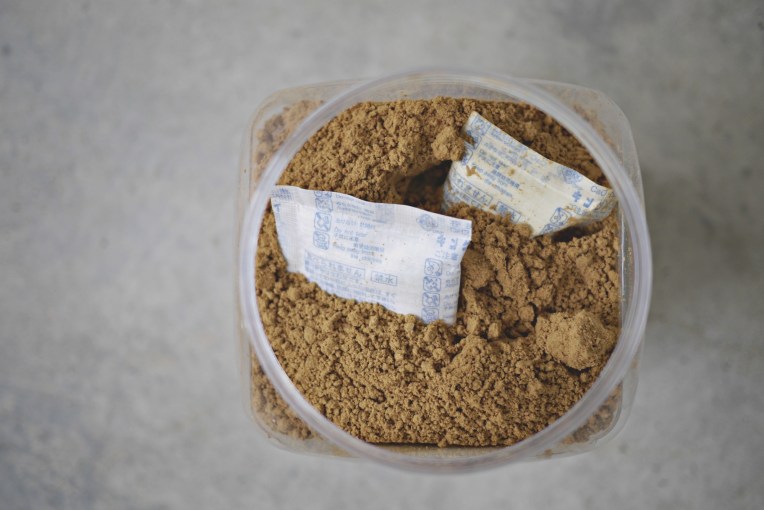
As for the powder with natural saponin, it is simply the residue which would otherwise be discarded from the process of camellia oil extraction.  The factories grind these seed residues into a very fine powder that can be dissolved in water, forming a paste or mixture for cleaning purposes.  Camellia seed powder, unfortunately, has a very short shelf life; one year if the packaging is unopened and 3 months after opening.  And after mixing with water to form a paste, it must be used up by end of the day as the process of decomposition starts to take place.  Given our humid weather here, I have been storing the powder in an airtight container with its past life as the ubiquitous Chinese new year goodies container.
5 Pantry Items As Natural Bath And Beauty Products // Mono + Co

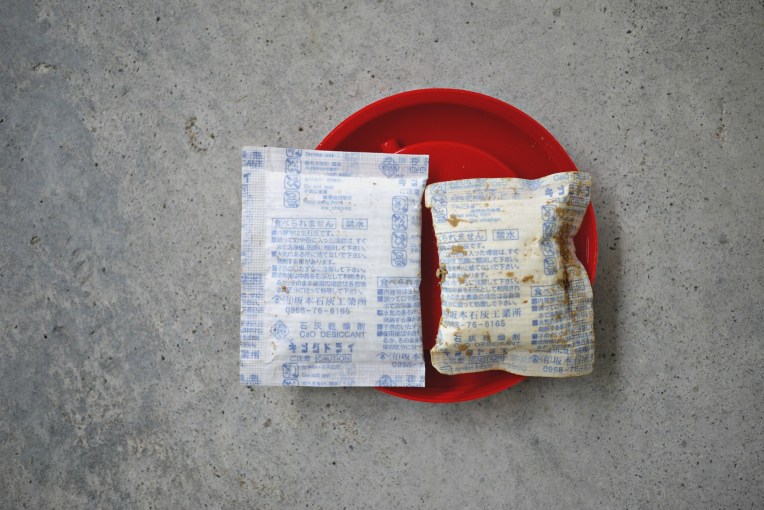
I also reuse dessicants found in Japanese seaweed packets to keep the powder dry.  On the right is an older packet I have been placing inside the powder for past few months and the newer one is on the left.  I find it wasteful to discard these palm-size packets that come with my Daiso seaweed sheets (and they weigh more than all the sheets added up!) so I reuse them in my cookie tins, tea leaves and anything that would thank a dry storage place.  They should be food safe since they come in direct contact with the seaweed sheets anyway.

Because tea seed powder needs to be used up quickly once opened, I have been finding ways to use them beyond cleaning my kitchen counter.  Like those pantry items above, camellia seed powder has crept into my bathroom as skin/hair care products.  Take note that when using tea seed powder as shampoo or facial cleanser, always be careful not to let it get in eyes.  Like any product with saponin, they sting and irritate the eyes when in contact.

Shampoo

1 teaspoon to 200ml water.  Shake to mix in a squeeze bottle.  Apply to scalp, massage gently to clean, rinse completely.

User note: The first time I shampooed with camellia seed powder, I was sorely disappointed that my scalp didn’t feel squeaky clean like my kitchen dishes after washing.  The real difference came the next day, when I noticed that my normally greasy scalp was not oily at all. This kind of prove that the shampoo was working in its own gentle way; cleaning my scalp and hair without stripping away all the natural oil, so the body will not produce even more oil to compensate.

Facial Wash + Scrub

Because the powder is really fine, it makes a gentle cleanser and an even more gentle exfoliant.
Mix 1 teaspoon of tea seed powder with 60ml of water to form a runny mixture.  Rub gently over face to clean.  Rinse completely.

Facial Mask

Mix 1 tablespoon of tea seed powder with just enough water to form a mud-like consistency, thick enough to apply on face.
Spread mask on face, avoiding delicate eye area.  Leave for 10 minutes.
Wash with water, remember to keep eyes shut until all residue has been rinsed clean.

Save

Save

Save

Save

Save

Save

Save

Save

Save

Save

Save

Green Monday : DIY Beeswax Food Wrap Ver 4.0

Green Monday : DIY Beeswax Food Wrap Ver 4.0 // Mono + CoGreen Monday : DIY Beeswax Food Wrap Ver 4.0 // Mono + Co

When I first started making my own beeswax food wraps, one of the suggestions I received was to choose organic fabric for it to be food safe.  I can’t agree more, homemade products have the best reputation for quality when everything thing is made with love.  So I went in search of organic cotton in People’s Park Complex to make my FOURTH batch of food wraps.   Funny that this item was marketed to replace the use of disposable cling wrap, something that I hardly use in the kitchen previously.  However, after making these food wraps of different sizes, I realized that they are kind of useful around the house, and this is my version 4.0.  Yes, I tweak something slightly after every batch.

Green Monday : DIY Beeswax Food Wrap Ver 4.0 // Mono + Co

Version 3.0 saw me making natural dyes with food to dye the fabrics at home.  The latest batch that I am making is intended for wrapping cooked food, there is something uneasy about reusing the same wrap for raw ingredients like onion halves on a bread bun.  I am always running out of the bigger A4 sized wraps anyway.  So I bought $4 worth of cotton fabric that is food grade according to the textile shop owner.  People have been buying these for making tofu, milking hot soy milk and liner for steaming hot buns and dim sum dishes.  Sounds food grade enough.

Green Monday : DIY Beeswax Food Wrap Ver 4.0 // Mono + Co

When it comes to natural dyes, I only have luck with yellow and red/pink so far.  The last blue dye I tried making with blue butterfly pea flower faded away totally after just a wash.  This time, I tried boiling the fabric in pandan leaves to create pastel green shade.  Sadly, it was a waste of time (and gas) when I realize that the green color did not stay a bit on the fabric after one rinse.  Even the cloth I used to squeeze pandan juice to make kaya jam stained better.

Green Monday : DIY Beeswax Food Wrap Ver 4.0 // Mono + Co

And so it was back to just yellow and pink.  For more colors, this site has a comprehensive list of natural dyes, I simply use the ingredients I have in my kitchen and must not be too expensive since the dye is to be discarded after the project.

Green Monday : DIY Beeswax Food Wrap Ver 4.0 // Mono + Co

Here’s the variation I made to my 4th version: after the beeswax wraps have air dried, I hand sewn cloth labels to differentiate the sides so that same side always goes towards the food.  Just like commercial beeswax wraps, there will be a side with prints that will be the facing outside.

A very quick run down on how I treat and dye my fabric before turning them into turmeric yellow color beeswax food wraps:
Step 1 : Trim the fabric to sizes for beeswax wraps.
Step 2 : Handwash with mild detergent and air dry.  Cloth seller mentioned avoiding laundry detergent.
Step 3 : To make turmeric yellow dye, fill up half a small saucepan with water and add 1 tall heap teaspoon turmeric powder, stir to mix well. If you want brighter, deeper shade, add more turmeric powder.  Bring the solution to boil and add 1 heap teaspoon of salt.
Step 4 : Wet the fabric and wring dry before adding it into the yellow dye.   Boil for 5 minutes, turn off the fire and let it soak until the water cools to room temperature.
Step 5 : Remove fabric from dye solution and rinse in cool water.  Air dry and press with an iron.
Step 6 : Line a tray with parchment paper, place the fabric on top.  Sprinkle beeswax evenly and melt the beeswax in a preheated oven at 150C for 2-3 minutes.
Step 7 : Once all the beeswax has melted, take out the tray, add 1/4 teaspoon of coconut oil, spread the oil and melted beeswax evenly on the fabric using a brush with short bristles.
Step 8 : If more beeswax is required, top up and send it back into the oven, but keep a watchful eye on the oven as beeswax is flammable.
Step 9 : Remove fabric from parchment paper and air dry for 1 minute.
Step 10 : Rinse the beeswax wrap with mild detergent once and air dry again before the first usage.
Step 11: (Optional) Sew a cloth label on one side of the wrap so you will know which side always goes towards the food.

For the record, my $4 fabric was made into 9 pieces of beeswax food wraps of various dimensions.

Save

Save

Save

Save

Save

Save

Save

Save

Save

Save

Save

Save

Save

Homemade Spoon Butter : A Wood Preserver

Homemade Spoon Butter : A Wood Preserver // Mono & Co

I have quite a number of wooden kitchen items at home but I have never thought of applying oil over them to moisturize and protect their surfaces.  I always thought that wooden products, being a natural material and subjected to much abuse in my kitchen, are meant to split/turn moldy/breakdown/wear and tear and eventually be replaced due to hygiene reasons.

I was so wrong.

While going through some of the methods to clean and restore my chopping boards, I stumbled upon this post that detailed how to give old wooden salad bowls from the thrift store a total makeover. Another one here.  My wooden spatulas and spoons need more than a thorough nightly air dry as maintenance.  And they have the potential to outlive me and gain vintage status if I just give them regular TLC sessions with spoon butter, which is nothing more than a mixture of beeswax and a neutral flavor oil.  The super brief ingredient list only means that I am going the DIY route instead of buying a big jar that I can’t use up.

There are many recipes out there when you search for “spoon butter recipes” and they are really similar to how I have been making my lotion bars and lip balm.  So I am going to make just enough to buff my wooden utensils and use up the leftover as hand moisturizer for the next few days. I hate leftovers that linger for months.

After eliminating mineral oil, and a number of cooking oil that turns rancid easily, I decided to turn to this recipe that uses coconut oil, something that I have been using for my homemade skin care products.  According to other sites, walnut oil and olive oil are great choices too.  Pick something food grade that you already have in your pantry instead of buying a bottle for a single purpose.

Homemade Spoon Butter : A Wood Preserver // Mono & Co

I made a really small initial batch for testing, with just 3g beeswax pellets and 10g coconut oil, since most instructions mention “1 part beeswax/ 3 parts oil.”  I have covered almost every wooden items in my drawer except for 3 large chopping boards.  If you need more, simply increase the portion of ingredients accordingly, especially for chopping boards.  I will give my boards the royal treatment over the weekend and let it cure longer.

I made the spoon butter directly inside a small glass jar that I am storing it with, hardened wax is really messy to clean up.   I learned that the hard way after making my beeswax wrap, so I will avoid making it a separate vessel to skip the transferring and pouring steps altogether.  For this reason, use a glass jar instead of a plastic one since we will be heating it.

Homemade Spoon Butter : A Wood Preserver // Mono & Co

Place the glass jar with beeswax pellets and coconut oil in a pot of water over low heat and let it simmer.  Once the beeswax pellets melt (in my warm house, coconut oil is always in liquid state), stir to mix well.  I usually hold the bottle by its rim (wear a mitten and be careful) and swirl to mix.  Then leave the spoon butter on the kitchen counter and let it set at room temperature.

Homemade Spoon Butter : A Wood Preserver // Mono & Co

To use, rub the spoon butter over the clean and dry wood surfaces, either with dry cloth or bare hands.  Leave them to sit over night.  The next day, wipe away any residual grease that is not absorbed by the surface with a dry cloth.

Homemade Spoon Butter : A Wood Preserver // Mono & Co

Homemade Spoon Butter : A Wood Preserver // Mono & Co

I always thought my spatula handle feels unfinished and dry.  After treatment, the wood grains even start to look more beautiful.

Homemade Spoon Butter : A Wood Preserver // Mono & Co

The difference before and after on my bamboo chopping board.

Homemade Spoon Butter : A Wood Preserver // Mono & Co

Homemade Spoon Butter : A Wood Preserver // Mono & Co

Bamboo toothbrushes getting a treatment too, especially the ones with unfinished surfaces that gets moldy really easily inside the bathroom.  See the difference before (below) and after (top).  But I can’t seem to find a way to reach the part between the bristles.

Reapply whenever the wooden surfaces start to look or feel dry.  I won’t wait until they crack or split anymore.

Save

Save

Save

Save

Save

Save

Save