Dry Braised Ban Mian

Dry Braised Ban Mian // Mono+CoDry Braised Ban Mian // Mono+Co

I love preparing one pot meals on weekends.  It is a great chance to use up some of the limp vegetables in the fridge and start the beginning of the next week with fresh groceries.

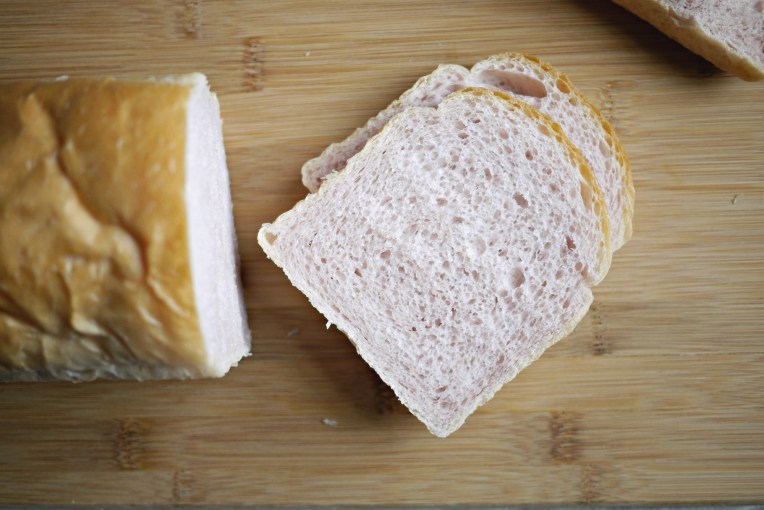
Chop up a few types of vegetables, blanch the noodles, and then stir fry these ingredients together is all it takes.  If I want to braise the noodles a bit for the sauce to get absorbed, I will choose a noodle type that can withstand a slightly longer cooking time, such as these fresh ban mian balls from the market.  They are a great choice if you like noodles al dente as these don’t turn soggy as fast as the Hokkien yellow version.

The crispy bean sheet seaweed sticks sprinkled on top were balanced condiment for an earlier nasi lemak meal.  I told you I was clearing my pantry right?  Leave out this ingredient if you do not have this item at home.  Instead, I would recommend white sesame seeds for garnishing : nutritious and pretty.

Dry Braised Ban Mian // Mono+Co Dry Braised Ban Mian // Mono+Co


BRAISED BAN MIAN

this recipe serves 4

4 balls of fresh ban main , 125g each
1/2 medium carrot, julienned
5 dry chinese mushrooms, rehydrated, sliced
5 leaves napa cabbage, sliced thinnly
chives, about 20 stalks, cut to 5cm long
Water from soaking chinese mushroom with
1 small knob ginger, sliced
2 tablespoon peanut oil
1 tablespoon Shaoxing cooking wine
1+1/2 tablespoon vegetarian oyster sauce
1 tablespoon light soy sauce
dash of white pepper, to taste
white sesame seeds, garnish

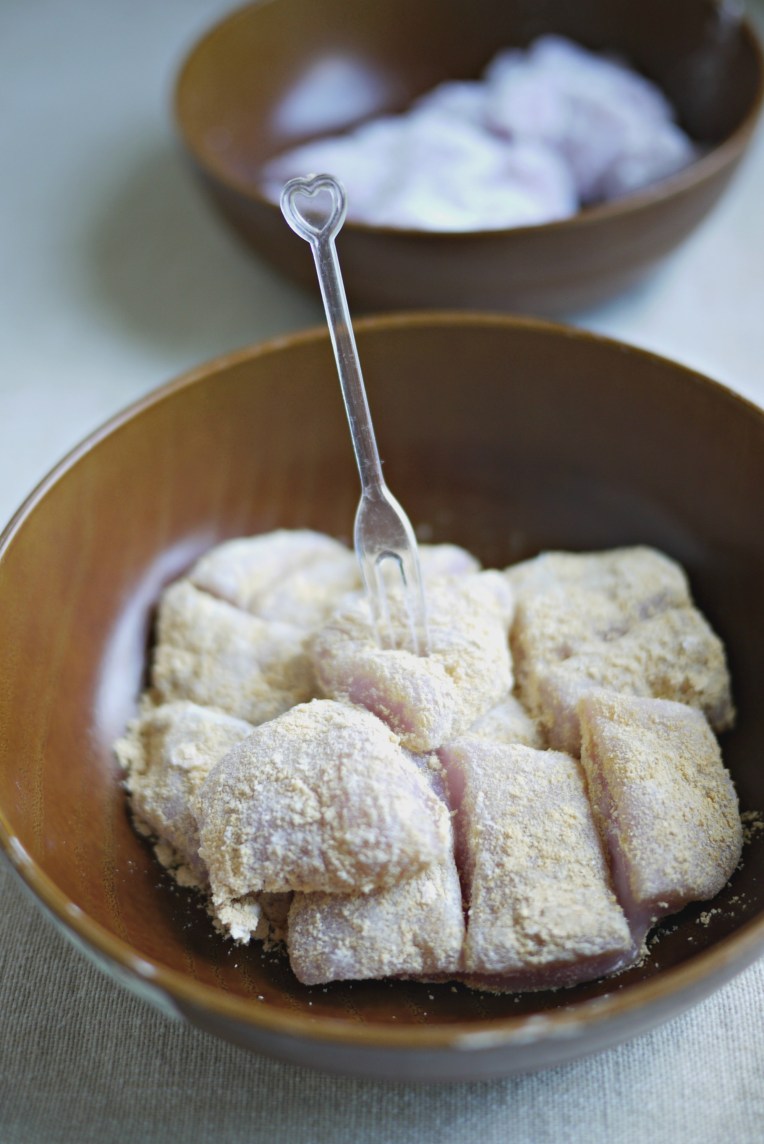
Cook ban mian in a pot of boiling water, quickly remove from water once the noodles look shiny from boiling and no traces the flour coating the surface can be seen.  Leave it to drain in a sieve.

Heat up the oil in a cooking wok. Add ginger slices and fry until aromatic.  Add mushroom slices and julienned carrot next, fry around to cook.  When the smell aroma of mushrooms start to fill the air, stir-fry for another 1 minute, then add chives and shredded napa cabbage.  Toss to cook the vegetables.  Pour in cooking wine and cook till alcohol evaporates.

Combine oyster sauce, light soy sauce and “mushroom water” to form a mixture, and pour this into the wok.  Stir around to cook, top up more hot water if it is too dry, there should be just enough liquid to coat and braise the cooked ban mian, but not too much to leave the noodles soaking in gravy at the end of the cooking process.  Do a taste test to see if more soy sauce is required.  This can be slightly on the salty side it will be balanced out by the bland noodles.  Add a dash of pepper before turning the heat up to high to boil the gravy.

With the gravy on rolling boil, add in the cooked ban mian.  The ban mian will stick together after they have been set aside, gently stir around with a chopstick to loosen them and let it cook to soak up the gravy.  Once the gravy has been completely soaked up, turn down the fire to low-medium.  Do a second round of taste test and season accordingly.

Transfer to a thermal pot to keep it piping hot if not serving immediately.  Sprinkle sesame seeds on top to garnish.

Save

Save

Save

Save

Purple Bread Loaf

Purple Sweet Potato Bread // Mono+Co

With the purple mochi prepared and eaten, I went on to bake a bread loaf with the remaining “purple color extract” that I am left with after boiling purple sweet potatoes in water.

Since the mashed sweet potatoes looked too wet to handle, I skipped adding them to my dough like my other potato bread attempts and used just the purple color liquid.  I added 30g of the mashed potato later on, after gaining more confidence when I saw how the dough had come together properly after a first proof.

Purple Sweet Potato Bread // Mono+Co Purple Sweet Potato Bread // Mono+Co Purple Sweet Potato Bread // Mono+Co

The interior of the bread has a more pastel shade but the purple color is still quite obvious.  I would experiment with adding more mashed potatoes next time and see if I can bake the bread with a darker purple shade .

This recipe is largely adapted from a white loaf recipe from <<孟老师的100道面包>>, one of my favorite bread recipe book.  It uses the sponge method that I like but takes slightly more time to prepare.


PURPLE SWEET POTATO LOAF

adapted from white loaf recipe <<孟老师的100道面包>> p.90

for sponge:
220g bread flour
3/4 teaspoon instant dry yeast
130g purple sweet potato water

for bread:
30g mashed purple sweet potato
30g bread flour
1 tablespoon raw sugar
1/2 teaspoon sea salt
20g purple sweet potato water
15g cold unsalted butter, cubed

To make sponge, place 220g bread flour, instant dry yeast and purple sweet potato water in a mixing bowl.  Knead with a dough hook at the lowest mixer speed (KA 1) till the ingredients come into a dough.  Let this dough rest aside, covered, for 90 minutes.

When the first proof is completed, add mashed sweet potato, bread flour, sugar, salt, potato water and continue to knead the dough till all the ingredients come together.  Knead at the same speed for another  2 minutes till it turns smoother.  By now, you can slowly add the butter cubes, one by one, and knead till no traces of butter are left and the dough reaches window pane stage: soft, super pliable.

Remove bowl from mixer, and let this dough rise for 60 minutes, covered.

The dough would rise to double its volume when time is up, punch to deflate the dough and transfer it to a clean worktop.  Squeeze out any air bubbles trap inside the dough, then shape the dough and place it in the bread tin, seam side downwards.  Let it proof for another 50-60 minutes.

Bake in a preheated oven at 170C for 30 minutes.

After baking, remove bread from the tin immediately.  Brush top of bread with butter to make the crust soft after it has cooled down.  Leave on rack to cool completely before slicing or serving.

Save

Save

Mochi With Natural Purple Coloring

Purple Mochi // Mono+Co Purple Mochi // Mono+Co

What do you get after boiling purple sweet potatoes for 15 minutes?

I got myself a pot of mashed sweet potatoes in purple colored water.  Usually, I will sweeten it slightly for a nice afternoon dessert soup, but the creative side of me decided to adapt some of my favorite recipes with this natural purple color extract.

Mochi is the easiest since I have some 2 months old glutinous flour to clear.  Without even weighing what I have, I simply empty the bag (hand-feel estimate 120g?) into the smallest metal mixing bowl that I have, add sugar, and then pour enough of the purple soup (make sure it has cooled down completely) to make a slightly runny mixture.  If you have never made mochi before, this previous recipe will be a better guide, just replace the plain water with the water that was boiled with purple sweet potatoes.

The mochi mixture color looked a tad pastel before it was cooked, but it turned several shades darker after 15 minutes of steaming.

Purple Mochi // Mono+Co

I made two different batches, one coated with sweet potato flour, another one with kinako.  The ones coated with sweet potato flour looked prettier, but kinako coated ones tasted nicer.

Purple Mochi // Mono+Co


Save

Save

Mashed Potato Buns

mashed potato filling bread 001  mashed potato filling bread 004mashed potato filling bread 003 mashed potato filling bread 002

I left out the bacon in the original recipe to make it a meatless one.

As I was baking these buns yesterday, news broke that more cases of Zika infected patients had been confirmed in Singapore.  I told myself from now on, meal preparation will be kept short and simple, so as to divert more time to keep the house dry, clean and clutter free.

More on Mozzies-Wipe-Out actions later, but let’s get back to these buns.  As usual, it was a tiny batch recipe, yielding exactly 4 buns, perfect for next day’s breakfast, no leftovers.  I also added potato to the bread recipe, whatever that was left after making the mashed potato filling, about 25 grams.  So if you have cooked a potato that is bigger than the 120g required for the filling recipe, you can easily incorporate the remainder into the bread.

I also shaped the bread the croissant way.  Feel free to shape the bread any way you like it, long rolls or round buns.


MASHED POTATO BUNS

recipe adapted from <<孟老师的100道面包>> p.85

for bread:
200g bread flour
15g raw sugar
1/4 teaspoon sea salt
1/2 teaspoon instant yeast
1 egg yolk
25g mashed potato**
100g water ***
20g unsalted butter, cubed

for filling:
120g mashed potato
15g unsalted butter
1/4 teaspoon black pepper

** Original recipe does not have potato, use any amount of potatoes that remains after making the filling.

*** Use the water from cooking the potato with, cool it down before using.  The starch present in the water is said to be great for making bread texture softer, no reason why fresh water should be used in place of what is available after cooking the potato in it.

In a small mixing bowl,  add butter to 120g of potatoes that have just been cooked and removed from the boiling water.  Mash the potato with a fork, then stir fast with a wooden spoon to whip it slightly.  Add black pepper and mix well.  Cover and set aside.

To make bread dough, mix bread flour, raw sugar, sea salt and instant yeast in a mixer bowl with a hand whisk to combine the dry ingredients together.  Next add cooled mashed potato, egg yolk and cooled potato water, and knead on the lowest speed (KA 1) with a dough hook until the ingredients form into a dough.  Leave this to autolyse for 15 minutes so that the flour absorbs the liquid properly.

After 15 minutes, run the mixer on its lowest speed for about 1 minute, then add cold cubed butter one by one, and knead until traces of butter is no longer visible and dough reaches window pane stage.  Remove mixing bowl from mixer, cover and let dough bulk rise in for 80 minutes.

Move the dough to a clean, dry worktop.  Dust worktop with as little flour as possible if it is too sticky to handle.  Roll the dough into a ball again, let it sit for 15 minutes in a draft-free place.

Flatten the dough with a rolling pin into a large round dough, like shaping a pizza base.  Divide the dough into 4 quadrants.  Take one of the quadrants and lay it down with the “circumference” side nearer to you, spread the filling horizontally to this end and roll the quadrant up towards the sharp tip.  Shape the bread slightly by bending the two ends towards the center to form an arch.  Place it on a greased baking tray.  Repeat till all the doughs and fillings are used up.

Let the buns proof for another 25 minutes, then bake them in a preheated oven at 180C for 20-23 minutes, till the buns  turn into a nice shade of golden brown.

After the buns are done and still piping hot, brush the surface generously with butter.  This step will produce buns that remain soft till next day.

RESave

Save

Save

Save

Save

Save

Save

About Being Thankful For A Real Pumpkin Butter Cake

Real Pumpkin Butter Cake // Mono+Co Real Pumpkin Butter Cake // Mono+Co Real Pumpkin Butter Cake // Mono+CoReal Pumpkin Butter Cake // Mono+Co

Whenever I cook, I silently give thanks that I am able to make a choice in the ingredients that go into my dish.  I don’t have a sky-high budget, but at least I am able to choose from a variety of items with a fairly reasonable grocery allowance.  I understock, rather than overstock my pantry, which hopefully leads to less food wastage at home.  With almost zero dollar wasted on food items thrown away due to spoilage,  I can stick to fresher produce or foodstuff that I think are of a better quality such as organic fruits (I get to eat the apple peels), healthier cooking oil (which I will use lesser cos they are after all, higher in price), or Omega-3 enriched nuts (instead of chips peppered with salt and MSG.)  I know that I will be eating them, not throwing them away.  This is my motivation for buying better food, not more food.  Quality, not quantity.

I had a lousy butter cake last week and wonder how the popular bakery chain could have gotten it all wrong?  Maybe it was a personal preference, but it was all dried up and not a whiff of butter spotted.  I suspected that I was eating a new breed of bread-cake or cake-bread, like cronuts or wassant.  But no, the label and my receipt clearly indicated BUTTER CAKE.  I am no food connoisseur, but I think I can differentiate between a good butter cake and a not-so-good “maybe-shortening cake”.  Good ingredients are all it takes for a home baker to satisfy her own cravings.

So early morning next day, I dug out a block of frozen butter from my stash (Yes! I stock up punnets of berries and blocks of butter on sale in my freezer!) and left it on the countertop to soften, while I went the market to get a wedge of pumpkin and fresh large eggs to bake a simple butter cake with a never-fail recipe from here.

By noon, I was enjoying a slice of butter cake, the kind that is perfect in all the right places : moist but fluffy, buttery but not greasy.  And the addition of 200 grams of pumpkin kind of offsets the guilt from consuming 200 grams of butter.  Plus, the beta-carotene comes in handy to keep my eyesight healthy.

Here’s another recipe that uses 2 fewer eggs but more 50grams more butter.


PUMPKIN BUTTER CAKE

recipe from here

200g pumpkin, steamed and mashed
200g soften butter, room temperature
180g raw sugar 
1/4 teaspoon vanilla extract 
5 large eggs (70g each)
300g cake flour
1 teaspoon baking powder

Grease and flour an 8 inch round cake pan.  Set aside.  Preheat oven to 180C.

Cream softened butter, sugar, and vanilla extract with a paddle attachment at medium speed till the yellow tone of the butter turns several shades paler and the mixture is soft and fluffy.  Stop the mixer once or twice to scrape the butter mixture down from the side of the bowl to the center so that mixture gets beaten evenly.  Add in the eggs, one at a time, making sure that each egg gets incorporated before adding the next one.  My cake mixture at this point started to look like a curdled mess, even though my eggs and butter were of room temperature.  After some reading (only after the cake was done), here, here and here, a curdled batter doesn’t seem to be the end of the world, and can usually be rectified with the addition of dry ingredients, like flour, which I am adding next.

Sift the cake flour and baking powder twice. Add only half of this to the batter and run the mixer on the lowest speed to combine.

Incorporate the pumpkin puree to the batter with the mixer on the same lowest speed.  For the last step of adding the remaining flour, I fold it into the batter with a spatula instead of using the mixer.  Once there are no more traces of flour in the batter, I pour it into the 8 inch round pan.  Level the surface of the batter with a spatula ( I sometimes use my finger) and bake it at 180C for 50 minutes, or when the skewer inserted in the center of the cake comes out clean.

Leave the cake to cool completely in its pan on a rack.  Any attempts to dislodge a very warm cake from its baking pan run the risk of tearing the cake from the middle where it is the hottest and still moist.  If you like to serve the cake hot out of the oven, you can line the cake pan with parchment paper instead of the grease and flour method.  In that way, you can simply lift the cake out of its pan with breaking it apart.

This cake doesn’t keep well due to the high moisture content of the pumpkin puree.  If it doesn’t get completely consumed in 24 hours after baking, store the remaining in a tight container, keep in the fridge.

The next time you eat it, return the cake to room temperature first. Otherwise, the butter will turn the cake hard when it is cold.

Save

Save

Save

Save

Save

Save

Save

Save

Save

Save

Save

Condensed Milk Square Pullman Loaf

Condensed Milk Square Pullman Loaf // Mono+Co Condensed Milk Square Pullman Loaf // Mono+Co

Watching my bread dough rises beyond the rim of the baking tin is one of my favorite kitchen highlights. But something about baking perfectly cornered square loaves sometimes lures me away from shaping dome loaves from time to time, and these tend to be plain milk recipes.

Other than making perfect symmetrical sandwiches, I enjoy turning this almost-brioche-texture bread into luxurious thick french toasts.  This is not something you will want to prepare if you are in a hurry as I make sure the bread slices soak up the custard thoroughly, and this could take up to 20 to 30 minutes.  Plus, I bake it in the oven for another 10 minutes just to make sure the custard gets cooked all the way inside the toast, even after frying them in the skillet.  So if you have really hungry kids waiting in line at the kitchen door for their breakfast, may I suggest regular omelettes on toast instead,  same ingredients but much faster.

Alternatively, make the french toasts with thinner bread slices to reduce the soaking time.  But still, make sure that the custard gets completely absorbed. Otherwise, it will just be cooking an omelette on the surface of the bread, which bring us back to my earlier suggestion.  This video perfectly illustrates the importance of the additional soaking and baking step.  It might just make you wake up an hour earlier to do the prep work, like how it did for me.

Coupled with homemade jam like this, breakfast gets extra brownie points, though I would have settled with just honey or maple syrup when the (cheaper) berry season is over.

Condensed Milk Square Pullman Loaf // Mono+Co


Condensed Milk Potato Bread

100g potato, cooked and mashed
200g bread flour
20g top flour
1 teaspoon instant yeast
1/4 teaspoon salt
2 tablespoons condensed milk
45g liquid**
36g butter
1/2 large egg (around 35g)

**  You can add liquid of your preference such as fresh milk, soy milk, plain water or water remained from cooking potatoes with, along as they are chilled or room temperature, never boiling hot.

In a mixing bowl, combine bread flour, top flour, instant yeast, salt with a hand whisk to mix the dry ingredients.

Add mashed potatoes, condensed milk, beaten egg (roughly 35g) and liquid of your choice.  I  made mine with fresh unsweetened soy milk.  Start the mixer on low speed (KA 1) to knead the ingredients to form a dough.  Stop the mixer and rest the dough for 15 minutes.  After the resting time is up, turn on the mixer again to continue kneading the dough, this time with cold cubed butter added, one by one.  Knead this dough till window pane stage, a must for soft, cotton-like Asian style bread.

Turn off the mixer, and let dough bulk rise covered for 1 hour, it should expand considerably up to twice its original size.  After an hour, punch the dough down to and transfer it to a clean and dry worktop.  Divide the dough into three equal portions, roll them into balls and let it rest for 15 minutes.   wl from the As soon as the bread dough reaches almost the top of the tin, it is covered and the bread should continue to rise well within the next 15 minutes to reach all corners of the enclosed tin, while my oven is being preheated.

Take a ball of dough, and flatten it to remove any air trapped inside.  With a rolling pin, flatten it into a longish piece, and roll this up into a cylinder, like a swiss roll.  Repeat with the other two balls of dough.  With seam side facing downwards, place them in a bread tin, and let it rise in a draft-free area for 40 minutes.  As soon as the bread dough reaches almost the top of the tin, it is covered and the bread should continue to rise well within the next 15 minutes to reach all corners of the enclosed tin, while my oven is being preheated.

After 40 minutes, check if the bread dough has risen to fill about 90% of the tin.  As soon as it has risen to that height, cover the bread tin and it should continue to rise well within the next 15 minutes to reach all corners of the enclosed tin.  Bake in a preheated oven at 210C for 40 minutes.

Unmold done bread from bread tin and cool it completely on a rack, before slicing or serving.

Save

Save

Save

Save

Save

Okara Bread Loaf

Okara Bread Loaf // Mono+CoOkara Bread Loaf // Mono+Co

This recipe follows up nicely with a previous post on reducing food waste in my tiny kitchen because of this ingredient : okara.

Okara Bread Loaf // Mono+Co

This creamy paste is the by product of homemade soy milk; leftover after extracting the milk out of blended soy beans.  Since they are still full of protein, calcium and fiber, the best waste free kitchen solution is to mix them in bread recipes or cook them into meat-free meatballs.  I’ll show you the bread method first.


OKARA BREAD LOAF

190g bread flour
20g top flour
120g fresh okara **
1 tablespoon raw sugar
1/4 teaspoon salt
1 teaspoon instant yeast
1 egg (60g)
60g water **
40g cold butter, cubed

** A note on fresh homemade okara, I can never seem to squeeze them completely dry when making soy milk.  Since I have found other ways use it in our food, I have chosen to go easy on myself; no need to squeeze till the last drop of milk comes out.  Since this will affect the amount of liquid in okara, the amount of water added to the recipe will be adjusted accordingly, pour just enough to make all the ingredients come together as a ball is a good indication.  Same caution with liquid addition applies if you use store bought dehydrated okara.

In a mixing bowl, add bread flour, top flour, sugar, salt, and yeast, and mix briefly with a hand whisk.   Add fresh okara, egg and water (**see note above) and knead on lowest speed (KA 1) till all ingredients come together to form a dough.  Let this dough rest for 15 minutes before adding cubed cold butter one by one, till no traces of butter can be seen.

Continue kneading alternating between KA speed 1 and 2, till the dough reach window pane stage, it will turn extremely pliable.

Turn off the mixer, and let the dough rise for 1 hour, covered with a clean towel.  I have started using a huge pot lid instead since it fits my KA mixer, so that I have one less towel to wash at the end of the day. Evolution takes place in my kitchen everyday.

This dough did not rise as much as my other recipes, but a straightforward “ripe” test is all it takes to see if the dough is ready for the next step.  Simply stick a floured finger deep into the dough, usually in the middle,  and when the indentation remains after taking out the finger, it is ready for punch down.

Okara Bread Loaf // Mono+Co Okara Bread Loaf // Mono+Co

Deflate the dough and transfer it to a clean work top.  Flatten the dough to push out any gas trapped inside, rolling pin will be helpful here when the dough is not too sticky.  Shape dough and place in a baking tin, seam side downwards.  Let it proof for another hour, covered and placed at a draft free place.  Remember that I don’t cover my dough with towel anymore? Another form of evolution has taken place : I leave the uncovered tin inside my oven with the oven door closed.  Some bakers proof their bread inside the oven with the lights turned on.  My oven doesn’t have this mode, maybe it took a little longer time than if the lights were turn on to increase the oven interior temperature slightly, but at least the bread still rise beautifully.

After an hour, check if the dough has risen to reach almost to the brim.  Bake at 170C for 30 minutes.  After baking, remove bread from the tin immediately and leave on rack to cool completely before slicing or serving.

Okara Bread Loaf // Mono+Co Okara Bread Loaf // Mono+Co   Okara Bread Loaf // Mono+Co Okara Bread Loaf // Mono+Co Okara Bread Loaf // Mono+Co

Save

Save

Save

Save

Save

Save

On Food Wastage And Tiny Kitchen

DIY Oat Flour // Mono+Co

How many weeks worth of food items to you keep at home?

Few days back, I was looking out for new ingredients at the wet market, when a lady next to me started lamenting how she threw away sprouted potatoes every time.  I thought she was complaining to the stall owner how fast the stocks were turning green, but she went on to elaborate that, because the potatoes at the stall were always looking so nice, she ended up buying a bag home, but never seemed to cook them.  So when they started to sprout after a while, the only safe thing to do was to throw them away.

I had two questions in my mind as I listened : “How does a nice potato look like? So much so that the lady buys it every time she sees it?”  I am biased towards the produce found in the local wet markets, they all seem very nice to me. So if her motivation to buy is “nice looking potatoes”, going by the same reason, I could end up buying every nice looking vegetable in the market.

And my second question was: “With 101 ways to cook potatoes, how can one end up throwing perfectly good ingredients away? And every time?”  I wanted to believe that the “every time” point could be an exaggeration, as “saving money is the greatest motivation to reduce food wastage” according to this study here.

I watched interestingly how the stall owner spoke with discomfort as he dispensed the perfect tip that greatly conflict with his business interest :” Just buy enough, don’t buy too much lah. Only wasting your own money.”   How’s that for a solution?  While companies all over the world roll out promotion after promotion to entice customers to buy more (Buy 3 for price of 2!  Buy 1 get 25% off 2nd item!), this stall owner sheepishly adviced the customer to buy lesser.  I am not sure if he had kept his volume lower to save the food wasting customer from embarrassment or he was worrying that his business would be affected if everyone hears his honestly simple tip.  Either way, his response greatly reflected 2 top habits that lead Singapore households to waste food at home ; over preparation of food/ingredients and oversight of expiring food inventories at home.

For me, my greatest sore is also the greatest solution to food waste reduction : a tiny kitchen at home.  Due to the lack of space, I have since developed a few (very good) habits to stock up less on pantry items.  Having a wet market and a 24 hours supermarket a stone’s throw away makes cooking with a low food inventory a lot easier.  If I run out of an ingredient, I try to replace with another, or do without altogether.  Often, I find that I do not really need a perfectly stocked pantry to prepare my daily meals.  Then once a month, I do a “total cleanse” with my pantry; to use up every single fresh ingredient or items that are close to expiry.  You will be surprised by how well stocked your pantry actually is, by refraining from grocery shopping for as long as possible.

Another great tip I have on keeping a low pantry stock is to DIY.  Available on the retail shelves are bottles of ready made sauce to make cooking more convenient, but most can be prepared at home if you already have the basic condiments ready such as chili paste, vegetarian oyster sauce, sugar, soy sauce, sesame oil, vinegar etc.  Do a quick search on the internet, and there are thousands of recipe entries for teriyaki sauce, black pepper sauce, sesame mayonnaise dressing, etc and the beauty of these diy sauces is that you can season them exactly to the way you like it.  I have also recently found that icing sugar is simply adding corn starch to fine sugar after processing it in a blender, one less item on my shelf since I already have corn starch and sugar at home.

DIY Oat Flour // Mono+CoDIY Oat Flour // Mono+Co

And talking about blender, they are great for making diy flour too, especially the types that you don’t use that often and certainly won’t need to buy 1 kg for, like I make my own small batch oat flour to make breads like this and this.  As you can see from my photos, my homemade flour might not be as fine as the store-bought ones**, but it doesn’t have to be for my bread recipes.  Moreover, between getting a not-quite-up-to-miller-standard flour and turning good quality flour rancid due to infrequent use, I’ll settle with coarser flour in my breads and think of it as a better fiber source.

What are the must-haves in your pantry?


** I have read that the ultra high end blenders like Vitamix and Blendec can produce really fine diy flours.  Use them to make you own diy flour if you already own one.  Lucky you!


Save

Save

Save

Save

Save

Save

Banana Avocado Smoothie

Banana Avocado Smoothie // Mono+Co Banana Avocado Smoothie // Mono+Co

Wholesome breakfast prepared with my immersion blender again!

No sophisticated cooking skills required and only three ingredients, or four if you have a super sugary tooth as banana has already sweetened the smoothie considerably, in a healthy way.  I will usually yearn for something sweeter during the later part of the day, like after dinner, so I can imagine myself stirring in 1/2 to 1 teaspoon of date syrup to this smoothie if I serve it as a dessert after a meal.

Enjoy!  Whether as a smoothie breakfast or healthy dessert!


Banana Avocado Smoothie

1 ripe avocado, pitted and sliced
1 ripe banana, sliced
Fresh milk
date syrup or honey, optional

To save the hassle of washing, I prepare my smoothie straight in a cup that has a wide mouth that fits my immersion blender.  This glass container with lid from Daiso is perfect, as I can prepare 2 servings with one of each fruit, store one serving covered in fridge and serve it later when my other half wakes up for breakfast.

Divide avocado and banana slices equally into 2 serving cups, and top with enough milk to cover the fruits.  Blend till smooth with immersion blender.  Add more milk if it is too thick for you.  If you prefer something really sweet, stir in date syrup or honey to taste.

BSave

Save