Raisin Potato Bread Loaf

Raisin Potato Bread Loaf // Mono+Co Raisin Potato Bread Loaf // Mono+Co

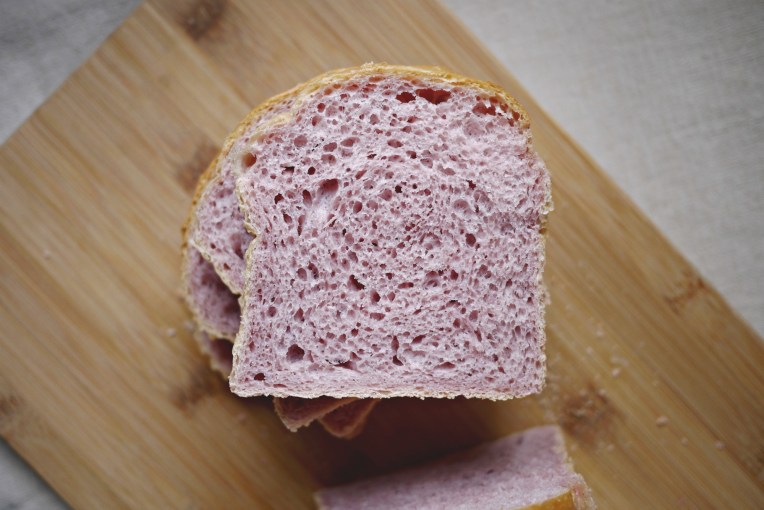
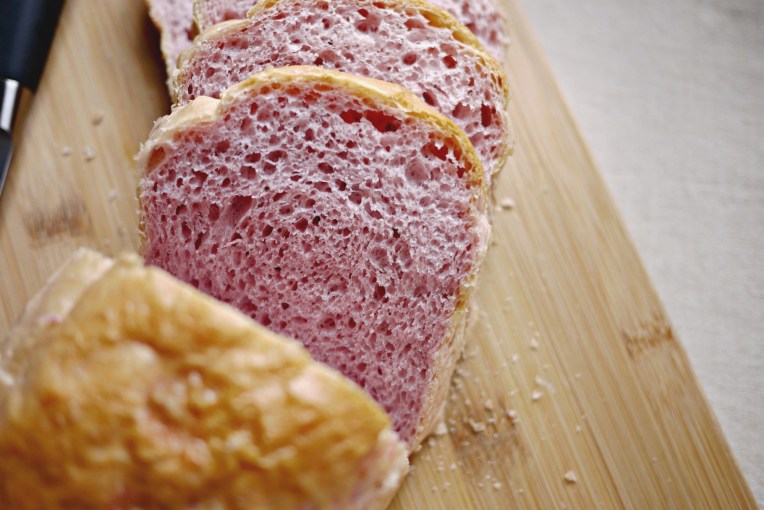
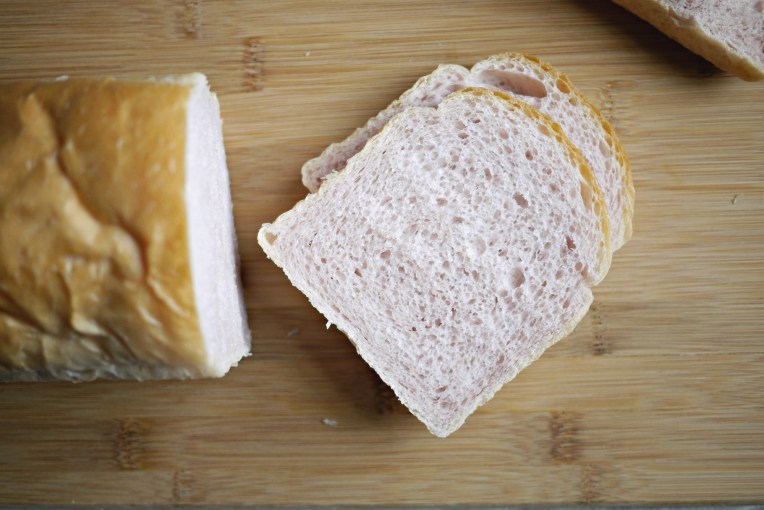
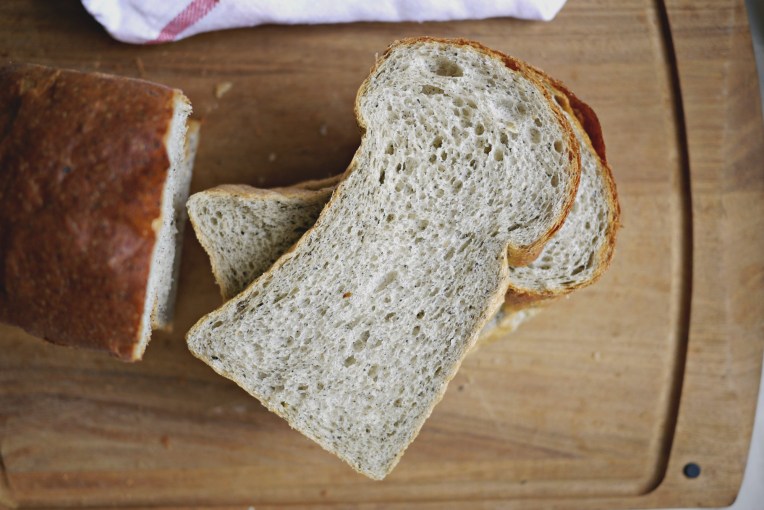
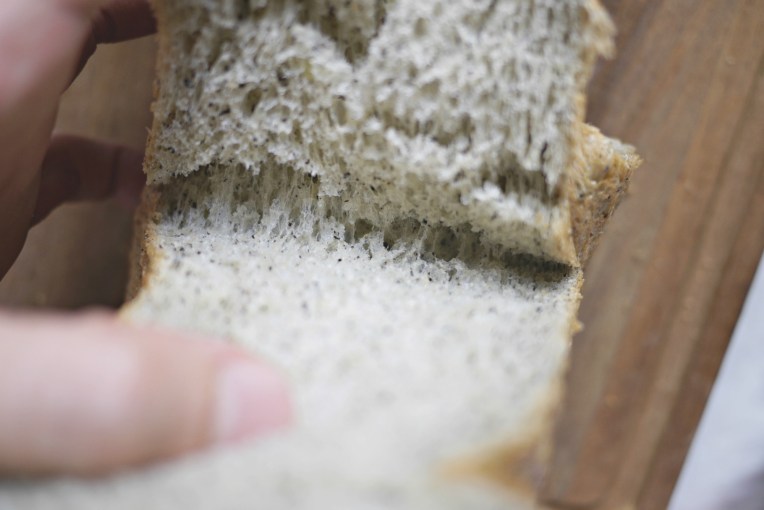
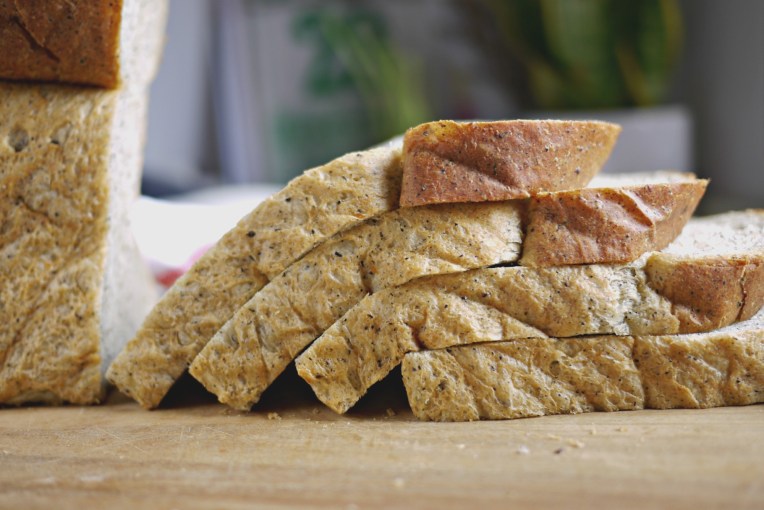
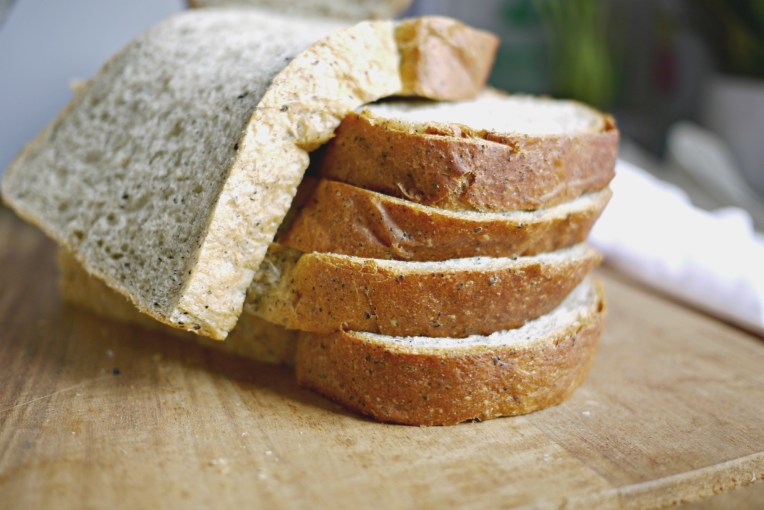
Raisins in bread are always welcome.  The addition of potato made the loaf really soft, as I was slicing it, every piece bended and collapsed beautifully on the one before.

This loaf got wiped out in one day.  Time to get on with ideas for the next potato bread.  I think I just saw purple sweet potatoes at the kitchen counter.

Raisin Potato Bread Loaf // Mono+Co Raisin Potato Bread Loaf // Mono+CoRaisin Potato Bread Loaf // Mono+Co  Raisin Potato Bread Loaf // Mono+Co


Raisin Potato Bread Loaf

220g plain flour
1/2 tablespoon instant dry yeast
1/4 teaspoon sea salt
2 tablespoon raw sugar
100g mashed potato
1 large egg, beaten **
30-40g potato water ***
35g cold butter, cubed
60g raisins ****

** I used a large egg that weighs 70grams with shell.

*** Potato water refers to the water that the potatoes were cooked in.  Cool it down to room temperature before using.

**** Up to 100g of raisins if you really like lots of raisins in your bread.

In a bowl, add the raisins and pour just enough warm water to cover the raisins.  This helps to hydrate them and prevent the raisins from drawing moisture from the bread when they are mixed into the dough.

In a mixer bowl, combine plain flour, instant yeast, raw sugar, sea salt with a hand whisk to form a uniform mixture of dry ingredients.  Add mashed potato, egg, and water next.  Turn on the mixer with a dough hook attachment and knead these ingredients on the lowest speed (KA 1) till they come into a ball.  Continue to knead for 3 minutes, then stop the mixer and let the dough sit for 15 minutes.

Turn on the mixer again and knead for 1 minute before adding butter cubes one by one while the mixer is running on its lowest speed.  Keep kneading till there are no traces of butter left and the dough has reached window pane stage.  At this stage, the dough will be extremely pliable and baby-bottom soft.  Stop the mixer for a while.

With one hand, squeeze to dry the raisins that have been soaked in warm water.  Add them to the dough in the mixer bowl, and start the mixer again on its lowest speed to incorporate the raisins into the dough.  Frankly, the electric mixer won’t do a very good job at mixing the raisins uniformly into the dough without over-kneading it.  I usually stop the mixer after 1-2 minute and take over to knead by hand, trying my best to spread the raisins  and make sure that they don’t clump at one spot.  This is to ensure that there will be raisins on every slice of the bread.

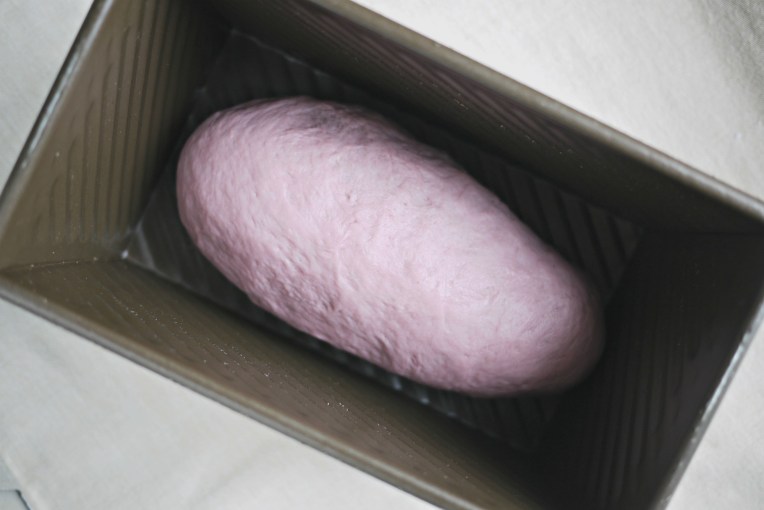
Leave the dough in the mixer bowl for its first proof of 60 minutes.  The dough will rise to double its volume,  punch down to deflate and transfer it to a clean worktop.

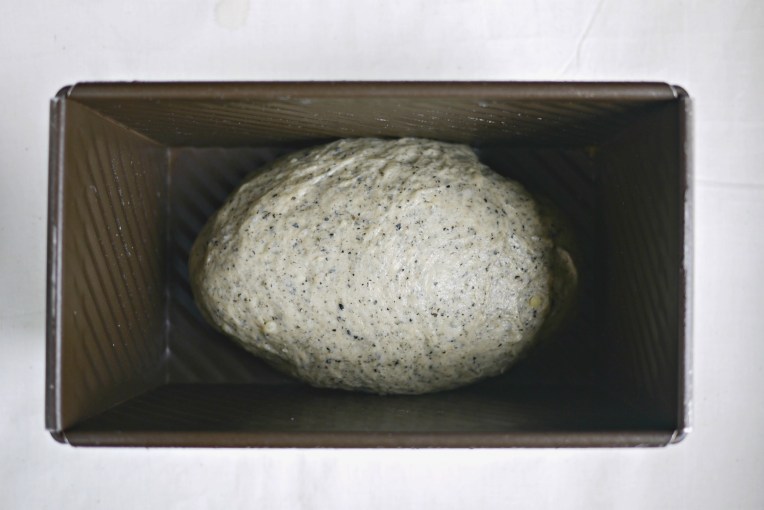
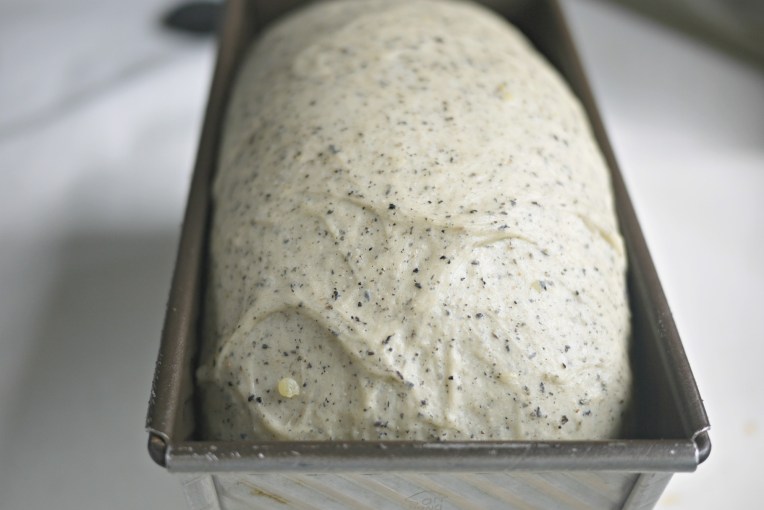
Flatten the dough with rolling-pin to push out any gas trapped inside the dough during proofing.  Shape the dough and place in a bread tin.  Proof for 50-60 minutes.

Bake in a preheated oven at 170C for 30 minutes.  Remove bread from bread tin immediately after baking and let it cool completely on a rack before slicing.

To soften the top crust, brush melted butter over the top of the loaf while it is hot.  I keep a handy small block of butter just for this purpose and run it over the crust and let the heat from the bread melt the butter as they come in contact.  Save the hassle of melting butter and washing an oily brush.

Save

Save

Save

Save

Save

Save

Save

Save

Charcoal Potato Dried Cheese Buns

Charcoal Potato Grated Cheese Buns // Mono+Co Charcoal Potato Grated Cheese Buns // Mono+Co

For my family, buns get consumed faster than sliced bread loaf, whether store-bought or homemade.  So it makes a lot of sense to be baking bamboo charcoal buns since I am trying to finish a bottle of the charcoal powder by year end.  I fiddled around with the usual potato bread recipe by adding more fats and reducing mashed potato amount to 100g.  The end result : 4 huge and fluffy buns.

I coated the dough with dried grated cheese, got them with my pasta/ pizza takeaways.  If you have them in your pantry, add them, if not, omit them.  Personally, I do not purchase these powdered cheese as they taste more like salty MSG flavoring than cheese.  You bet I will be making these buns with real cheese topping very soon.

Charcoal Potato Grated Cheese Buns // Mono+Co Charcoal Potato Grated Cheese Buns // Mono+Co Charcoal Potato Grated Cheese Buns // Mono+Co


Charcoal Potato Dried Cheese Buns

220g plain flour
1/2 tablespoon instant dry yeast
1/4 teaspoon sea salt
1/4 teaspoon bamboo charcoal powder
2 tablespoons raw sugar
100g mashed potato
1 large egg **
40g potato water ***
40g cold butter, cubed
20g dried grated cheese, optional

** I used an egg that weighs 70g with shell.

*** Potato water refers to the water that is left behind after cooking the potatoes with.  Cool it down to room temperature before adding them to the rest of the ingredients.

In a mixer bowl, combine plain flour, instant yeast, sea salt, bamboo charcoal powder, raw sugar with a hand whisk to stir the dry ingredients into a uniform mixture.

Add mashed potato, beaten egg, and potato water.  Turn on the electric mixer and knead the ingredients on the lowest speed (KA 1) until they come into a ball.  Continue to knead for about 3 minutes and then turn off the mixer and let this dough stand for 15 minutes.

Turn on the mixer to knead the dough for 1 minute, before adding cubed butter, one by one, while the mixer is running.  Continue to knead even after no traces of butter can be seen, until the dough reach window pane stage, this is when the dough becomes super stretchy and soft, though slightly sticky.  You can tell that you have reached this stage when the dough looks being lifted completely from the bottom and pulling itself away cleanly from the side of the mixing bowl, leaving no messy traces of dough behind.  At this stage, stop the mixer and leave the dough to rise in the covered mixer bowl for 60 minutes.

The dough should rise to double its volume.  Punch down the dough to deflate it and transfer it to a clean work top.  The dough will be sticky, dust hands and worktop with a little flour.  Divide the dough into 4 equal portions.  Flatten each dough to push out any gas trapped inside the dough, shape them into balls.  Holding the seam side of the ball dough, dip it into a small plate filled with grated cheese to coat the top side of the bread with the cheese before arranging it on a greased baking pan, seam side downwards.  Repeat until all 4 doughs are shaped and leave the pan in a draft-free place, covered with a clean towel, to have a final proof of 50 minutes.

Bake the buns in a preheat oven at 170C for 20-25 minutes.  Remove them from the pan and leave to cool completely.

220Save

Save

Save

Purple Sweet Potato Bread Loaf #2

Purple Sweet Potato Bread Loaf // Mono+CoPurple Sweet Potato Bread Loaf // Mono+Co

The purple sweet potato bread I baked last week was not purple enough, so I baked another version using my usual mashed potatoes recipe.  Actually the earlier version got its color from only 30 grams of sweet potatoes and 20 grams of water that I boiled the potatoes in.  This time, I made the color more intense by using 100grams of potatoes, steaming it instead of boiling to cook it.

Thinking that the sweet potatoes will be sweet enough to replace the sugar, I omitted any sweeteners, and ended up with a really bland but still pillowy loaf.  Not that I mind, traditional bread recipes do not add sugar anyway.  The bread was meant to be eaten with butter and spreads, so it did not really bother me, though I did wonder if the bread would have risen higher if sugar was added, given that it was a 220g of flour recipe.  I have baked taller loaves.

I will find out when I bake this again if I see purple sweet potatoes available in the market next week.

Purple Sweet Potato Bread Loaf // Mono+Co   Purple Sweet Potato Bread Loaf // Mono+Co Purple Sweet Potato Bread Loaf // Mono+Co  Purple Sweet Potato Bread Loaf // Mono+CoPurple Sweet Potato Bread Loaf // Mono+Co Purple Sweet Potato Bread Loaf // Mono+Co


Purple Sweet Potato Bread Loaf

220g plain flour
1/2 tablespoon instant yeast
1/4 teaspoon sea salt
100g mashed purple sweet potatoes
1/2 egg
40g water
30g cold unsalted butter, cubed

Combine flour, yeast and salt in a mixer bowl and stir with hand whisk to mix them well.  Add sweet potatoes, beaten egg and water, turn the mixer on lowest speed (KA1) with a dough hook, and knead till the ingredients come into a ball.  Stop the mixer and let this dough stand for 15 minutes to allow liquid to be absorbed better by the flour, I find that kneading to reach window pane stage later will be easier with this additional dough resting step.

After 15 minutes, turn the mixer on again to knead the dough for 1 minute, then slowly add cubed butter one by one, and knead till dough reaches window pane stage.  Remove bowl from mixer, and let it proof for 60 minutes, covered and placed in a draft free place.

The dough would have expanded to twice its size, punch down the dough to deflate it, and transfer it to a clean work top.  With a rolling pin, flatten the dough to push out gases trapped inside the dough.  Shape the dough and place in bread tin, seam side downwards, and proof for another 60 minutes.

Bake in a preheated oven at 170C for 30 minutes.  When done, remove bread from tin immediately and let it cool completely on a cooling rack before slicing.

If you like bread loaf soft at the top, brush over the top crust with butter when the bread is freshly hot out of the oven.  The soft dome top also makes slicing the bread easier after it has cooled down.

In Save

Save

Bamboo Charcoal Potato Bread Loaf

Bamboo Charcoal Potato Bread Loaf // Mono+Co Bamboo Charcoal Potato Bread Loaf // Mono+Co

The bread recipe with root vegetable as an additive is so versatile that I continue to experiment with additional ingredients like dry fruits or nuts.  They all come out great, soft and fluffy.  But sometimes, it is nice to go back to basic plain potato bread.

I added the bamboo charcoal powder to the regular recipe because I realise that it is expiring in 4 months.  I need to make a lot more charcoal bread this month to use up the bottle.  Who knew a 40-gram bottle could last so long?

The charcoal powder imparts no flavourings at all to the bread.  So if one eats it with eyes closed, he won’t be able to tell it apart from plain white bread.  But I eat with my eyes wide open, so I turn these black bread slices into a pretty sandwich by teaming them with grilled vegetarian cheese, red lettuce, sweet basil and cherry tomatoes.

With all these vibrant colors from the ingredients, definitely a feast for my eyes.

Bamboo Charcoal Potato Bread Loaf // Mono+Co

Bamboo Charcoal Potato Bread Loaf // Mono+Co


Basic Bamboo Charcoal Potato Bread Loaf

220g plain flour
1/2 tablespoon edible charcoal powder
1/2 tablespoon instant dry yeast
1/4 teaspoon sea salt
2 tablespoons raw sugar
125g mashed potatoes
40g potato water **
1/2 egg ***
30g cold unsalted butter,cubed

** Potato water refers to the water that is left behind after cooking the potatoes with.  Cool it down to room temperature before using.

*** I use large eggs that weigh above 70g with shell, if you have smaller eggs, simply weigh out 35g for this recipe.

In a mixer bowl, stir plain flour, charcoal powder, yeast, sea salt, raw sugar with a hand whisk to mix these dry ingredients uniformly.  Next, add mashed potatoes, potato water, and egg, then knead using an electric mixer with dough hook on the lowest speed (KA 1) until the ingredients come into a ball.  Continue to knead this for about 3 minutes, then stop the mixer and leave this dough to stand for 15 minutes.

Turn on the mixer again on its lowest speed and knead the dough for another 1 minute.  After that, add butter cubes one by one carefully with the mixer running, keep kneading until no visible traces of butter can be seen in the bowl and the dough has reached window pane stage.  The dough should be extremely soft and pliable now, stop the mixer and leave the dough in the bowl, covered.  Proof this for 60 minutes.

The dough will double in volume after its first proof.  Punch down to deflate it and transfer to a clean work top.  Dust hands and worktop with a little flour if the dough is too sticky to handle.  Flatten dough either with palms or rolling pin to push out any gases trapped inside the dough.  Shape the dough and place it in the bread tin, seam side downwards.

If making a square loaf, check on the dough 50 minutes after proofing, the dough should rise to cover about 90% of the height of the tin.  Slide over the cover to enclose the bread and continue to proof for another 10 minutes before baking.  Bake the bread covered in a preheated oven at 200C for 30 minutes.

If making a dome-shaped bread loaf, proof it for 60 minutes.  If the dough has risen above the bread tin, proceed to bake.  If not, give it another 10-15 minutes to rise.  However, do not extend the proof time further than 90minutes, as this will run the risk of over-proofing the dough.  Bake in a preheated oven at 170C for 30 minutes.

Remove bread from tin immediately after baking and leave it to cool completely on a rack before slicing.

Save

Save

Save

Save

Save

Save

Purple Bread Loaf

Purple Sweet Potato Bread // Mono+Co

With the purple mochi prepared and eaten, I went on to bake a bread loaf with the remaining “purple color extract” that I am left with after boiling purple sweet potatoes in water.

Since the mashed sweet potatoes looked too wet to handle, I skipped adding them to my dough like my other potato bread attempts and used just the purple color liquid.  I added 30g of the mashed potato later on, after gaining more confidence when I saw how the dough had come together properly after a first proof.

Purple Sweet Potato Bread // Mono+Co Purple Sweet Potato Bread // Mono+Co Purple Sweet Potato Bread // Mono+Co

The interior of the bread has a more pastel shade but the purple color is still quite obvious.  I would experiment with adding more mashed potatoes next time and see if I can bake the bread with a darker purple shade .

This recipe is largely adapted from a white loaf recipe from <<孟老师的100道面包>>, one of my favorite bread recipe book.  It uses the sponge method that I like but takes slightly more time to prepare.


PURPLE SWEET POTATO LOAF

adapted from white loaf recipe <<孟老师的100道面包>> p.90

for sponge:
220g bread flour
3/4 teaspoon instant dry yeast
130g purple sweet potato water

for bread:
30g mashed purple sweet potato
30g bread flour
1 tablespoon raw sugar
1/2 teaspoon sea salt
20g purple sweet potato water
15g cold unsalted butter, cubed

To make sponge, place 220g bread flour, instant dry yeast and purple sweet potato water in a mixing bowl.  Knead with a dough hook at the lowest mixer speed (KA 1) till the ingredients come into a dough.  Let this dough rest aside, covered, for 90 minutes.

When the first proof is completed, add mashed sweet potato, bread flour, sugar, salt, potato water and continue to knead the dough till all the ingredients come together.  Knead at the same speed for another  2 minutes till it turns smoother.  By now, you can slowly add the butter cubes, one by one, and knead till no traces of butter are left and the dough reaches window pane stage: soft, super pliable.

Remove bowl from mixer, and let this dough rise for 60 minutes, covered.

The dough would rise to double its volume when time is up, punch to deflate the dough and transfer it to a clean worktop.  Squeeze out any air bubbles trap inside the dough, then shape the dough and place it in the bread tin, seam side downwards.  Let it proof for another 50-60 minutes.

Bake in a preheated oven at 170C for 30 minutes.

After baking, remove bread from the tin immediately.  Brush top of bread with butter to make the crust soft after it has cooled down.  Leave on rack to cool completely before slicing or serving.

Save

Save

Mashed Potato Buns

mashed potato filling bread 001  mashed potato filling bread 004mashed potato filling bread 003 mashed potato filling bread 002

I left out the bacon in the original recipe to make it a meatless one.

As I was baking these buns yesterday, news broke that more cases of Zika infected patients had been confirmed in Singapore.  I told myself from now on, meal preparation will be kept short and simple, so as to divert more time to keep the house dry, clean and clutter free.

More on Mozzies-Wipe-Out actions later, but let’s get back to these buns.  As usual, it was a tiny batch recipe, yielding exactly 4 buns, perfect for next day’s breakfast, no leftovers.  I also added potato to the bread recipe, whatever that was left after making the mashed potato filling, about 25 grams.  So if you have cooked a potato that is bigger than the 120g required for the filling recipe, you can easily incorporate the remainder into the bread.

I also shaped the bread the croissant way.  Feel free to shape the bread any way you like it, long rolls or round buns.


MASHED POTATO BUNS

recipe adapted from <<孟老师的100道面包>> p.85

for bread:
200g bread flour
15g raw sugar
1/4 teaspoon sea salt
1/2 teaspoon instant yeast
1 egg yolk
25g mashed potato**
100g water ***
20g unsalted butter, cubed

for filling:
120g mashed potato
15g unsalted butter
1/4 teaspoon black pepper

** Original recipe does not have potato, use any amount of potatoes that remains after making the filling.

*** Use the water from cooking the potato with, cool it down before using.  The starch present in the water is said to be great for making bread texture softer, no reason why fresh water should be used in place of what is available after cooking the potato in it.

In a small mixing bowl,  add butter to 120g of potatoes that have just been cooked and removed from the boiling water.  Mash the potato with a fork, then stir fast with a wooden spoon to whip it slightly.  Add black pepper and mix well.  Cover and set aside.

To make bread dough, mix bread flour, raw sugar, sea salt and instant yeast in a mixer bowl with a hand whisk to combine the dry ingredients together.  Next add cooled mashed potato, egg yolk and cooled potato water, and knead on the lowest speed (KA 1) with a dough hook until the ingredients form into a dough.  Leave this to autolyse for 15 minutes so that the flour absorbs the liquid properly.

After 15 minutes, run the mixer on its lowest speed for about 1 minute, then add cold cubed butter one by one, and knead until traces of butter is no longer visible and dough reaches window pane stage.  Remove mixing bowl from mixer, cover and let dough bulk rise in for 80 minutes.

Move the dough to a clean, dry worktop.  Dust worktop with as little flour as possible if it is too sticky to handle.  Roll the dough into a ball again, let it sit for 15 minutes in a draft-free place.

Flatten the dough with a rolling pin into a large round dough, like shaping a pizza base.  Divide the dough into 4 quadrants.  Take one of the quadrants and lay it down with the “circumference” side nearer to you, spread the filling horizontally to this end and roll the quadrant up towards the sharp tip.  Shape the bread slightly by bending the two ends towards the center to form an arch.  Place it on a greased baking tray.  Repeat till all the doughs and fillings are used up.

Let the buns proof for another 25 minutes, then bake them in a preheated oven at 180C for 20-23 minutes, till the buns  turn into a nice shade of golden brown.

After the buns are done and still piping hot, brush the surface generously with butter.  This step will produce buns that remain soft till next day.

RESave

Save

Save

Save

Save

Save

Save

Condensed Milk Square Pullman Loaf

Condensed Milk Square Pullman Loaf // Mono+Co Condensed Milk Square Pullman Loaf // Mono+Co

Watching my bread dough rises beyond the rim of the baking tin is one of my favorite kitchen highlights. But something about baking perfectly cornered square loaves sometimes lures me away from shaping dome loaves from time to time, and these tend to be plain milk recipes.

Other than making perfect symmetrical sandwiches, I enjoy turning this almost-brioche-texture bread into luxurious thick french toasts.  This is not something you will want to prepare if you are in a hurry as I make sure the bread slices soak up the custard thoroughly, and this could take up to 20 to 30 minutes.  Plus, I bake it in the oven for another 10 minutes just to make sure the custard gets cooked all the way inside the toast, even after frying them in the skillet.  So if you have really hungry kids waiting in line at the kitchen door for their breakfast, may I suggest regular omelettes on toast instead,  same ingredients but much faster.

Alternatively, make the french toasts with thinner bread slices to reduce the soaking time.  But still, make sure that the custard gets completely absorbed. Otherwise, it will just be cooking an omelette on the surface of the bread, which bring us back to my earlier suggestion.  This video perfectly illustrates the importance of the additional soaking and baking step.  It might just make you wake up an hour earlier to do the prep work, like how it did for me.

Coupled with homemade jam like this, breakfast gets extra brownie points, though I would have settled with just honey or maple syrup when the (cheaper) berry season is over.

Condensed Milk Square Pullman Loaf // Mono+Co


Condensed Milk Potato Bread

100g potato, cooked and mashed
200g bread flour
20g top flour
1 teaspoon instant yeast
1/4 teaspoon salt
2 tablespoons condensed milk
45g liquid**
36g butter
1/2 large egg (around 35g)

**  You can add liquid of your preference such as fresh milk, soy milk, plain water or water remained from cooking potatoes with, along as they are chilled or room temperature, never boiling hot.

In a mixing bowl, combine bread flour, top flour, instant yeast, salt with a hand whisk to mix the dry ingredients.

Add mashed potatoes, condensed milk, beaten egg (roughly 35g) and liquid of your choice.  I  made mine with fresh unsweetened soy milk.  Start the mixer on low speed (KA 1) to knead the ingredients to form a dough.  Stop the mixer and rest the dough for 15 minutes.  After the resting time is up, turn on the mixer again to continue kneading the dough, this time with cold cubed butter added, one by one.  Knead this dough till window pane stage, a must for soft, cotton-like Asian style bread.

Turn off the mixer, and let dough bulk rise covered for 1 hour, it should expand considerably up to twice its original size.  After an hour, punch the dough down to and transfer it to a clean and dry worktop.  Divide the dough into three equal portions, roll them into balls and let it rest for 15 minutes.   wl from the As soon as the bread dough reaches almost the top of the tin, it is covered and the bread should continue to rise well within the next 15 minutes to reach all corners of the enclosed tin, while my oven is being preheated.

Take a ball of dough, and flatten it to remove any air trapped inside.  With a rolling pin, flatten it into a longish piece, and roll this up into a cylinder, like a swiss roll.  Repeat with the other two balls of dough.  With seam side facing downwards, place them in a bread tin, and let it rise in a draft-free area for 40 minutes.  As soon as the bread dough reaches almost the top of the tin, it is covered and the bread should continue to rise well within the next 15 minutes to reach all corners of the enclosed tin, while my oven is being preheated.

After 40 minutes, check if the bread dough has risen to fill about 90% of the tin.  As soon as it has risen to that height, cover the bread tin and it should continue to rise well within the next 15 minutes to reach all corners of the enclosed tin.  Bake in a preheated oven at 210C for 40 minutes.

Unmold done bread from bread tin and cool it completely on a rack, before slicing or serving.

Save

Save

Save

Save

Save

Okara Bread Loaf

Okara Bread Loaf // Mono+CoOkara Bread Loaf // Mono+Co

This recipe follows up nicely with a previous post on reducing food waste in my tiny kitchen because of this ingredient : okara.

Okara Bread Loaf // Mono+Co

This creamy paste is the by product of homemade soy milk; leftover after extracting the milk out of blended soy beans.  Since they are still full of protein, calcium and fiber, the best waste free kitchen solution is to mix them in bread recipes or cook them into meat-free meatballs.  I’ll show you the bread method first.


OKARA BREAD LOAF

190g bread flour
20g top flour
120g fresh okara **
1 tablespoon raw sugar
1/4 teaspoon salt
1 teaspoon instant yeast
1 egg (60g)
60g water **
40g cold butter, cubed

** A note on fresh homemade okara, I can never seem to squeeze them completely dry when making soy milk.  Since I have found other ways use it in our food, I have chosen to go easy on myself; no need to squeeze till the last drop of milk comes out.  Since this will affect the amount of liquid in okara, the amount of water added to the recipe will be adjusted accordingly, pour just enough to make all the ingredients come together as a ball is a good indication.  Same caution with liquid addition applies if you use store bought dehydrated okara.

In a mixing bowl, add bread flour, top flour, sugar, salt, and yeast, and mix briefly with a hand whisk.   Add fresh okara, egg and water (**see note above) and knead on lowest speed (KA 1) till all ingredients come together to form a dough.  Let this dough rest for 15 minutes before adding cubed cold butter one by one, till no traces of butter can be seen.

Continue kneading alternating between KA speed 1 and 2, till the dough reach window pane stage, it will turn extremely pliable.

Turn off the mixer, and let the dough rise for 1 hour, covered with a clean towel.  I have started using a huge pot lid instead since it fits my KA mixer, so that I have one less towel to wash at the end of the day. Evolution takes place in my kitchen everyday.

This dough did not rise as much as my other recipes, but a straightforward “ripe” test is all it takes to see if the dough is ready for the next step.  Simply stick a floured finger deep into the dough, usually in the middle,  and when the indentation remains after taking out the finger, it is ready for punch down.

Okara Bread Loaf // Mono+Co Okara Bread Loaf // Mono+Co

Deflate the dough and transfer it to a clean work top.  Flatten the dough to push out any gas trapped inside, rolling pin will be helpful here when the dough is not too sticky.  Shape dough and place in a baking tin, seam side downwards.  Let it proof for another hour, covered and placed at a draft free place.  Remember that I don’t cover my dough with towel anymore? Another form of evolution has taken place : I leave the uncovered tin inside my oven with the oven door closed.  Some bakers proof their bread inside the oven with the lights turned on.  My oven doesn’t have this mode, maybe it took a little longer time than if the lights were turn on to increase the oven interior temperature slightly, but at least the bread still rise beautifully.

After an hour, check if the dough has risen to reach almost to the brim.  Bake at 170C for 30 minutes.  After baking, remove bread from the tin immediately and leave on rack to cool completely before slicing or serving.

Okara Bread Loaf // Mono+Co Okara Bread Loaf // Mono+Co   Okara Bread Loaf // Mono+Co Okara Bread Loaf // Mono+Co Okara Bread Loaf // Mono+Co

Save

Save

Save

Save

Save

Save

Black Sesame Potato Loaf

Black Sesame Potato Bread Loaf // MonoandCoBlack Sesame Potato Bread Loaf // MonoandCo

Bread yoga time!

I like doing such strange things to my bread when they turn out this soft.  A reminder to myself that this proportion of ingredients works very well.  The crust also browned nicely, largely due to the higher amount of butter.

I have read from somewhere that black sesame seeds are better eaten grounded than as seeds, just like the flaxseeds.  So a white bread recipe incorporating black sesame powder sounds like a good idea given its medicinal benefits.

Although toasting and grounding the seeds wouldn’t take up much time given that this recipe only needs 3 tablespoons of it, I had some ready black sesame powder that I like to eat with my muah chee, so I used that instead.

Black Sesame Potato Bread Loaf // MonoandCoBlack Sesame Potato Bread Loaf // MonoandCo Black Sesame Potato Bread Loaf // MonoandCoBlack Sesame Potato Bread Loaf // MonoandCoBlack Sesame Potato Bread Loaf // MonoandCo Black Sesame Potato Bread Loaf // MonoandCoBlack Sesame Potato Bread Loaf // MonoandCoBlack Sesame Potato Bread Loaf // MonoandCoBlack Sesame Potato Bread Loaf // MonoandCo


BLACK SESAME POTATO BREAD LOAF

200g bread flour
20g top flour
100g potatoes, cooked + mashed
2 tablespoons raw sugar
3 tablespoons ground black sesame seeds
1/4 teaspoon salt
1 teaspoon instant yeast
40g unsweetened soy milk
1 small egg (50g)
40g cold butter, cubed

Combine all dry ingredients : bread flour, top flour, sugar, ground black sesame seeds, salt and yeast in a mixer bowl, stir with hand whisk to mix them evenly.  Add cooled mashed potatoes, beaten egg, and soy milk and knead the ingredients with a dough hook into a ball dough on the lowest speed (KA 1).  Stop the mixture and let the dough rest for 15 minutes to let flour absorb the liquid well.

After the dough has rested, turn the mixer on low speed for about 1 minute.  Add the butter cubes one by one with the mixer running.  Knead the dough till window pane stage, then let the dough rest covered in the bowl for 1 hour to expand to twice its size.

After an hour, punch the dough down to deflate it and transfer the slightly sticky dough to a clean and slightly floured worktop.  Flatten dough to push out air bubbles inside the dough. Shape dough and place it inside the bread tin, seam side downwards. Let it proof for another 45 minutes to 1 hour, covered and placed in a draft free place.

Once the dough has rise over and above the brim, bake the bread in a preheated oven at 170C for 30 minutes.  After baking, remove the bread from the tin immediately and allow it to cool completely on a rack before slicing or serving.

Save

Save