Pumpkin Sourdough (No Recipe)

Pumpkin Sourdough // Mono + Co Pumpkin Sourdough // Mono + Co Pumpkin Sourdough // Mono + CoPumpkin Sourdough // Mono + CoPumpkin Sourdough // Mono + Co

No recipe because while mixing the dough, I got lost halfway jotting down how much flour I have topped up.  Did I stop after 2 tablespoons? Or was it 3?  But I remember starting the mixture with 270g of flour.  Without adding water, the dough was already wet with liquid from the starter, pumpkin, and honey.  I enjoyed the bread: sweetness from the pumpkin that ends with tangy flavor. Crumb is moist and slightly burnt crust was thin and flavorful.  Definitely worth trying again to find out the amount of flour I added.

Ingredients + steps for my future reference:
+ plain flour, unknown amount
+ 150g fed starter
+ 120g mashed steamed pumpkin
+ 2 tablespoons raw honey
Mix and left to autolyse for 1 hour.
+ 1/4 teaspoon sea salt
Knead with mixer until the salt is incorporated into the dough.
+ 18g cold cubed butter
Knead till window pane stage.
Transfer to a covered container and leave in the fridge for 1 day.
Next day, remove from fridge, shape the dough gently into a ball, creating a smooth and stretched outer surface.
Line the bottom of a dutch oven with rice flour.  Place the shaped dough inside, dust surface of dough with rice flour, score the loaf to liking and bake covered for 40 minutes in a preheated oven at 250C.  I made a 30 degree cut to create “ears”.
After 40 minutes, remove the cover and bake for another 20 minutes at 220C.  When done, transfer the bread to a rack to cool completely, at least 1 hour, before slicing or serving.

Pumpkin Sourdough // Mono + Co

Save

Save

Save

Save

Save

Save

Flaxseed Taro Loaf

Flaxseed Taro Loaf // Mono + Co Flaxseed Taro Loaf // Mono + Co Flaxseed Taro Loaf // Mono + Co Flaxseed Taro Loaf // Mono + Co

I applied a step from making sourdough bread to this yeasted recipe: only add salt to the dough after the autolyse stage.  It didn’t seem to make any difference to my taro bread recipe, but I thought my dough reached window pane stage slightly earlier than usual.  Someone else commented the same thing here so this could be making an impact on my bread just that I didn’t know. There is really no harm adding the salt later (I think) so I will be doing this for all my future bread recipes.

The flaxseeds were a last minute add-on.  Got them on a 20% offer, $5.44 for a 500g pack, and they are organic.  The bread rose tall enough after 50 minutes into its final proofing but I find the bread top too bare.  Before sending it into the oven, I mist the loaf with water and sprinkle a tablespoon of flaxseeds on top.


Flaxseed Taro Loaf

270g plain flour
1 teaspoon instant yeast
100g steamed taro
2 tablespoons raw honey
1 large egg
70g water
1/4 teaspoon sea salt
20g cold butter, cubed
1 tablespoon flaxseeds

In a mixer bowl, place these ingredients: plain flour, instant yeast, mashed and cooled steamed taro, raw honey, beaten egg and knead with a dough hook attachment on the lowest speed (KA 1).  Slowly add the water with the mixer running, you may need more or less of the water stated in the recipe.  Watch the dough, when the ingredients come into a ball,  stop adding and turn off the mixer.  Let the dough rest for 15-30 minutes.

After resting the dough, sprinkle the sea salt on the dough.  Start the mixer running on its lowest speed again to knead the dough for 1 minute, before adding cubed butter, one by one.  Knead until the dough reaches window pane stage, this is when the dough becomes very smooth and elastic, and starts to pull away from the sides of the bowl.  Remove the bowl from mixer, cover and bulk rise for 1 hour.

After an hour, the dough should rise and increase its volume, punch it down to release the gas, and transfer to a clean work top.  Flatten the dough to push out gas trapped inside the dough, either by hand or a rolling pin.  The dough is quite sticky, flour hands and worktop with flour to help with shaping.  Shape the dough into a log and place it in a greased bread tin, seam side facing downwards.  Let this sit in a draft-free place to rise for another 50-60 minutes.  When the bread has risen to the rim of the baking tin, brush some water on the surface and sprinkle flaxseeds even on top.

Bake in a preheated oven at 170C for 30 minutes.  Remove the bread from the pan immediately after baking, and let it cool on a rack completely before slicing or serving.

Store in an airtight container if not consumed immediately, to keep the loaf soft and the crumbs from drying out.

Save

Save

Save

Save

Step-By-Step Guide : Hand Sewn Produce Bag

My hand sewn drawstring bag turned out more useful than I thought.  Originally made to store my homemade bread, I have started using them for buying loose items like dried beans and mushrooms from the dry goods store.  I have also started using them for the fresh produce shop, for broccoli, cauliflower, tomatoes, carrots, fresh mushrooms….

I used this Tenugui from Daiso, measuring 87cm x 35cm.  Since they already come hemmed at the sides, sewing work is minimal.  I chose to sew a drawstring version so that the produce will not fall out from the bag.  An alternative is bag clip, this will be an even simpler project as there will be no need to sew a loop for the cord.

Fold and iron the shorter sides to create a loop for the string to go through later.

Start sewing.  I sew with a blind/invisible stitch so that the stitches can hardly be seen on the right side of the fabric.

Here is a great instructional video to illustrate the how-to.

If I use white color thread, the stitches will hardly be noticed.  Repeat the series of blind stitch on the other end.

To sew the side seam, I used the blanket stitch.  And here’s another video.

Stop sewing when you reach the loop section.

Repeat for the other side.

Flip the bag out.

I used a safety pin to guide a cotton ribbon through the loop.

Tie a knot with the ends and the cotton drawstring bag is done.  Handwash and line dry before use.

Save

Save

Save

Save

Save

Save

Walnut And Dried Longan Sourdough

Walnut and Dried Longan Sourdough // Mono + CoWalnut and Dried Longan Sourdough // Mono + CoWalnut and Dried Longan Sourdough // Mono + Co

The natural starter rose to more than doubled it’s original volume but I still have balance bread.  What to do when the bread baking schedule cannot catch up with the starter’s feeding schedule?

i. The easiest way is to skip a day of baking.
Discard starter to leave just 1/3 of the weight that you normally need (mine is 150g, so I discard to leave 50g of starter in the container)  for baking, feed it with equal amount of flour and water (mine will be 50g of flour and 50g of water) and leave it in the fridge.  By the time I need it for the next day or the day after, I simply return it to room temperature on the counter and once it rises to double or pass the float test, I will use it to mix the dough.  If the baking break is too long, and the starter does not appear to be active or doubling its volume, 1 or 2 more feedings might be required to reactivate its strength.  To do so, discard to leave  1/3 of the weight of the fed starter required by the bread recipe and feed with flour and water.  Repeat this once or twice a day until the starter regains back its strength.

ii. Make sourdough pizza dough like this.

iii. Make sourdough pancakes or waffles.

iv. I chose to bake a sourdough that requires 2-3 days of long fermentation time so that my bread consumption can catch up with my productive baking timetable.  After using 125g of my 150g fed starter for a Tartine’s walnut sourdough recipe, I feed it with another 20g flour and 20g of water to maintain a 60g starter.  This can then be kept in the fridge or leave it on the counter for next day to be fed for a different bread dough.

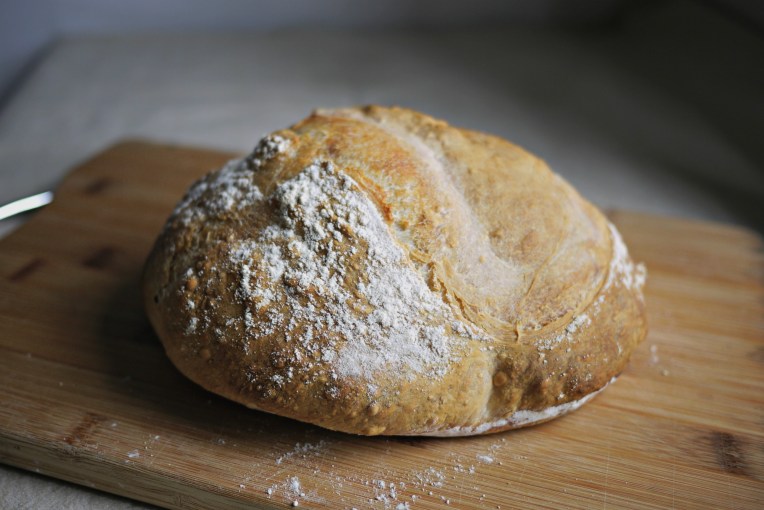
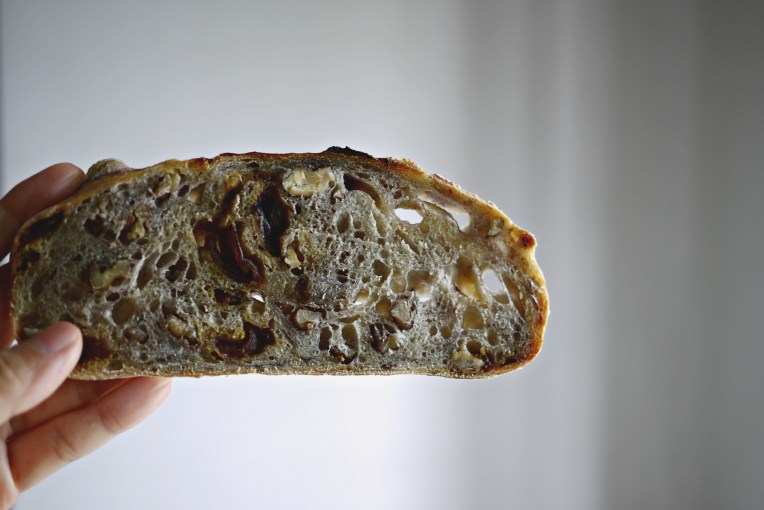
For this Tartine’s sourdough, I adapted from here, (I like the timetable he puts up) halved the recipe and added dried longans for sweetness.  Just like my previous Tartine recipe attempt, the dough was too wet to be shaped or handled at my 30C room temperature, so I let it final proof and ferment in its shaggy state in the container without shaping, only to gently gluten stretch it into a boule just before baking and it worked out fine.


TARTINE WALNUT DRIED LONGAN SOURDOUGH

adapted from the perfect loaf

125g fed starter
350g water
500g of plain flour
(original used 50g wholewheat 450g white flour)
10g sea salt 
25g water 
1 cup toasted walnuts 
1/2 cup dried longans **

** In a small bowl, rehydrate the dried longans by covering them with just enough water.  Gently squeeze out excess liquid before adding them to the dough.

In a large mixing bowl, add fed starter to 350g of water and stir with a wooden spoon to mix well.  Next, add plain flour, turn on mixer to knead with a dough hook to form a wet dough.  Cover the bowl and leave this aside for 40 minutes (I left mine to autolyse for 60 minutes.)

Sprinkle sea salt over the dough and pour the remaining 25g water, start the mixer and knead on its lowest speed setting.  The dough by now will appear very stretchable and doesn’t stick to the side of the bowl while the mixer is running.  Stop once the salt and water has appeared to be mixed well into the dough.  Remove bowl from mixer and transfer this to a covered container.  Leave this in the fridge for 1st fermentation.  The original recipe did its bulk rise and turns immediately after this.  I wasn’t in any rush, so I gave the dough a whole day in the fridge.

Next morning, take out the dough from the fridge and do a series of turns 6 times at 30 minutes interval.  No need to bring the dough to room temperature.

Turn 1 : Reach of the dough from the bottom of the bowl and pull up to tuck it to the opposite side of the bowl.  Turn the bowl and repeat for another pull-stretch-tuck action for about 3 more times till one round is completed. Leave this aside for 30 minutes.

Turn 2 : Repeat the same pull-stretch-tuck action, when completed, add the walnuts and rehydrated longans and roughly mix them into the dough with few folding actions.  Leave aside for 30 minutes.

Turn 3 –  6 : Repeat as above.  By the end of the 6th turn, cover the container and put the dough back into the fridge for another overnight retardation.

When ready to bake, preheat the oven to 250C.  Take out the dough from the fridge and shape the cold dough gently into a ball, careful not to break up too much of the air pockets that has built up inside the dough.  Place the dough inside a floured dutch oven pot.  Sprinkle flour on surface and score, cover the pot and put it into the preheated oven bake for 40 minutes.

After 40 minutes, remove the cover, reduce the oven temperature to 220C and bake for another 30 minutes.

Cook on rack completely for at least 1 hour before slicing.

Save

Save

Save

Save

Save

Save

Save

Save

Save

Save

Save

Save

Hand Sewn Drawstring Bag

Hand Sewn Drawstring Bag // Mono + Co

I wanted to hand sew a drawstring bag to store my home baked bread when these Tenugui with cute animal prints caught my eyes at Daiso.  Made of 100% cotton, these hand towels come in a dimension that is perfect to be turned into a drawstring bag with a few simple folds and blanket stitches without cutting the fabric.

These bags are also in the perfect size for buying in bulk stores for nuts, grains, onions, potatoes, carrots etc.  No more bulky containers when grocery shopping!

Hand Sewn Drawstring Bag // Mono + CoHand Sewn Drawstring Bag // Mono + CoHand Sewn Drawstring Bag // Mono + Co Hand Sewn Drawstring Bag // Mono + CoHand Sewn Drawstring Bag // Mono + Co

Save

Save

Save

Save

Simple Pleasures

Simple Pleasures // Mono +Co

// these hand-sewn cotton bags for shopping in bulk, sewing more out of excess tea-towels I have at home.

Simple Pleasures // Mono +Co

// this meat-free request at a cafe, it’s getting easier nowadays.

Simple Pleasures // Mono +Co

// shopping for eggs, look ma, no disposable plastics!

Simple Pleasures // Mono +Co

// a foot soak update, less than $2 spent.

Simple Pleasures // Mono +Co

// this sourdough toast, best eaten plain.

Tartine’s Country Bread

Tartine's Country Bread // Mono + Co

This sourdough bread almost didn’t make it to the baking stage as I found it too sticky to shape at room temperature.  After going bulk fermentation overnight and 4 turns at 30-minute intervals to carry out a series of stretch-and-fold action,the dough became more and more sticky as it returned to room temperature.  By the time I had reached the last turn, the wet dough obviously looked like it won’t survive beyond my somewhat still botchy shaping skills.

Tartine's Country Bread // Mono + Co

But my natural starter has been surprising me pleasantly for the past few bakes, so I was curious how this bread will turn out, with a nice shape or not.  Plus the recipe I referred to also bake the bread straight out of the fridge.  So I placed the dough back into the fridge overnight to firm it up again, swiftly removed the entire dough out of the container it while it is cold the next morning, shaped the dough by creating a tight gluten cloak, sprinkled some flour on the surface, created a deep slash before sending it into a preheated oven at 220C for 1 hour.

Tartine's Country Bread // Mono + Co

True enough, my starter did not disappointment me this time either.

Tartine's Country Bread // Mono + Co Tartine's Country Bread // Mono + Co

Save

Save

Save

Save

Natural Starter Taro Chia Seed Bagel

Natural Starter Taro Chia Seeds Bagels // Mono + Co

I bake bread fervently for two reasons. One. To have control over the ingredients that goes into mine, that means no artificial flavors or unfamiliar additives that I can’t pronounce.  Two.  To avoid packaging, especially the plastic ones from commercial bakeries.  I have taken an extra step to buy as many ingredients as possible without packaging by sourcing them from dry goods stores at wet markets.  I am so glad that I have found plain flour, sold in bulk.  Being the main ingredient of bread, that’s a lot of plastic bags avoided, but there is still no avail for wholemeal flour.

Natural Starter Taro Chia Seeds Bagels // Mono + CoNatural Starter Taro Chia Seeds Bagels // Mono + Co

I am not a great fan of bagels but I am intrigued by that overlapping end that gives bagel its signature handmade look.  Some recipes suggest simply poking a hole through a dough ball and shape it further like a donut.  I found the method of flattening one end of a cylindrically shaped dough and wrap this end around the other end most useful.  For more shaping techniques, check out here and here.  The method I adopted is demonstrated with photos in the recipe section.

Natural Starter Taro Chia Seeds Bagels // Mono + Co

After proofing, the size of the hole became smaller as the dough expanded.  It was reduced further to resemble a belly button after boiling in water before baking.

Natural Starter Taro Chia Seeds Bagels // Mono + Co Natural Starter Taro Chia Seeds Bagels // Mono + Co Natural Starter Taro Chia Seeds Bagels // Mono + Co

I boiled these bagels in a small pot of water with honey added to get these golden brown effect after baking.  As this recipe yields 6 bagels, I boiled them one by one for 1 minute on each side, so that I won’t waste a big pot of water as well as honey, which is expensive.  Alternatively, cheaper malt syrup can be used.


Natural Starter Taro Chia Seed Bagel

160g fed starter
200g plain flour
100g steamed taro, mashed
3 tablespoon milk powder
45g water
1/4 teaspoon sea salt
30g cold butter, cubed
1 tablespoon chia seeds

In a mixer bowl, add fed starter, plain flour, cooled mashed taro, milk powder, and water. Start mixer to knead on its lowest speed with a dough hook until all the ingredients come into a ball.  Stop the mixer and let the dough rest for 15 minutes to allow the flour to absorb the liquid better.

After 15 minutes, sprinkle the sea salt on the dough and start the mixer again to knead for 1-2 minutes before adding cubed butter one by one.  Knead until the dough reaches window pane stage.  Add chia seeds to incorporate.  Stop mixer and leave the dough in the covered mixer bowl to bulk rise at room temperature for 120 – 150 minutes, until the dough expands and passes the poke test, a sure sign that the first fermentation stage is completed.

After the dough has risen to double its volume, punch down the dough to deflate and transfer to a clean worktop.  Sprinkle worktop and palms with flour if the dough is too sticky to handle.  Divide the dough into 6 portions, mine’s around 100g each.

Take one of the dough and roll it on the worktop to get a cylinder shape, about 30cm long.  Using a roller pin, flatten about 5 cm of one end, then join the two ends to make a loop with the dough and overlay the flatten end to wrap the other end.

Natural Starter Taro Chia Seeds Bagels // Mono + CoNatural Starter Taro Chia Seeds Bagels // Mono + CoNatural Starter Taro Chia Seeds Bagels // Mono + Co

Arrange on a baking tray.  Repeat with the rest of the dough balls.  Proof these for an hour.

Fill up 3/4 pot with water, I used my smallest 16 cm diameter one to save water, and add 1 tablespoon of honey.  Bring the water to boil.  Gently pick up a bagel dough, and transfer it into the pot of boiling water, with its top side facing down.  After 1 minute, flip the bagel and continue to cook for a further 1 minute.  Remove the cooked bagel from the pot, and drain on a sieve, before arranging it on a baking pan.

Bake in a preheated oven at 200C for 8 minutes. Turn the tray and bake for a further 7-8 minutes till the surface turns golden brown.

Save

Save

Save

Save

Save

Save

Save

Save

Save

Natural Starter Pumpkin Pullman Loaf

Natural Starter Pumpkin Loaf // Mono+Co Natural Starter Pumpkin Loaf // Mono+Co

I am so addicted to the height my natural starter gives to all the homemade bread.  The dough might take longer to bulk rise or ferment, but the magic they do once they are in the oven is amazing.

Natural Starter Pumpkin Loaf // Mono+Co

I sprinkled a mixture of white + black sesame seeds and slashed the loaf top lengthwise for decorative effect because I know the natural starter will create an oven spring that gives the loaf a beautiful split top look.  And I was not disappointed.

Natural Starter Pumpkin Loaf // Mono+Co Natural Starter Pumpkin Loaf // Mono+CoNatural Starter Pumpkin Loaf // Mono+CoNatural Starter Pumpkin Loaf // Mono+Co


NATURAL STARTER PUMPKIN PULLMAN LOAF


150g fed starter **
245g plain flour
100g steamed pumpkin
2 tablespoons brown sugar
17g water
1/4 teaspoon sea salt
20g cold butter, cubed
1 tablespoon black + white sesame seeds

** I used a starter made from raisin yeast.

In a mixer bowl, add the starter, plain flour, cooled and mashed pumpkin, and brown sugar.  Start mixer to knead on its lowest speed with a dough hook, and add water in a trickle until a dough ball is formed.  You might not use up all the water or you might need more, depending on the hydration level of the ingredients, especially with pumpkin.  Stop the mixer and let the dough rest for 15 minutes to allow the flour to absorb the liquid better.

After 15 minutes, sprinkle the sea salt on the dough and start the mixer again to knead for 1-2 minutes before adding cubed butter one by one.  Knead until the dough reaches window pane stage.  Stop mixer and leave the dough to bulk rise at room temperature for 120 – 150 minutes, until the dough expands and passes the poke test, a sure sign that the first fermentation is completed.

After the dough has risen to double its volume, punch down the dough to deflate and transfer to a clean work top.  Sprinkle worktop and palms with flour if the dough is too sticky to handle.

Flatten the dough with a rolling pin to push out air bubbles trapped inside during the bulk rise stage.  Shape the dough into a long roll that fits inside a Pullman tin, mist the top of the dough with some water, and sprinkle black and white sesame seed mix on top evenly.  Then place the dough in the tin and proof for another 120 – 150 minutes, till the bread height rise to reach the top of the tin.  Make a deep slash across the top of the dough, lengthwise, before baking in a preheated oven at 200C for 25 minutes.

Remove bread from tin immediately after baking and cool completely on a rack before slicing or serving.

Save

Save

Save