Milk Bread Loaf

milkbread2 milkbread1milkbread3milkbread4
This Sweet Milk Bread recipe is a keeper.  Original 元子’s recipe had plain water and whole egg.  After 2 bloggers’ modifications (1st here, then here), the recipe now uses fresh milk and egg whites instead.  My final proof took almost 4 hours for the dough to rise and fill 80% of the loaf pan, but I think the overall texture was worth the wait.

As with all fresh homemade bread (no additives, bread improver, blah, blah), finish it up within 2 days.  On day 3, bread sort of dried out, and turned crummy, even though I only slice it before eating

Made notes below next to the ingredients to remind myself what I have used or tweaked.  So far, all my 3 attempts have been very successful.

The Big Man asks for consistent taste in his daily bread, commented that I have attempted far too many different milk/sweet bread recipes.  I think this is his way of saying that I should stick to this recipe.

MILK BREAD
//Adapted from Eileenの记事本

INGREDIENTS:
250g bread flour (I used Prima) / plain flour (I used Sheng Siong house brand, Happy Family)
50g fine sugar
65g egg white
100ml fresh milk (I used Meiji full cream)
8g milk powder (I used Fernleaf)
1/2 teaspoon instant yeast
1/4 teaspoon salt
25g unsalted butter (I used SCS and Anchor)

Oven Temp : 170C
Bakeware : Bread Loaf Pan

1. In a mixer with paddle attachment, mix well all ingredients except butter at low speed.
2. Change to a dough hook attachment, add in butter, and continue mixing till window pane stage, about 20 minutes.
3. Remove mixing bowl from mixer, cover with a clean tea towel, and leave it aside for 1 hour, The dough will rise to approximately twice its original size.
4. Punch down the inflated dough, and pour it out onto a clean worktop.
5. Evenly divide the dough into 3 portions (approx 160g each), roughly work them into balls and leave it covered for 15 minutes with the tea towel.
6. Flatten and roll out with a pin and roll up dough like a swiss roll from the shorter end.  Leave dough aside for another 15 minutes.
7. Repeat step 6, this time pinching the seams to seal tightly.  Arrange the 3 rolled up dough with seam facing down into the loaf pan.  Final proof till dough rise up to fill 80% of the pan.
8. In a preheated oven at 170C, bake for 35 minutes.
9. Remove the bread from the baking tin immediately after the baking is done.  Leave the bread on a cooling rack to cool completely before slicing.

For a better understanding of Step 6-7, See Photos Here.

Easy Peasy Honey Drizzled Cinnamon Rolls

cinnamonrolls // mono+cocinnamonrolls // mono+co

I have never seen an easier cinnamon roll recipe than the one from The Pioneer Woman.

++Notes 001 // I substituted the maple icing with pure honey as topping.

++Notes 002 // The original recipe makes 40-50 cinnamon rolls.  I halved the recipe, to feed my small family.

++Notes 003 // Her step-by-step instruction here, completed with photos, really useful.

++Notes 004 // Original recipe asked for the dough to be used right away after adding baking soda, baking powder and remaining flour.  But I could not roll it out as it was too wet, so I proofed it for another hour and this made the dough easier to handle.  Recipe also stated that chilling the dough in the fridge for an hour before hand will also make it easier to handle.  Remember always to cover the dough with a clean towel to prevent the surface of the dough from drying out.

++Notes 005 // Dough can also be kept in fridge for up to 3 days.  But take note that the dough will still rise and need a “punch-down” once a while when it rises above the bowl.

++Notes 006 //Overnight buns will taste better if reheated in a toaster oven for 2 minutes.

RECIPE : EASY PEASY HONEY DRIZZLED CINNAMON ROLLS
/ Source
/ Makes 25 buns

____________

Dough

2 cups whole milk
1/2 cup vegetable oil
1/2 cup sugar
2 tsp instant yeast
4  1/2 cup plain flour
1/2 tsp baking powder
1/2 tsp baking soda
1/2 tbsp salt

Filling

1 cup melted butter
1/8 cup ground cinnamon
1 cup sugar, white or brown

Icing/Topping

Pure honey

____________

Dough

Heat the milk, vegetable oil, and sugar in a medium saucepan. Do not bring the mixture to a boil.  Set aside and cool to lukewarm.  Sprinkle the yeast on top of the mixture, do not stir and let it sit on the milk mixture for 1 minute.

After 1 minute, pour in 4 cups of the flour. The remaining 1/2 cup will be added later after the dough rise/first proofing. Stir until just combined, then cover with a clean kitchen towel, and set aside in a relatively warm place for 1 hour.  I left it standing on the still-warm stove.

After 1 hour, the dough would have risen.  Add the baking powder, baking soda, salt, and the remaining 1/2 cup flour on top of the still a-bit-too-wet dough. Stir to mix in the added dry ingredients.  Cover back again with towel and set aside for another hour.*

On a clean worktop (recipe suggested floured surface, but I could manage without), roll the dough thinly into a 30 x 10 in rectangle.

Filling

Pour melted butter over the surface of the dough. I pour about 3/4 cup of it before it starts to flow over the dough.  I reserve the remaining and pour them over the arranged buns on the pan, so that they stay in/on the bun, not on my work top.

Using fingers, spread the butter evenly all over the dough.  This is my favorite part of the recipe:-)

Sprinkle ground cinnamon first then sugar over the butter.  According to Ree, The Pioneer Woman, “Gooey is the goal.”

Assemble

Next, with the longer side facing you, roll up the dough towards you, taking care to roll it really tight.  I use a food scraper to scoop up the fillings into a bowl that oozes out as the dough is being rolled up.  I then pour them over the dough before them are being baked.  No waste!

When reaching the end, pinch the seam tightly to seal the roll.

Place the log roll on a cutting board with seal facing down, and cut 1/2-inch slices with a very sharp knife.

Grease a baking tray by pouring some melted butter on it.  Arrange the sliced rolls in the tray, leaving some space in between.  The dough will expand further, and even more during baking.  You can pour the remaining melted butter + cinnamon butter sugar goo on the dough now.

Preheated oven now to 180C/375F.  Leave the dough covered to rise for another 20 minutes before baking.  The oven should be done by the time the dough rises for one last time.

Bake for 15 to 18 minutes, until golden brown. Don’t allow the rolls to become overly brown.

Remove buns from the oven. Immediately drizzle honey over the top of the hot buns.  About 1 tablespoon per bun.  And more on the sides and edges.

Serve warm.

Updated : A Squarer Softmeal Bread

softmeal loaf // mono+co softmealloaf// mono+co

This softmeal recipe actually has a version 2.0. The updated recipe has a 60-80 minutes of proofing time after all the ingredients are mixed and kneaded till window pane stage.

++Notes001 // If the loaf has a more rounded corner, this means it could have done better with a longer proofing time.  I final proof the bread for an additional 15 minutes, and it turned out better.

++Notes002 // This is the first attempt with the updated recipe, ingredients remaining the same, but slot in a 60 minutes of first proof, and a slightly longer final proof in the end.

SOFTMEAL BREAD
// Adapted from Kitchen Corner
// Yields One 10″x10″x20″ Square Loaf

INGREDIENTS

  • 30g wholemeal flour
  • 270g bread flour
  • 3g instant yeast
  • 6g sugar
  • 5g salt
  • 240ml cold fresh milk
  • 12g unsalted butter, cubed

METHOD

01. In a mixing bowl, add both types of flour, yeast and sugar, stir to mix well.
02. Pour in salt, but do not stir or mix in at this moment.
03. Turn on the mixer at low speed (I used KitchenAid Speed 1) and with a flat beater attachment, gradually pour in the cold milk, mix till ingredients are just combined.
04. Add in the cubed butter, continue mixing for 2 minutes.
05 Change to a dough hook, and knead at low speed for 20 minutes, or till window pane stage. I increased the mixer speed to level 2 for the final 5 minutes. You can tell that the bread dough is ready and gluten has fully developed when the sides of the mixing bowl is clean, now that the dough is more elastic and doesn’t stick as easily to the sides anymore. If this stage has not been reached, keeping the mixer going, checking every 5 minutes.
06. Remove the mixing bowl from mixer and use one hand to knead the dough into a neat ball. At this stage, the dough should not be too wet but they will still stick to fingers. I apply some butter to my fingers to handle the dough better.
07. Leave the dough in the mixing bowl for 60 minutes. Cover the bowl with a clean towel.
08. After 60 minutes, transfer the dough onto a clean table top or any smooth working surface. You may also oil the working surface slightly with butter to prevent the dough from sticking to it.
09. Divide the dough equally into 2 balls. Mine is About 290g each.
10. Shape the bread accordingly to the method here and arrange them in a greased bread tin.
11. Let the dough goes through a final rise in the bread tin, covered with the clean towel again.
12. When the dough rises to fill up about 90% of the tin, turn on the oven and preheat to 210C. Mine takes about 6 minutes to preheat, adjust accordingly if the oven takes a longer time to heat up.
13. Cover the bread tin, bake it for 40 minutes on the middle rack.
14. When the bread is done, remove it from the tin immediately and cool it completely on a rack before slicing or serving.

Cranberries and Raisins Mini Buns

minibuns // mono+co minibuns // mono+co

No bread improver or softener.

++Notes001 // If the leftover buns stored overnight have slightly dried out, warm up in a toaster or oven, they’ll turn soft back. But only for a while, say not more than 1 minute.  And warm them up just before eating.  If let them cool down, they’ll only turn harder than before.

++Notes002 // Brush melted butter over the bread when they are just freshly out of the oven is important, helps to keep the buns soft.

CRANBERRIES AND RAISINS MINI SOFT BREAD ROLLS
// Adapted from a sweet dough recipe from this book
// Makes 10 mini buns


- 174g bread flour
- 43g plain flour
- 13g milk powder
- 7g instant yeast
- 39g white castor sugar
- 2g salt
- 22g beaten egg
- 100g water
- 22g unsalted butter
- dried cranberries or raisins

METHOD

01. Sift both types of flour, yeast and milk powder in a bowl. Set aside.
02. In a mixing bowl with a flat beater,  mix sugar, salt, egg and water, on speed 1 for 2 minutes or till well combined.
03. Add flour and milk powder mixture, and run the mixer on speed 1 till the ingredients form a ball.
04. Change to a dough hook, and knead at speed 2 for about 5 minutes.
05. Add in butter, and continue to knead at speed 2 till dough reach window pane stage.
06. Remove bowl from mixer, knead the dough with hand into a neat ball, cover it with a clean tea towel and proof it for 90 minutes, when the dough expands to twice its size.
07. Pour out the expanded dough on a clean kneading board/tabletop, and knead the dough again, pushing out gases inside.
08. Divide and shape the dough equally into 10 small balls (about 40g each).  Set aside to rest for 10 to 15 minutes.
09. Flatten each dough gently with palm, place a teaspoon of raisin/cranberries/or a mixture of both in the center.
10. Shape the dough into a ball and arrange on a baking tray.  Proof for another 45 minutes.
11. Bake in a preheated oven at 170C for 10 minutes or until the buns turn golden brown.
12. Remove from oven and brush each of the bun’s top with melted butter immediately to keep the buns soft, even after cooling down.

Artisan Bread In 5 Minutes A Day – My First Attempt

ABin5 // mono+co ABin5 // mono+co ABin5 // mono+co ABin5 // mono+co ABin5 // mono+co

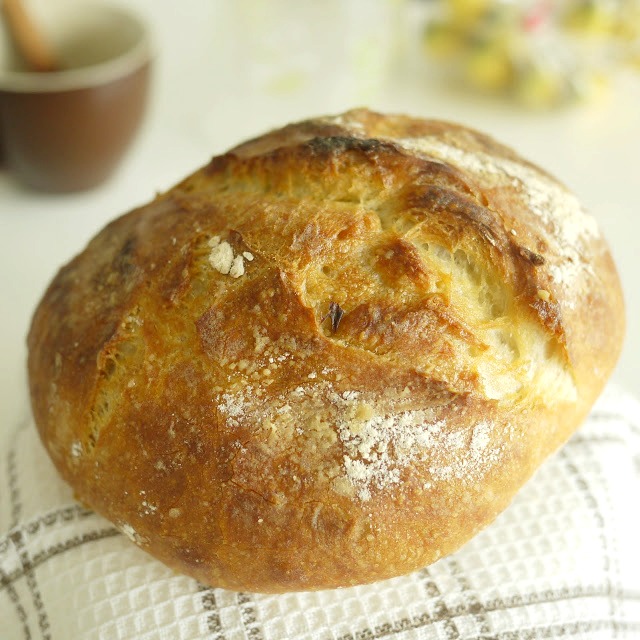
The book, Artisan Bread In 5 Minutes A Day(ABin5), that advocates the making of good quality artisan bread at home quickly and easily has been on the retail shelves for quite some time.  But I have been using another No-Knead Bread Recipe and Video Demonstration from NY Times – without a single success.  I attributed my result of dense loaves with thick -PLUS – hard crust to the fact that I do not own a dutch oven to bake the bread, a necessity tool for the No-Knead recipe.  But I kept on trying, using any oven-safe cookwares available at home that comes with a lid.  What was I thinking?  But I realized that my few failed attempts have actually taught me quite a few things when I tried the Basic Master Recipe in ABin5.

So what did I learn?  First of all, do not fear a wet dough.  By comparison, the ABin5 master recipe was not as wet as the NY Times one.  I even had the ‘courage’ the add another half a cup of water when my dough did not appear as wet as the ones I have seen on the web.

Secondly, patience in bread making.  Having waited up to 18 hours for the dough to be ready in the other recipe, the 5 hours wait for this one seemed manageable.  In fact, I left the chilled dough in the fridge for one more day before I used it to bake my first loaf.   Why?  Because the recipe says that the dough can be kept up to 14 days in the fridge, and the taste of the bread will get better with an aging dough, taking on a similar characteristic of a sourdough.  While my bake with a 2-days-old dough did not taste anything like a sourdough, I could still feel its huge potential in churning out batches after batches of delicious batard, brioche, or even pizza base (that’s covered in their latest recipe book, Artisan Pizza And Flat Bread In 5 Minutes A Day).  In the meantime, I will chuck another bin of newly prepared dough to the back of the fridge for 10 days.  Ready for sourdough?

I have bookmarked the book’s official website in my computer.  The FAQ section offers many useful tips to make sure this wonderful recipe works.  I also noted that the 2 authors respond very promptly to readers who post their bread making questions on the website, and new recipes are often tried out and updated.  How about using a slow cooker to bake your bread?


Recipe for Artisan Bread – adapted from “Artisan Bread In 5 Minutes A Day” recipe book, by Jeff Hertzberg and Zoë François (Thomas Dunne Books, 2007)

Yields 4 x 1lb loaf

- 3 cups lukewarm water
 - 1 tablespoon granulated yeast (I used instant)
 - 1 tablespoon salt
 - 6 1/2 cups (2 lbs) all purpose flour

Preparing The Master Dough:

Put water, yeast and salt, in a plastic container.

Dump all flour at once and stir till the ingredients are just mixed, do not knead. (*1)

Cover lid, but do not snap shut, so that gas can escape from the container. (*2)

Allow the dough to rise for 2 hours in room temperature.  By now, the dough could rise up twice its original volume,  Bubbles will appear popping on the surface. (*3)  Do not punch down the dough.

The dough can now be used for baking.  Or it can be stored in the fridge with its cover (again, not tightly shut to allow gas to escape) for up to 14 days.  Chilling the dough will make it easier to manage.

Baking:

Preheat oven to 450F/230C, with a baking tray on the middle rack, and a broiler below.

Take out the dough from the fridge, and dust the surface with some flour, so that it won’t stick to your hands when retrieving the dough.

Pull out a piece of dough and cut out about the size of a grapefruit , or weigh 1lb.  Return the rest of the dough into the fridge.

Form the dough into a ball, gluten coated.  Sprinkle flour on surface as you go for easier handling, but take care not to incorporate the flour into the dough.  Handle the dough gently at this stage, do not knead, press or squeeze out the air that has expanded inside the dough.

Rest the shaped dough on a piece of parchment paper for 40minutes (*4)

Slash the loaf so that it does not split at the bottom during baking.

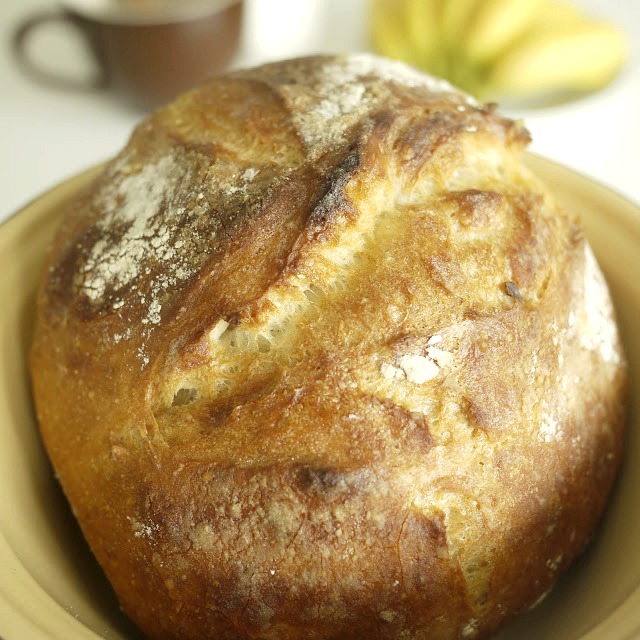
Place the dough with the parchment paper on the heated baking tray in the oven.  Throw some ice cubes on the broiler to produce steam.

Bake for 30-35minutes.

Remove the parchment paper after 20minutes of baking, and continue to bake the bread on the tray to create a crispy bottom crust.

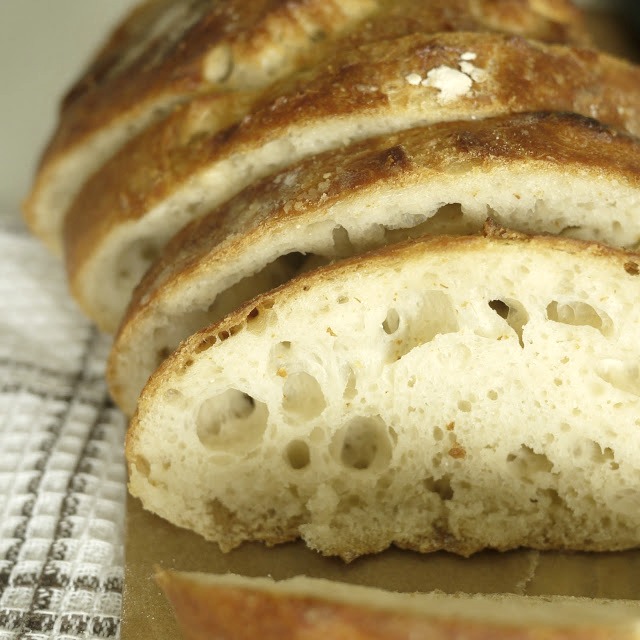
Allow the loaf to cool completely on a rack to room temperature before slicing it.  Otherwise, the bread will end up with a hard crust and a gummy interior.


My Notes:-

(*1) The end result should not be in the consistency of a ball dough, if it does, add some water.  I added 1/2 cup more for this first attempt.

(*2) My container did not have a lid, so I used a cling wrap to cover the container.

(*3) For some reason, mine took 5 or 6 hours to reach this stage, which is fine, as some readers have indicated on the website.  Something to do with the amount or types of yeast, I guess.

(*4) The longer it rest, (e.g. 60 to 90 minutes), the more open whole structure it creates.  Take your preference.  And delay the time needed to start preheating your oven.

This video is useful to show how to prepare the dough (3:00) and shape a basic loaf (4:20).