Natural Starter Country Loaf

Natural Starter Country Loaf // Mono + Co

If there is anything that I have too much of in the fridge right now, it will be my raisin yeast starter.  About 200g of it in 3 different glass containers, resting in deep slumber at the back of my chiller.  I am slowly cleaning out one of the bottles with a schedule that yield 160g of active starter in 2 days.

Natural Starter Country Loaf // Mono + CoNatural Starter Country Loaf // Mono + Co

My chilled starter, I reckoned to be pretty healthy, gets all ready by 2nd feeding.  The timetable goes roughly like this:

Day 1 / 7am
start with : 20g of dormant/chilled starter + a clean glass/ clear plastic jar with at least 300ml capacity
add : 20g filtered water and 20g plain flour
stir : with a clean wooden chopstick to mix well until no visible traces of white flour

set aside : at room temperature (28-30C) for 24 hours
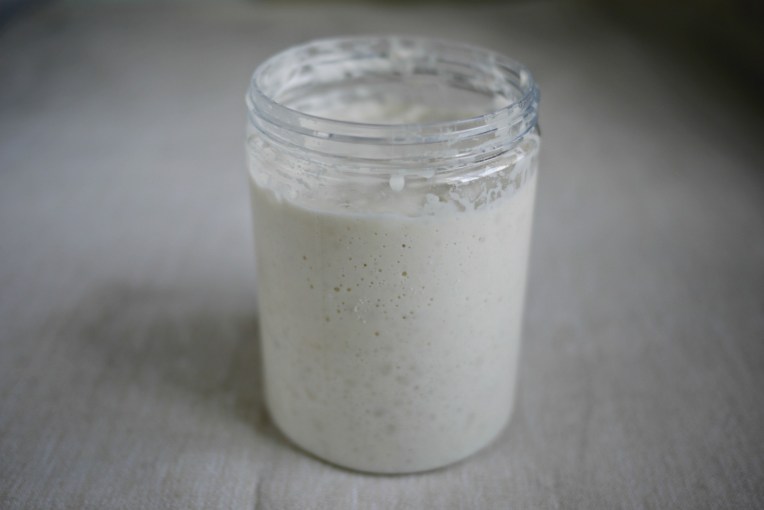
Day 2/ 7am
add :  50g filtered water and 50g plain flour to the 60g overnight starter
stir : with a clean wooden to mix well until no visible traces of white flour
set aside : at room temperature, ready to use when the starter rise to double/triple its volume, mine took around 4-5 hours
** After emptying the bottle, I do not wash it.
Instead, I reuse it to start the steps all over again, hoping that the activated starter remains in the unwashed bottle helps to kickstart the next batch making them stronger and faster to rise.

Proceed to bake your favorite bread.  I used mine to bake a country loaf recipe from this book,  but lend a slow fermentation technique from this blog to bake the end product.

Natural Starter Country Loaf // Mono + Co


Natural Starter Country Loaf

adapted a recipe from this book
295g plain flour
160g fed starter
6g salt
183g cold water

In a mixer bowl, add plain flour, ripe starter and salt.  Start the mixer to knead the ingredients on its lowest speed. Pour cold water slowly into the mixer bowl with the mixer running.

Continue to knead for 5 minuted, until the dough looks smooth.  This dough will be sticky.  Transfer to a covered container, and leave this in the fridge for 2-3 days.

Return the dough to room temperature and let it rise to double its volume, this will take about 3-5 hours depending on room temperature.

Transfer the dough onto a generously floured worktop.  With flour hands and a bench scraper, stretch and fold the dough into a rectangle shape like this.  Stretch and fold the dough 2 times.  Cover the dough with an inverted large mixing bowl or large plastic container and let it rest for 1 hour on the worktop. Repeat the stretch and fold steps again after 1 hour, and let it rest for a further hour.

Shape the dough and transfer to a well floured baking tray.  Cover and let rise for 2-3 hours.  I divided my dough into 2 equal portions and shaped them into long loaves.

When ready to bake, preheat the oven to 200C.  Make a few slashes on the surface with a sharp knife just before sending the bread into a preheated oven to bake for 35-40 minutes.

Cool on rack completely before slicing to serve.

Save

Save

Save

Save

Save

Save

Save

Save

Passion Fruit Walnut Taro Country Bread

Passion Fruit Walnut Taro Country Bread // Mono + Co

Something I tried out after noticing that my natural starter is getting stronger and more predictable.  Taro and passion fruit pulp are added to my usual taro bread recipe, skipping the butter.

Passion Fruit Walnut Taro Country Bread // Mono + Co Passion Fruit Walnut Taro Country Bread // Mono + Co

Sometimes things progress so slow that I can’t tell whether it has risen or not after 2 hours.  A photo taken before and after helped a lot.

Passion Fruit Walnut Taro Country Bread // Mono + Co

Stretch and fold is one of my favorite part of bread making.

Passion Fruit Walnut Taro Country Bread // Mono + Co

While slashing is the least….

Passion Fruit Walnut Taro Country Bread // Mono + Co

The result is a loaf with thin crackling crust and soft interior.

Have fun trying this recipe!


Passion Fruit + Walnut + Taro Country Loaf

160g natural starter
235g bread flour
1/4 teaspoon sea salt
85g mashed taro
pulps from 2 passion fruits
50g beaten egg
50g walnut, chopped roughly

In a mixer bowl, combine natural starter, bread flour, sea salt, mashed taro, passion fruit pulp and beaten egg.  Knead with a dough hook, the ingredients should come into a dough ball without any water added.  If it doesn’t, slowly add some water, spoon by spoon, till a ball is formed.  Stop the mixer and leave the dough to rest for 15 minutes. Knead with a dough hook until window pane stage.

After 15 minutes, start the mixer again and knead until window pane stage.  Remove bowl from mixer, and let the dough bulk rise for 2-3 hours, till the dough rise to double its volume.

Transfer the dough to a clean work top.  Sprinkle worktop and palms with flour if the dough is too sticky to handle.

Pour in the chopped walnuts. Stretch and fold the dough to incorporate the walnut into the dough, and firming up the dough at the same time.  I refer to this video all the time, demonstrating the stretch and fold method. Then cover the dough to rest for 60 minutes.  Repeat the stretch and fold + 60-minute resting time one more time.

Shape the dough this way, and place it on a floured tray or banneton and let it rise for about 2 hours.

When ready to bake, make a slash in the center with a sharp knife before placing it in a preheated oven at 200C, and bake for 35 minutes.  I created “steam” by placing my smallest ramekin with some ice cubes in the oven.

When done, remove bread from oven and place on a rack to cool completely before slicing.

Save

Save

Save

Save

Save

Save

Save

Natural Starter Raisin Taro Loaf

Natural Starter Raisin Taro Loaf // Mono + Co

I pick up the natural starter baking habit lately, feeding the yeast early in morning, have the bread proofed, shaped and ready to be baked by end of the day.  All completed within 12 hours in a 30C+ room temperature.

Natural Starter Raisin Taro Loaf // Mono + Co

The natural yeast starter I made from raisins is very strong.  After almost 1 month of ignoring it, leaving it at the back of the fridge, it came back alive, bursting with bubbling activity, tripling its volume after just 2 feedings.  The conversion of this natural starter in my root vegetable bread recipes was also a breeze.  Here’s to more healthy homemade bread!

Natural Starter Raisin Taro Loaf // Mono + CoNatural Starter Raisin Taro Loaf // Mono + CoNatural Starter Raisin Taro Loaf // Mono + Co

The few natural starter bread loaves I have baked so far, adapted from my taro bread recipes, took about 2.5 – 3 hours for the dough to rise above the bread pan.

Natural Starter Raisin Taro Loaf // Mono + Co

The crumbs were tighter, denser but still soft.  Another difference between baking with commercial yeast and natural yeast is that the bread continues to rise dramatically during baking.

Natural Starter Raisin Taro Loaf // Mono + Co

So now that I have attempted the taro bread loaf with natural starter, I will try out my next few bakes with other vegetables to test out if starter ratio to flour is the same.


Natural Starter Raisin Taro Loaf

160g natural starter **
265g plain flour
1 tablespoon raw sugar
1/4 teaspoon sea salt
100g mashed taro
65g cold milk
20g cold butter, cubed
55g raisins ***

** Raisin yeast starter.

*** Soak raisins in a bowl of warm water for 30 minutes.  Drain and gently squeeze dry to remove excess liquid before use.

In a mixer bowl, combine all the dry ingredients together ( flour, sugar, sea salt) with a hand whisk.  Then add natural starter, cooled mashed taro and half of the milk.  Turn on the mixer to knead with a dough hook.  With the mixer running on its lowest speed (KA 1), pour the milk slowly in a trickle until the ingredients come into the ball.  You might not use up all the milk or you might need more, depending on the hydration level of the ingredients.  Once a dough ball is formed, stop the mixer and let the dough rest for 15 minutes to allow the flour to absorb the liquid better.

Start the mixer again to knead for 1 minute before adding cubed butter one by one, and knead till the dough reach window pane stage.  Add raisins while mixer is running and knead for about 1 minute to incorporate the raisins into the dough.  Stop mixer and leave the dough to bulk rise at room temperature for 120 – 150 minutes, until the dough expands to double its volume.

After the dough has risen to double its volume, punch down the dough to deflate and transfer to a clean work top.  Sprinkle worktop and palms with flour if the dough is too sticky to handle.

Divide the dough into 2 equal portions.  Flatten and shape each portion into a tight ball.  Arrange them in a well greased Pullman bread tin, seam side downwards.  Leave this aside to proof for 120-150 minutes, covered with a towel.

Preheat oven to 160C, and bake the bread for 35 minutes.

When done, remove bread from tin immediately and place on a rack to cool completely.

Save

Save

Save

Save

Save

Save

Save

Save

Save

Save

Save

Save

Save

Save

Save

Save

Save

Chocolate Raisin Bread

Chocolate Raisin Potato Bread Loaf // Mono + CoChocolate Raisin Potato Bread Loaf // Mono + Co   Chocolate Raisin Potato Bread Loaf // Mono + Co

Chocolate bread for breakfast is so indulging.  The plump and juicy sweet raisins in every bite made it even better, the trick is to soak them in warm water for at least 15 minutes.  With hydration, it also prevents the raisins from drawing moisture from the dough during proofing and baking, drying out the bread.

I didn’t add a lot of honey in case the bread becomes more of a guilty dessert than a healthy breakfast.

Chocolate Raisin Potato Bread Loaf // Mono + Co  Chocolate Raisin Potato Bread Loaf // Mono + Co


Chocolate Potato Raisin Bread

300g plain flour
1 teaspoon instant dry yeast
30g cocoa powder **
1/4 teaspoon sea salt
2 tablespoons raw honey
1 small egg ***
50g water
150g mashed potatoes
35g cold butter, cubed
60g raisins ****

**  I use Van Houten cocoa powder.

*** mine weighs 55g with shells.

**** soak raisins in a bowl of warm water for 30 minutes.  Drain and gently squeeze dry to remove excess liquid before use.

In a mixer bowl, combine all the dry ingredients together ( flour, yeast, cocoa powder, sea salt) with a hand whisk.  Then add honey, egg and water and mashed potatoes and knead into a ball with a dough hook.  Stop the mixer and let the dough rest for 15 minutes.  Start the mixer again to knead for 1 minute before adding cubed butter one by one, and knead till the dough reach window pane stage.  Add raisins while mixer is running and knead for about 1 minute.  Stop mixer and leave dough to bulk rise for 60 minutes.

After the dough has risen to double its volume, punch down the dough to deflate and transfer to a clean work top.  Sprinkle worktop and palms with flour if the dough is too sticky to handle.

Divide the dough into 3 equal portions.  Flatten and shape each portion, rolling them up swiss roll style.  Arrange them in a Pullman tin, seam side downwards.  Leave this aside to proof for 60-75 minutes, covered with a towel.

Preheat oven to 160C, and bake the bread for 30 minutes.

When done, remove bread from tin immediately and place on a rack to cool completely.

Save

Save

Save

Save

Save

Save

Save

Save

Save

Save

Save

Potato Raisin Bread

Potato Raisin Bread // Mono + Co Potato Raisin Bread // Mono + Co Potato Raisin Bread // Mono + Co     Potato Raisin Bread // Mono + Co

I love slightly sticky dough when I want to make soft bread loaves like this sugar topped raisin bread.  With eggs, honey and more than the usual amount of water added, the final dough will be much more wobbly than usual, but after 30 minutes in the oven set at 160C, it transforms itself into an almost sponge cake like texture bread.

I made 3 slashes to the bread before baking and topped with butter strips a sprinkle of sugar.  This is to mimic the sugar-topped bread rolls that are a common item in the neighborhood bakeries.  But I get to control the amount of sugar this time.


Potato Raisin Bread

300g plain flour
1 teaspoon instant dry yeast
1/4 teaspoon sea salt
1 tablespoon raw honey
140g mashed potatoes
1 egg **
85g water
20g cold butter, cubed
60g raisins

For toppings : 
butter cut into strips 
1 -2 tablespoons sugar

** I used a small egg weighing 60g with shell.

*** Soak the raisins in warm water for 30 minutes.  Drain and squeeze slightly to remove excess liquid before use.

In a mixer bowl, add dry ingredients : plain flour, instant yeast, sea salt and stir well with a hand whisk.  Next add raw honey, cooled mashed potatoes, egg and start the mixer running to knead with a dough attachment.  Slowly drizzle water while the mixer is running.  Once all ingredients come into a ball, stop adding the water and turn off the mixer.  Leave this aside to stand for 15 minutes undisturbed.

After 15 minutes, turn on the mixer again for 1 minute, before adding cubed butter one by one.  Knead this until it reaches the window pane stage.  Then add raisins into the dough, let the mixer run for another 1 minute to let the raisin be incorporated into the dough.  It is ok if the raisins are not mixed uniformly, this can be done during the shaping stage when the dough is repeatedly stretch and fold.  Remove bowl from mixer and cover to bulk rise for 60 minutes.

After 60 minutes, the dough would have expanded to double its volume.  Punch to deflate it and transfer to a clean worktop.  The dough will be sticky, dust worktop and hands with flour to make the dough easier to handle.  A bench scraper will be extremely useful for handling such sticky dough too.  Using the stretch and fold method, shape the dough into a slight oblong bread.  Leave it aside covered for its final  60 minutes proof.

Preheat the oven to 160C.  Slash the bread and place butter strips where the slash marks are.  Mist the top of the dough with water, then sprinkle sugar on top.  Bake for 30 minutes.

When the baking is done, transfer the bread to a rack to cook completely before slicing to serve or store in an airtight container.

Save

Save

Save

Save

Save

Condensed Milk Wholemeal Taro Sandwich Loaf

Condensed Milk Wholemeal Taro Sandwich Loaf // Mono + Co

It’s always more exciting to bake Pullman loaf in a covered tin.  The bread dough is left to rise without a view during the last 15 minutes of proofing time, leaving this baker hoping hard that it will fill up to the brim without a hitch, preferably reaching all corners, producing a perfect squarish sandwich bread which sliced.

So it’s natural for my heart skipped a beat when I uncovered the lid after baking and saw this browned top crust, perfect.

Condensed Milk Wholemeal Taro Sandwich Loaf // Mono + CoCondensed Milk Wholemeal Taro Sandwich Loaf // Mono + Co

I adapted a recipe from Zoe, a cheerful mom who bakes for her happy kids in Melbourne.  The latest bread recipe she lauded to be soft and chewy is one with condensed milk added.  I simply love the sight of the tight crumbs in her photos, so I halved the recipe, added mashed taro (my secret to fluffy bread) on top of condensed milk (Zoe’s magic ingredient), switched 1/3 of the flour to wholemeal, and started kneading away.

Glad to have another reliable and versatile sweet loaf recipe in my (almost) daily bread baking repertoire.

Condensed Milk Wholemeal Taro Sandwich Loaf // Mono + Co  Condensed Milk Wholemeal Taro Sandwich Loaf // Mono + Co Condensed Milk Wholemeal Taro Sandwich Loaf // Mono + Co Condensed Milk Wholemeal Taro Sandwich Loaf // Mono + Co


Condensed Milk Taro Pullman Loaf

adapted from here

200g plain flour
100g wholemeal flour
1 teaspoon instant dry yeast
1/4 teaspoon sea salt
1 heap tablespoon milk powder
100g condensed milk 
68g steamed taro, mashed 
120g water 
20g cold butter, cubed

In a mixer bowl, place plain flour, wholemeal flour, instant yeast, sea salt, and milk powder and mix with a hand whisk to mix these dry ingredients well.

Add condensed milk, cooled mashed taro, and half of the required water, then turn on the mixer to start kneading with a hook attachment while pouring the remaining water slowly, stop the mixer when the ingredients have come into a ball.  Let this dough rest aside for 15 minutes.

After 15 minutes, turn on the mixer again to knead the dough for 1 minute, before adding the cubed butter one by one.  Continue to knead when all traces of butter are gone, until the dough reaches window pane stage, it will be very elastic and smooth and pull away from the side of a very clean bowl.

Stop the mixer and remove the bowl, let the dough bulk rise for 60 minutes covered with a pot lid or clean towel.

After an hour, the dough would have risen to double its volume.  Punch it down to release gas, transfer to a clean worktop.  Divide the dough into 3 equal portions (mine weighs about 212g each.)  Flatten each dough to push out gas trapped during the bulk rise stage, then roll out into a long oval strip.  Roll it up like a swiss roll from the shorter end, and placed it in a well greased Pullman loaf tin, seam side downwards.  Repeat with the other 2 portions of dough.

Cover the tin and leave it aside to proof for 60 minutes.  Bake for 30 minutes in a preheated oven at 160C.  Remove bread from tin immediately after baking and let it cool completely on a rack before slicing to serve or storing in an airtight container.

Save

Save

Save

Save

Taro Milk Loaf

Taro Milk Loaf // Mono + Co

Years back, one of the first few loaves I attempted to bake at home was a Hokkaido milk bread recipe, they were all over the internet then.  It’s not hard to fall in love with these milk loaves when they are so fluffy, soft and sweet.  That’s how I learned that the rich milky aroma actually comes from a combination of milk PLUS milk powder, whipping cream, egg, and sweetener.  Over time, I slowly removed or reduced the latter four ingredients from my loaf recipe in pursuit of a healthier bread for breakfast.

Taro Milk Loaf // Mono + Co

Another signature feature of the Japanese bread is this ubiquitous “pull apart web” effect, which I have managed to achieved with various root vegetable loaf recipes.  As long as the dough has been kneaded to reach the window pane stage, this outcome will somehow be a given.  And I have also skipped the tangzhong or sponge method, the go-to method for fluffy Japanese style bread, opting for the easier straight dough method instead.  The sponge method is said to be good for keeping the crumbs soft for the next 1 or 2 days, in a case of leftover.  Since we usually finish up the bread in 2 days or less, plus I have noticed my 2 days old buns baked with root vegetables seem to do well in retaining their soft texture, the straight dough method will suffice.

Taro Milk Loaf // Mono + Co

I just bought a packet of milk powder to modify some of my root vegetables bread recipes,  I miss that whiff of creamy dairy aroma that appears when you stick your nose close to your bread.  There is only so much fresh milk I can add to my recipes without turning it into a shaggy mess.  So I am turning to milk powder for help for today’s bake.

Taro Milk Loaf // Mono + Co


Taro Milk Loaf

225g plain flour
3 tablespoons instant milk powder
2 tablespoons raw sugar
1 teaspoon instant dry yeast
1/4 teaspoon sea salt
105g mashed taro
95g fresh milk
20g cold butter, cubed

In a mixer bowl, place the dry ingredients: plain flour, instant milk powder, raw sugar, instant yeast, and sea salt, mix these dry ingredients well with a hand whisk.  Next, add cooled mashed taro and half of the milk to the dry ingredients, and knead with a dough hook attachment on the lowest speed (KA 1).  Slowly add the remaining of the milk with the mixer running, you may need more or less of the milk stated in the recipe.  Watch the dough, when the ingredients come into a ball,  stop adding and turn off the mixer.  Let the dough rest for 15 minutes.

Start the mixer running on its lowest speed again to knead the dough for 1 minute, before adding cubed butter, one by one.  Knead until the dough reaches window pane stage, this is when the dough becomes very smooth and elastic, and starts to pull away from the sides of the bowl.  Remove the bowl from mixer, cover and bulk rise for 1 hour.

After an hour, the dough should rise to double its volume, punch it down to release the gas, and transfer to a clean work top.  Divide the dough into 3 equal portions (mine is about 166-168g each.) Flatten the dough and roll out with a pin.  Then roll up the dough like a swiss roll from the shorter end.  Place it in a well-greased Pullman tin, seam side downwards.  Repeat with the remaining 2 portions.

Let the bread rise for 60 minutes then bake for 30 minutes in a preheated oven at 170C.  Remove bread from tin immediately after baking and leave it to cool completely on a rack.

Save

Save

Save

Save

Save

Honey Taro Sandwich Loaf

Honey Taro Sandwich Loaf / Mono + Co

After baking these buns at a lower oven temperature that produced really soft texture, I wanted to see if this can be replicated on covered loaf recipes to turn them softer.

End result: softer, thinner crust with crumbs that stay soft and fluffy.

Honey Taro Sandwich Loaf / Mono + Co

I also added an extra tablespoon of raw honey to this recipe, as I usually can taste some sweetness in my bread, but never the aroma of honey.  This time, with 3 tablespoons in total, I finally can taste the honey in my end bake.  But this also means that I need to add slightly lesser liquid (water in this case) to my dough to make it easier to handle/shape.  Like I mentioned in my other recipes, I like to add just half the liquid stated in the recipe first, then top up slowly till the dough finally come together into a firm ball.  I do this to prevent the dough from getting too wet when I tweak the recipes/ ingredients.  I noticed that even an alteration in the brand/type of flour, sometimes the liquid amount required might also deviate slightly.

Honey Taro Sandwich Loaf / Mono + Co Honey Taro Sandwich Loaf / Mono + Co


Honey Taro Sandwich Loaf

225g plain flour
1 teaspoon instant yeast
1/4 teaspoon sea salt
3 tablespoons raw honey
105g mashed taro
80g water
30g cold butter, cubed

In a mixer bowl, place the dry ingredients: plain flour, instant yeast, and sea salt, mix these dry ingredients well with a hand whisk.  Next, add cooled mashed taro, raw honey, and half of the water to the dry ingredients, and knead with a dough hook attachment on the lowest speed (KA 1).  Slowly add the remaining of the water with the mixer running, you may need more or less of the water stated in the recipe.  Watch the dough, when the ingredients come into a ball,  stop adding water and turn off the mixer.  Let the dough rest for 15 minutes.

Start the mixer running on its lowest speed again to knead the dough for 1 minute, before adding cubed butter, one by one.  Knead until the dough reaches window pane stage, this is when the dough becomes very smooth and elastic, and starts to pull away from the sides of the bowl.  Remove the bowl from mixer, cover and bulk rise for 1 hour.

After an hour, the dough should rise to double its volume, punch it down to release the gas, and transfer to a clean work top. Shape the dough and place in a well-greased Pullman tin, seam side downwards, and cover the tin.  Remember to grease the cover as well.

Let the bread rise for 60 minutes then bake for 30 minutes in a preheated oven at 180C.  Remove bread from tin immediately after baking and leave it to cool completely on a rack.

Save

Save

Ultra Soft Haiji White Buns V.2 海蒂白面包

Ultra Soft Haiji Buns V.2 // Mono + Co Ultra Soft Haiji Buns V.2 // Mono + Co

OK, so these buns are still not as white as I thought they should be after tweaking the oven setting to bake at 150C, which is the lowest temperature that my oven can go.  But at least it took a shorter time to heat up compared to these baked yesterday which required a preheated oven at 190C.  That’s some electrical charges saved.

Another great improvement is the shaping part, the bun finally looks like 2 buns fused in the middle with that signature groove of a Haiji bun.  I used my rolling pin to make a deep and much wider dent on each dough ball.  I had to dust the top of the dough with flour to prevent the pin from sticking.  That’s 2 more tips I have picked up.


Ultra Soft Haiji Buns

200g unbleached plain flour
20g wholemeal flour
1 teaspoon instant yeast
1/4 teaspoon sea salt
100g mashed taro
2 tablespoons raw honey
 85g fresh milk
30g cold butter, cubed
optional : rice flour for dusting

In a mixer bowl, place the dry ingredients: white flour, wholemeal flour, instant yeast, and sea salt, mix these dry ingredients well with a hand whisk.  Next, add cooled mashed taro, raw honey, and half of the fresh milk to the dry ingredients, and knead with a dough hook attachment on the lowest speed (KA 1).  Slowly add the remaining of the fresh milk with the mixer running, you may need more or less of the milk stated in the recipe.  Watch the dough, when the ingredients come into a ball,  stop adding milk and turn off the mixer.  Let the dough rest for 15 minutes.

Start the mixer running on its lowest speed again to knead the dough for 1 minute, before adding cubed butter, one by one.  Knead until the dough reaches window pane stage, this is when the dough becomes very smooth and elastic, and starts to pull away from the sides of the bowl.  Remove the bowl from mixer, cover with tea towel, and bulk rise for 1 hour.

After an hour, the dough should rise to double its volume, punch it down to release the gas, and transfer to a clean work top.  Flatten the dough to push out gas trapped inside the dough.  Divide dough into 9 equal portions, I weigh out each dough at about 55g each.  Shape each portion into a ball and place it on a greased tray, seam side facing downwards. Using a rolling pin, make a straight deep dent in the middle of the bun, without cutting the bun into halves.  Dust flour on the top the dough ball to make it less sticky for the rolling pin to be removed.

Let the buns sit in a draft free place to rise for another 50-60 minutes.   Optional: I topped my bread dough with rice flour before baking for decorative purpose.

Bake the buns in a preheated oven at 150C and bake for 15 minutes.  Remove the bread from the pan immediately after baking, and let it cool on a rack completely serving.

Store in an airtight container if not consumed immediately, to keep the buns soft and the crumbs from drying out.

Save