Brown Banana Ice Cream

Brown Banana Ice Cream // Mono + Co

This is not exactly a post about saving brown bananas from becoming food waste although it looks like it.

Brown Banana Ice Cream // Mono + Co

I intentionally waited for these bananas to develop as many brown/black spots as possible, short of turning into a puddle on the kitchen counter before I use them for making ice cream.  The sweetness level shoots up as bananas rot, perfect for making desserts.  If you have seen Christina Tosi demo her banana cream pie recipe in one of the episodes of “The Mind of a Chef”, you will understand why I say “rot”.  I would have never thought such blackened banana is still edible.

Brown Banana Ice Cream // Mono + Co

I adapted from this recipe, altering the recipe savagely.  I did away with the white chocolate since I have a feeling that my 2 very ripened bananas are going to be really sweet.  I also halved the sugar amount and added 1 tablespoon of raw honey instead, partly to replace the corn syrup too.  Without cream cheese at home, I also omitted that but added 1/4 teaspoon of pink salt (recipe called for 1/8) to sort of replace the salt from the cheese.  After 20 minutes of churning the chilled cream and freezing it overnight, the end result is a creamy dessert that is unmistakenly banana in flavor.  Perfect for my banana lovers at home.

Brown Banana Ice Cream // Mono + Co


BROWN BANANA ICE CREAM

adapted from here

2 cups whole milk
1 tablespoon + 1 teaspoon cornstarch
1/4 teaspoon salt
1 1/4 cup heavy cream **
1/3 cup raw sugar
1 tablespoon raw honey
1 tablespoon vanilla extract
2 ripe bananas, chopped into chunks

** I used whipping cream instead of heavy cream

Scoop 2 tablespoons of milk and mix with cornstarch in a bowl to form a smooth slurry.  Set aside.

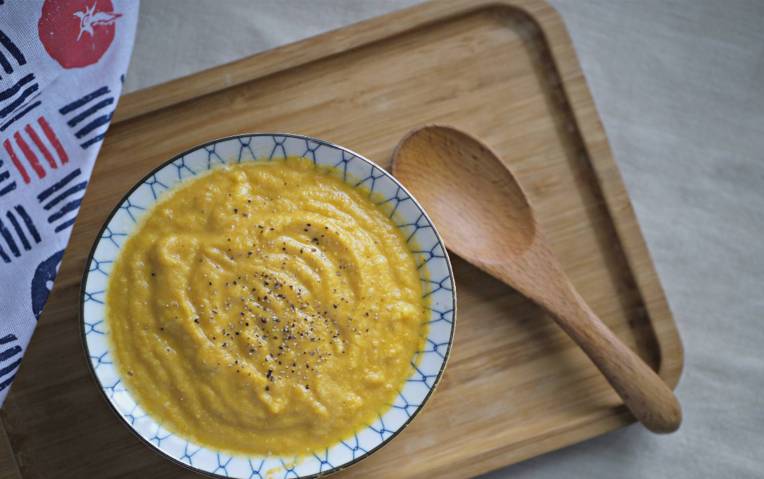
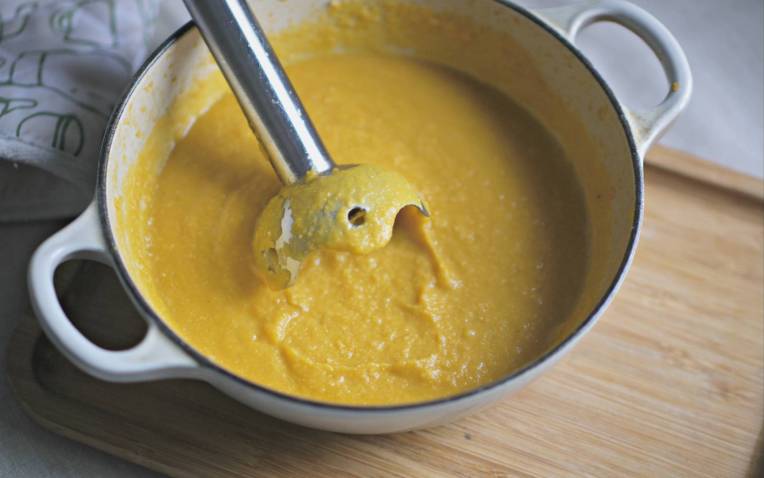
In a saucepan, add the remaining milk, salt, heavy cream, sugar, honey and vanilla extract and cook to a rolling boil.  Remove from heat, add the banana chunks and puree with an immersion hand blender.Let it boil for 4 minutes, then shift the pot away from heat, and add the cornstarch mixture.

Remove from heat, add the banana chunks and puree with an immersion hand blender. Bring the mixture back to boil again, and let it boil for exactly 4 minutes. then shift the pot away from heat, and add the cornstarch mixture.

Shift the pot away from heat, add the cornstarch mixture, and bring it to boil over medium heat, this time while stirring continuously with a heat proof spatula or hand whisk.  After boiling about 1 minute, the mxiture will thicken.  Remove from heat and let mixture cool to room temperature.  Cover the saucepan and chill it in the fridge for a few hours.

Pour the chilled mixture into the ice cream maker and churn for 20-25 minutes.  Transfer to a storage container and freeze until firm for at least 4 hours or overnight.

Save

Save

Ugly Carrots

Ugly Carrots // Mono + Co

“Common sense and a visual inspection should dictate whether the (cracked) carrot is safe to eat or not.”love2garden.

I find this so true for most of the ugly produce we see in the market. Or we do not get to see since they usually don’t make it to the shelves, rejected by the distributors and retailers, and ended up as food waste.

Slightly cracked carrots are quite common at the wet market, and I have no qualms picking them up since I know that they are generally safe to eat after a good scrub.  During a recent shopping trip, I noticed a bunch of broken carrots placed aside at the usual vegetable stall I patronize.  A check with the stall holder revealed that these carrots had just arrived and found to be damaged, most likely when the cartons were dropped from a great height during transportation, and she was willing to let them go at $1.  It was already past noon, I guess no one was interested.

Since I always chop up carrots for cooking anyway, the snapped carrots don’t really bother me.  So these carrots went home with me and it is now my job to turn them into beautiful meals.

// 001. Creamy Carrot Soup

adapted from here

Ugly Carrots // Mono + Co

I like how the recipe added white rice to make the soup creamier.

Ugly Carrots // Mono + Co

Added my own idea : Nutritional yeast instead of making broth from scratch and cashew nuts for a more nutty flavor.

Ugly Carrots // Mono + Co

After blending, who cares if the carrots have cracks or have snapped into halves?

//002. Pickled Carrot Sticks

adapted from here

Ugly Carrots // Mono + Co

Glass jars are great for pickles.  I sterilise mine by steaming before reusing.  More glass jars and bottle recycling ideas here.

Ugly Carrots // Mono + Co

Instead of finely julienned carrots, I simply prep mine matchstick style for crunch.

//003. Mashed Carrot Buns

adapted from here

Ugly Carrots // Mono + Co

Instead of taro, I replace with the recipe with mashed carrots.

Ingredients: 250g white flour, 1 teaspoon instant dry yeast, 150g mashed carrots, t tablespoon raw honey, 1 tablespoon raw sugar, 1/4 teaspoon sea salt, 1 egg, 80g water, 20g cold butter.
Method: here

Some recipes use carrot juice to get the bright orange color for the bread, but there is something special about being able to spot real carrot bits in the buns when I use mashed vegetables to bake my bread recipes.

After making these, I still have half of the carrots left.  This and this for breakfast real soon.

Save

Save

Save

Save

Save

Save

Milo Taro Pullman Loaf

Milo Taro Pullman Loaf // Mono + Co

I tried something different with this bake.  I used the water bath method to bake this bread for the first 10 minutes, but had to deconstruct the water bath structure once I realized that the bread top had risen to touch the oven’s upper heating element.  That explains the odd looking plateau you see on my bread top.  I continued to bake it the standard way for the remaining 20 minutes.

The additional steam inside the oven looks promising as a method to create taller loaves, although my table-top oven is too small for the set-up; rack + 10″ cake tin with hot water + trivet + Pullman tin.  I won’t put this in my recipe instructions below but I will try another method to create steam inside the oven by placing my smallest ramekins filled with hot water around the corners of the oven instead.  But that’s for another day.

Milo Taro Pullman Loaf // Mono + Co

As always, the addition of steamed taro makes my homemade bread moist and fluffy.  The Milo powder idea stems from this bread recipe that uses cocoa powder.  I added only 2 tablespoons of Milo powder (not the 3-in-1 type) so the loaf does not exactly whiff a strong aroma of chocolate malt, but the color reminds me of the brown traditional Hainan bread loaves : subtle.

For non-taro milo bread ideas (& for me to adapt with taro) :
this recipe with whole wheat flour
this bun recipe with milo custard filling

Milo Taro Pullman Loaf // Mono + Co


Milo Taro Pullman Loaf

280g plain flour
1 teaspoon instant dry yeast
1/4 teaspoon salt
2 tablespoon raw sugar
2 tablespoon Milo powder
100g steamed taro, cooled
1 egg
110g fresh milk
30g cold unsalted butter, cubed

In a mixer bowl, combine all the dry ingredients together ( flour, yeast, salt, sugar, milo powder) with a hand whisk.  Then add mashed steamed taro, egg, and milk to knead into a ball with a dough hook.  Stop the mixer and let the dough rest for 15 minutes.  Start the mixer again to knead for 1 minute before adding cubed butter one by one, and knead till the dough reach window pane stage.  Stop mixer and leave dough to bulk rise for 60 minutes.

After the dough has risen, punch down the dough to deflate and transfer to a clean work top.  Sprinkle worktop and palms with flour if the dough is too sticky to handle.

Divide the dough into 3 equal portions.  Flatten and shape each portion, rolling them up swiss roll style.  Arrange them in a Pullman tin, seam side downwards.  Leave this aside to proof for 60minutes, covered.

Preheat oven to 170C, and bake the bread for 30 minutes.

When done, remove bread from tin immediately and place on a rack to cool completely.

Save

Save

Save

Save

Save

Peach Gum, 4 ways

Peach Gum, 4 ways // Mono + Co

First, a note to self: peach gum expands 8 to 10 times in volume after soaking, so remember not to soak too many pieces next time.

Obviously, I forgot the lesson last time, repeated the same mistake and ended up with a very huge bowl of soaked peach gum after 2 nights in the fridge.  The hard crystals softened into a gelatinous texture that is very convincing as a collagen booster food.  Since peach gum is tasteless and I have no idea how much longer can it last inside the fridge, I decided to cook as much as possible in one day and leave the remaining to make a pot of this longan and peach gum dessert for tomorrow.  Yup, I have that much, so here we go:

Peach Gum, 4 ways // Mono + Co

++ Honey Lemon Peach Gum Drink ++

I got this idea from the popular bottled collagen drink in the market.  Since I don’t consume animal derived collagen, adding peach gum to my homemade honey lemon juice sounds like a good substitute. Delicious when served chilled.

P.S. I am not sure if peach gums can be eaten without cooking first, but I steamed the soaked gum for 15 minutes just to be safe.

Peach Gum, 4 ways // Mono + Co

++ Banana Milk Shake with Peach Gum ++

I was clearing some brown bananas into milk shake for my kids and decided to blend some steamed peach gums with the banana and milk as well.

Peach Gum, 4 ways // Mono + Co

++ Dashi Vegetable Soup with Peach Gum ++

Since the peach gum is tasteless, I am not limiting my collagen intake to just desserts.  I have cooked this meatless “trotter” vinegar with peach gum before, so I can surely add them to savory soups.  I made kombu dashi stock like this, add apples, onions, corn, and carrots and simmer for 1 hour.  The kombu from making dashi can be eaten, so don’t throw them away after making the stock.  After an hour, remove apple and onion from the pot, season with soy sauce, add soaked peach gum and boil for another 15 minutes.  Transfer to a bowl and serve immediately.

Peach Gum, 4 ways // Mono + Co

++  Udon Soup with Enoki Mushroom and Peach Gum ++

With leftover vegetable dashi stock, it’s easy to create this late afternoon snack.  Heat up the soup, add enoki mushrooms, peach gum and miso paste (optional).  In a serving bowl, place udon (cooked separately in another pot) and pour soup over it, top with a bunch of cilantro leaves.  Serve immediately.

Save

Save

Save

Save

Save

Save

Save

6-Inch Castella Cake

6-Inch Castella Cake // Mono + Co

Have been putting off baking Castella cakes since most recipes require steam-baking.  I do not have a steam oven, neither do I have a large roasting pan to hold my cake pan to do a “water-bath”.  The aha moment came only when I saw this 6-inch Castella cake recipe: I can water bath this 6-inch cake in a 10-inch cake pan!  I even get to omit using aluminum foil to wrap my pan since I am not using a springform pan, the only item discarded after baking this cake is the parchment paper used to line the base of the pan.  There is no need to line the side of the pan.

6-Inch Castella Cake // Mono + Co

Using the steam baking method definitely made the cake airy yet producing a fine and moist texture.  No cracked top, and not much shrinkage after cooling down, all thanks to the slower (1 hour at 150C) yet even heat source from the water bath, just like this steamed chocolate cake recipe post has described.

6-Inch Castella Cake // Mono + Co

Trim the round cake into a thick rectangular slab to serve, just like the ones attracting long queues at the malls.  I found this article in mandarin that is super detailed with its step-by-step method, definitely worth a read.  The instructions has an additional step to slash the top halfway during baking to make it split evenly for the rest of the process.  I am thinking of making this variation already for my next attempt.


6 -INCH CASTELLA CAKE

adapted from My Mind Patch

3 eggs, yolks and whites separated *
40g rice bran oil
50g plain flour **
30g fresh milk
40g raw sugar
pinch of salt
Optional: 1/4 teaspoon vanilla extract

* I use eggs weighting 70g with shells for this recipe
** original recipe called for top/cake flour, I used plain flour to bake and the texture is still very fluffy to me.

Warm up rice bran oil in a saucepan over low heat, watch the oil carefully and turn off the fire once you see waves/lines begin to form at the base of the pot.

Add the plain flour to the warm oil and mix with a spatula, then add milk and vanilla extract, and stir to mix again.

Next, add the egg yolks, one at a time, stirring well to form an even mixture before adding the next yolk.  Set this batter aside.

To prepare meringue, whisk egg whites with a pinch of salt until frothy.  Add raw sugar next and whisk this mixture until it forms soft peaks.

Add about 1/3 of the meringue to the cake batter and mix well with a spatula.

Fold in the rest of the meringue to form an even cake batter.

Prepare a 6-inch cake pan by lining just the base with parchment paper.  Pour the cake batter into the pan and bang the pan on the table 3 times to get rid of air bubbles trapped inside the batter.  Removing these trapped bubbles ensure an even and smooth finished cake texture.

Place this pan inside a 9 or 10-inch round pan (or roasting pan if you have one) and fill the larger pan with about 2-cm deep of hot water.  Send the cake to bake immediately in a preheated 150C oven for 1 hour.

When the cake is done, remove from oven and drop the cake pan from a height of 10cm onto a padded counter top, 3 times.  This is supposed to help preventing excessive shrinkage during as the cake cools.  Leave the cake inside the pan to cool on a rack for 15 minutes before turning the cake out, removing the parchment paper at the base of the cake.  Return the cake to the pan and cool it further 15 minutes.  This cake serves best when still warm.

Save

Save

Save

Save

Oatmeal Porridge White Pullman Loaf

Oatmeal Porridge White Pullman Loaf // Mono + Co

I like how oatmeal porridge in this recipe made the sourdough bread really soft, so I added 135g of it to my bake today.  I probably need to add more if I want it to be as soft and fluffy as the ones I bake with steamed taro or steamed white rice.

Oatmeal Porridge White Pullman Loaf // Mono + Co

Oatmeal Porridge White Pullman Loaf // Mono + Co


Oatmeal Porridge Pullman Loaf

for oatmeal porridge:
100g boiling hot water
35g instant oatmeal

290g bread flour
1/2 tablespoon instant dry yeast
1/4 teaspoon sea salt
2 tablespoons raw sugar
1 large egg **
80g water
25g cold butter, cubed
topping: 2 tablespoons rolled oats

** I use a large egg weighing 70g.

To prepare oat porridge, mix hot water to instant oatmeal and stir until a thick consistency is formed. Leave it aside to cool completely.

In mixer bowl, combine bread flour, yeast, salt, and sugar well with a hand whisk.  After the dry ingredients are mixed, add cooled  oatmeal porridge, beaten egg and half of the water.  Start the mixer and knead on its lowest speed (KA 1) .  If the ingredients do not come together into a ball, slowly add more water, once a ball dough starts to form, stop adding water.  Turn off the mixer and let the dough sit for 15 minutes.

After 15 minutes, start the mixer again and knead for 1 minute before adding cubed butter, one by one.  Knead this until the dough reaches window pane stage; when the dough becomes very smooth and elastic.  Remove bowl from mixer and bulk rise this for 1 hour.

Punch the dough down and transfer it to a clean work top.  Shape the loaf and place in greased pullman bread tin, seams side facing downwards.  Let it rise in a draft-free place for 50-60 mins.  Before baking, spray the bread top with a fine mist of water and sprinkle rolled oats on top evenly.

Bake in a preheated oven at 170C for 30 minutes. Remove the bread from the pan immediately after baking, and let it cool on a rack completely before slicing or serving.

Store in an airtight container if not consumed immediately, to keep the loaf soft and the crumbs from drying out.

Save

Save

Save

Purple Sweet Potato Burger Patty

Purple Sweet Potato Burger // Mono + Co

This purple sweet potato burger patty was created based on a taste that I like, smoky with lots of sweetness from onion and basil leaves.  Added walnut and black sesame seeds to make my mum happy, she always worries that I don’t get enough nutrients by going meatless.  But hey look, my recipe is packed with real food, no space for fillers like breadcrumbs or flour!  Pan frying these patties will require a bit of tender loving care as I only add a beaten egg to hold the ingredients together.

Purple Sweet Potato Burger // Mono + Co

As I made this through trial and error, I don’t have an exact recipe for this.  To recreate this, I will probably be referring to the following photos and estimate the proportion of ingredients by eyeballing.  I did not come up with this recipe from scratch though.  Other than having a rough idea how I want my burger to taste, I referred to one of my favorite recipe sites, Minimalist Baker , for some ideas on creating this delicious looking sweet potato burger patty.


Purple Sweet Potato Burger Patty, A Rough Guide

Purple Sweet Potato Burger // Mono + Co

In a food processor, blitz a handful of walnuts and about 1/4 yellow onion.

Purple Sweet Potato Burger // Mono + Co

Add this to steamed and mashed sweet purple potatoes (from 2 medium size ones), a tablespoon of black sesame seeds, a handful of sweet basil leaves, chopped, an half a tablespoon of sweet paprika.

Purple Sweet Potato Burger // Mono + Co

Stir to mix well.  Depending on how moist the sweet potato is, the patty at this stage will be on the dry side.

Purple Sweet Potato Burger // Mono + Co

Slowly add beaten egg and stop just before the patty mixture becomes too wet to be molded.

You should be able to shape the patty by hand to look like this:

Purple Sweet Potato Burger // Mono + Co

In a preheated skillet, add some cooking oil.  Gently place the patties on the skillet and fry till both sides are cooked.

To assemble and serve, I added lettuce,

Purple Sweet Potato Burger // Mono + Co

sliced red capsicum,

Purple Sweet Potato Burger // Mono + Co

cheddar cheese, and grilled portobello mushroom,

Purple Sweet Potato Burger // Mono + Co

between 2 burger buns.  Eat immediately.

Purple Sweet Potato Burger // Mono + Co

More meatless vegetarian patty ideas, try out:

// this made with black bean,

// this vegan version with chickpeas and sweet corn,

// my favorite protein, bbq tofu patty,

// another “red meat”-looking patty, using beetroot.

Save

Save

Save

Save

Save

Save

Save

Save

Tartine Sourdough Country Loaf

Tartine Sourdough Country Loaf // Mono + Co

I save bread packaging from going to landfills by baking my own rustic bread loaves baked with plain flour bought in bulk.  Currently into natural starter and Tartine’s recipes seem to be on everyone’s must-bake list.

There is nothing different about the recipe I used to bake this classic Tartine sourdough except that I have halved it, based on the size of my Dutch Oven and my refrigerator’s capacity.  Why bake the full recipe when it takes me a few mornings to finish one loaf?  What helped a lot is that this dough recipe is a breeze to mix.  Simply mix another batch when the loaf is about to finish.

Tartine Sourdough Country Loaf // Mono + Co

An active starter is a critical ingredient here.  I continue to be awed endlessly by my natural starter that produces the most dramatic oven spring in my short sourdough baking history.  Coating the surface of the bread with rice flour before slashing is also a must, to make the “split” more obvious and help it look more ‘pro’ and rustic.  My heart skips a beat every time I uncover the pot after the first 40 minutes in the oven.

To ensure that the starter is active, I make sure that I feed my starter at regular interval until it can double within 3 hours at room temperature which is 30C here.

Tartine Sourdough Country Loaf // Mono + Co

While the original recipe stated 20 minutes with the lid and 20-25 minutes with the lid off, this is for bakers who are experienced or willing to risk a scalding arm with a preheated hot dutch oven pot at 230C.  I bake my dough cold, straight from the chiller and in an unheated pot, but I still manage to get a perfect oven spring and a crust that caramalize to a beautiful brown.  I have to bake the bread longer though: 40 minutes in the oven with the lid on and another 40minutes without the lid.

Tartine Sourdough Country Loaf // Mono + Co

Made for myself a step by step pictorial guide with 1/2 the ingredients of this recipe.  Hope you will find it useful too.


Tartine Sourdough Country Loaf

Start with an active starter, pour 125g into a mixer bowl, and add 370g water.

Tartine Sourdough Country Loaf // Mono + Co

Stir around with a wooden spoon until the starter is mixed well with the water.

Tartine Sourdough Country Loaf // Mono + Co Tartine Sourdough Country Loaf // Mono + Co

Add 350g plain flour and 150g wholemeal flour to the diluted starter.

Tartine Sourdough Country Loaf // Mono + Co

Stir and mix with the wooden spoon.  Let this sit aside for at least 30 minutes, covered.

Tartine Sourdough Country Loaf // Mono + Co

After 30 minutes, sprinkle 10g sea salt on top of the dough and another 25g water, and

Tartine Sourdough Country Loaf // Mono + Co

gently stir to mix the salt and water into the autolysed dough, which will appear smoother at this point.

Tartine Sourdough Country Loaf // Mono + Co

Mix until all the water has been absorbed by the dough.  Then, with a clean wet hand, do a few round of  “stretch and pull” actions.  Let dough sit for another 30 minutes.

Tartine Sourdough Country Loaf // Mono + Co

After 30 minutes, repeat the “stretch and pull” action, then let it sit for 30 minutes again.  This will be “Turn #1”.  Repeat this for another 3 times.

Tartine Sourdough Country Loaf // Mono + Co

After “Turn #4”, transfer the dough to a container with cover, or simply cover the mixer bowl (if your fridge has ample space for it) with a pot lid of the right size, and let it bulk ferment inside the fridge overnight.

Tartine Sourdough Country Loaf // Mono + Co

Next morning, when ready to bake, preheat oven to 250C.  Flour the base of a Dutch Oven with rice flour, to prevent the bread from sticking to the pot when baking.  I do this to save on parchment paper.  Retrieve the dough from fridge and shape the dough gently into a ball, place it inside the pot, seam side downwards.

Tartine Sourdough Country Loaf // Mono + Co

Sprinkle rice flour on top and make a score on the surface of the dough.

Tartine Sourdough Country Loaf // Mono + Co

Cover and bake for 40 minutes.

Tartine Sourdough Country Loaf // Mono + Co

After 40 minutes, Remove cover, and bake for another 40 minutes at 220C.

Tartine Sourdough Country Loaf // Mono + Co

After baking, remove the bread from the Dutch Oven immediately, and let it cool completely on a rack before slicing.  Store unfinished bread in an airtight container to prevent crumbs from drying out.

Tartine Sourdough Country Loaf // Mono + Co

Enjoy!

Save

Save

Save

Save

Save

Save

Save

Save

Save

Save

Save

Save

Blue Butterfly Pea Flower Lemonade

Blue Butterfly Pea Flower Lemonade // Mono + Co

My blue butterfly pea flower lemonade has a lighter hue than what you’ll see here and here.  These recipes state to steep the flowers in boiling water first to allow the blue pigment to be extracted before adding the juice of a lemon and transform the blue tea purple.

I prepared mine in a different order: squeeze the juice of a lemon into a glass first, followed by adding ice cubes that has been frozen with the flowers inside each of them.  This method suits me better since I prefer my lemonade really sour with little dilution. By the time all the ice cubes has melted, at least the drink still stay tasting like lemonade.

Blue Butterfly Pea Flower Lemonade // Mono + Co

I started freezing these blue flowers in my ice cube tray when I ran out of ideas what to do with them as they continue to bloom.  I have since brewed them as hot blue tea, dye a cotton hankerchief into a lightest shade of blue (the color has since faded after a few washing), and conducted a self-learning calligraphy lesson in, you guessed it, blue ink.

Blue Butterfly Pea Flower Lemonade // Mono + Co

This is a great way to preserve the blooms and make pretty drinks.  If you let these ice cubes melt on counter, you will get a puddle of blue ink which you can subsequently use for your favorite  crafting ideas with blue pigment.

Blue Butterfly Pea Flower Lemonade // Mono + Co

Blue Butterfly Pea Flower Lemonade // Mono + Co

Back to my lemonade, as the ice cubes started to melt, the color of the drink slowly turned pink.  It’s so perfect for the warm day!

For the curious ones, this explains the science behind.

Blue Butterfly Pea Flower Lemonade // Mono + Co

Save

Save

Save

Save

Save

Save

Save