Make it Healthier : Oatmeal Potato Bread Loaf

Oatmeal Potato Bread // Mono+CoOatmeal Potato Bread // Mono+Co

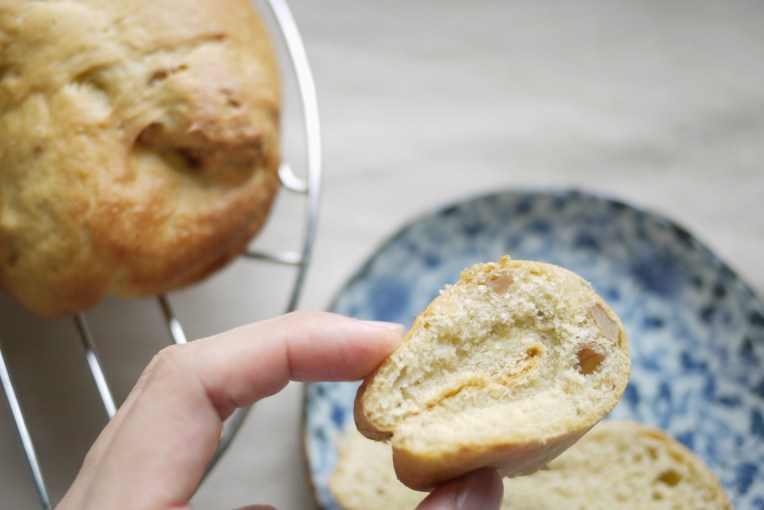
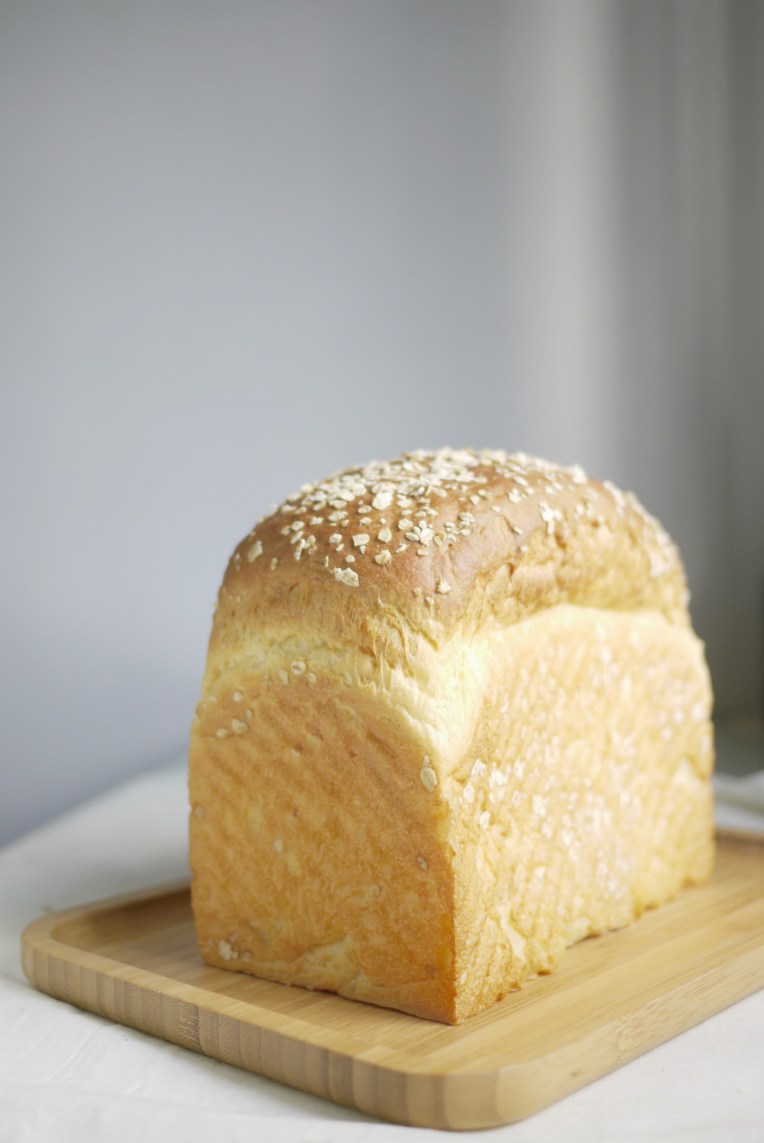
I am on a bread baking lucky spree, you know, the period when every single thing you modify to a recipe turns out 101% successful?  This was made with adding oat flour (diy!) and raw sugar to amp up its feel-good factor.  Very glad that this oatmeal loaf recipe has turned out so well.  The dough rose over and above the tin, creating these stretchy structure below the crown that are really pleasing to the eyes after baking.  As with the other potato breads that I have baked, the interior is soft and fluffy.

I have been baking this recipe at 170C degrees, and this is my preferred oven temperature nowadays, instead of 180-190C. Baking at this temperature for at least 30 minutes achieves the most delicate, softest, yet golden brown crust, my essential requirements for bread loaves are that are both cottony and great looking.  As I usually bake for next day’s breakfast, I find that breads baked at this temperature also stay soft longer.  Breads I have baked with thicker crusts tend to turn crummy next day which lead to more clean up work after breakfast.  No good.

Oatmeal Potato Bread // Mono+CoOatmeal Potato Bread // Mono+Co

Slice this super soft loaf with a good bread knife.  I recently acquired a new one only to realize what a world of difference it made.  Too often, I destroy my perfectly baked pillowy loaf with a lousy bread knife that squash my bread more than slicing it.  Now I can serve perfectly sliced breads for breakfasts, thin or thick, without any problem!

Oatmeal Potato Bread // Mono+Co


OATMEAL POTATO BREAD

100g bread flour
100g plain flour
30g oat flour **
100g cooked+mashed potatoes
2 tablespoons raw sugar
1/4 teaspoon salt
1/2 tablespoon instant yeast
1 egg ***
40-50g water
40g cold butter, cubed
2 tablespoons oatmeal, and more for topping

** If oat flour is not a regular item in your pantry, no need to buy a bag just for this recipe.  Simply run oatmeal/rolled oats in a processor till fine, that’s your oat flour.  Or omit this completely and coat dough with more oatmeal on top before baking.

*** I use 1 small whole egg, weighing about 50g with shell.  If you have larger eggs (70g and above), use half of a beaten egg.

*** Use water left over from boiling the potatoes with, this water contains starch from the potatoes and are great for making bread.  Remember to cool them down to room temperature before using.

In a mixer bowl, place bread flour, plain flour, oat flour, potatoes, raw sugar, salt, yeast, and mix these dry ingredients well with a spoon.  Add beaten egg and 40g of water.  Turn the mixer on, with a dough hook, knead ingredients on low speed (KA:1).  Watch the ingredients as it gathers to form a dry ball dough, if it doesn’t, slowly add more water from a pouring cup, and stop when a dough is formed.  Let the mixer knead this dough for another 2 minutes.  Then leave this dough aside for 15 minutes to allow the flour to absorb the liquid properly, a process known as autolyse method.

After 15 minutes, turn the mixer on again on low speed, you might notice that the dough is now slightly more elastic than before, let mixer run for a minute before adding cubed cold butter one by one, till they get mixed well into the dough and there is no visible sight of solid butter.

Continue to knead this dough to reach window pane stage, it should look and feel smooth and elastic.  Remove mixing bowl from mixer, cover bowl with a clean towel, and let it rise for an hour.

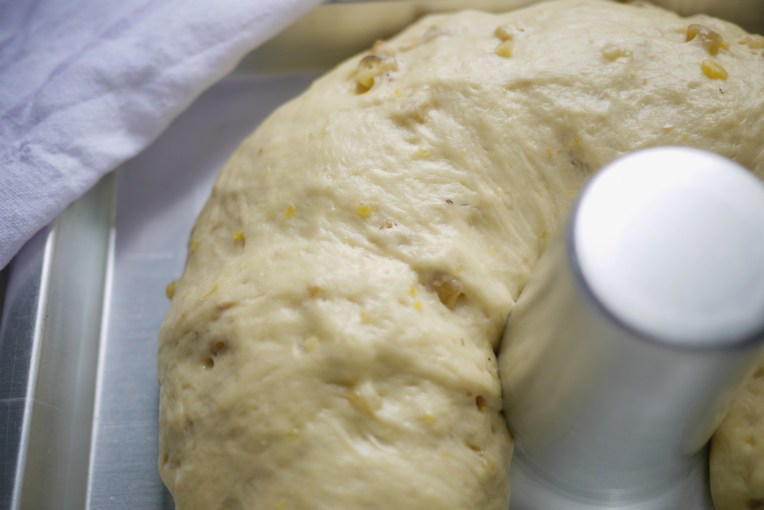
After an hour of rising, punch dough down to deflate and transfer to a clean worktop.  If the dough is too sticky, grease hands and worktop with some butter for easier handling.  With a rolling pin, or bare hands, deflate dough to squeeze out air bubbles trapped inside the dough.  Roll dough into a rugby ball shape to fit your bread tin, roll it over a plate filled with 2 tablespoons of oatmeal, place the dough inside baking tin, seam side down.  We will coat more on the top after the dough rise to the top of the tin.  Let it proof for another 45 minutes to 1 hour, covered and placed in a draft free place.

After its final proof, mist the top of the bread slight with water, sprinkle generously with more oatmeal to your liking, tap lightly to make the toppings adhere better to the dough.  Bake bread in a preheated oven at 170C for 30 minutes, till golden brown.

Remove bread from its tin immediately after baking and let it cool completely on a rack before slicing/ serving it.  Due to the weaker interior structure of this bread when it is steaming hot, I cool it lying on its side to prevent the bread from collapsing on its weight.  After cooling down, the crust structure will become more stable and the bread will be able support its own weight upright.

Make Them Softer : Mini Walnut Bread Rolls

Walnut Mini Rolls // Mono+Co Mini Walnut Bread Rolls // Mono+Co Make Them Softer: Mini Walnut Bread Rolls // Mono+Co Make Them Softer : Mini Walnut Bread Rolls // Mono+Co

For the past few months, I have been on a bread baking spree converting a few bread recipes to include mashed potatoes as an additive.  This walnut roll’s  original recipe is from a Japanese baker/author Backe Akiko, whose backyard garage cafe I really envy.  Her recipes requires only basic ingredients, but I wish they have a more “squishable” bite.

Enter the mashed potatoes.

I halved the original recipe, tweaked the flour and water amount with added potato and the end result is a softer bun.  As the dough is quite wet, I suspect I might have used easily another 2-3 grams of butter when oiling my hands and work top to make the handling of the dough easier without sticking.

I served them with Japanese curry for breakfast and thought they made a perfect match, although the bread rolls can also be great on their own too, or simply add a spread of butter for a quick on the go snack.

~ Enjoy!


MINI WALNUT BREAD ROLLS

largely adapted from Backe's book here

60g mashed potatoes**
100g bread flour
 1/2 tablespoon sugar
 1/4 teaspoon salt
 1 teaspoon instant yeast
 40g water***
 2g chilled butter
 25g walnuts, chopped

** Potatoes are boiled, mashed and cooled to room temperature before use.
*** You may like to use the starchy water left behind from boiling the potatoes with, cooled to room temperature.

In a mixer bowl, combine the flour, sugar, salt and instant yeast with a hand whisk to mix well the dry ingredients together.  Add mashed potatoes, and start the mixer running with a dough hook on the lowest speed.

Slowly drizzle the cooled potato water into the mixture with a pouring cup, or spoon by spoon, and when the mixture gathers into a ball, stop adding water.  As the quantity of ingredient is really quite small for the dough hook to reach in the big mixer bowl, halfway through the liquid addition, it will be a good idea to stop the mixer and use a spoon to manually incorporate the wet and dry ingredients together, otherwise you may end up adding too much water. Add butter and knead the dough till window pane stage.

Pour all the 25g chopped walnuts into the mixer to incorporate the nuts into the dough.  The dough will be wet and sticky, but still manageable with oiled hands/fingers.  Stop the mixer, and place dough in a greased bowl for its first proof, around 45 minutes.

The dough would have risen to about twice its original size after 45 minutes, punch down the dough to deflate it, and transfer the dough to a clean work top.  Grease the work top if the dough is too sticky.  Divide the dough into 3 portions, roughly roll them into balls, place on work top, cover and let the dough relax for 10 minutes.

After 10 minutes, deflate to squeeze out any air bubbles trapped in the dough balls, and then shape them into balls again, and arrange them in a greased 8″x3.5″x3″ rectangular cake tin.  Let it go through its final proof before baking, covered and placed in a draft free place, around 45 minutes.

When ready to bake, make sure that the oven has been preheated to 190C.

Bake for 15-18 minutes, till the bread are golden brown.

Remove from oven and cool on rack before serving.  If you want a soft crust, brush melted butter over the bread now while they are fresh hot out of the oven.

If not eaten immediately, store in an airtight container to keep the bread rolls soft after they have cooled down.

Save

Start The Day With Sweet Potato Bread

Sweet Potato Bread // Mono+Co Sweet Potato Bread // Mono+Co

If I have to give one compelling reason to not own a bread machine, it has to be the freedom to shape my own bread.  But that is only because my KitchenAid mixer did most part of the hard work: the kneading process.  This horse shoe shaped bread was inspired by a modern bakery from Taiwan.  After making some mental notes on the ingredient permutations (they even kimchi!) and some interesting scoring patterns, I decided to bake my next day’s breakfast loaf using a familiar recipe but shaped it like a horse shoe, just like those ‘artisan-looking’ breads on the bakery’s shelves.

I used a Wilton heating core to hold the bread dough in a semi circle shape, even after a pretty dramatic final proof.

As usual, with one sweet potato, the recipe produced a super duper soft bread texture, without any need for chemically derived bread improver.  I can’t help doing one or two “bread-yoga-poses” to  illustrate my point.

Sweet  Potato Bread // Mono+Co Sweet  Potato Bread // Mono+Co Sweet  Potato Bread // Mono+Co Sweet  Potato Bread // Mono+Co Sweet  Potato Bread // Mono+Co


SWEET POTATO WALNUT HONEY BREAD

adapted from here

93g cooked+mashed sweet potato
 175g bread flour/ plain flour
 2 tablespoons honey
 1/4 teaspoon salt
 1/2 tablespoon instant yeast
 1/2 egg
 40g water
 35g cold unsalted butter, cubed
 40g walnut, roughly chopped

*After many rounds of baking breads with tubers, I think that the amount of sweet potatoes added does not have to be as accurate as the recipe.  To avoid food waste, I simply eyeball one that would roughly give me around 70g-100g of potato after peeling, and use up the entire cooked potato for the bread, instead of leaving behind small chunks just to adhere strictly to the amount the recipe had called for.  However, as the additional potatoes contains water, the amount of liquid added to the dough subsequently need to be adjusted; just enough for the ingredients to come to a ball.

In a mixing bowl, combine flour, mashed sweet potatoes , honey, salt, yeast and beaten egg.  With a dough hook, knead the ingredients on low speed, nothing much would happen now as most of the ingredients are dry, slowly drizzle water from a pouring cup and stop when the ingredients start to gather into a ball.  You may like to use the starchy water left behind from boiling the sweet potatoes with, just return them to room temperature.

If you have time, leave this dough aside for 15minutes to allow the flour to absorb the liquid properly.  Otherwise, add cubed butter one by one, till they are mixed completely into the dough and there are no sight of butter left. Continue kneading this dough to window pane stage, the dough should look really smooth and elastic.  Finally, add the roughly chopped walnuts and let the mixer incorporate the nuts into the dough, takes about 1 minute.

Place dough in a greased bowl, cover and let it rise for an hour. Punch dough down to deflate it and transfer to a clean worktop. Shape to desire, in my case, I flatten the dough on the worktop with a rolling pin and push out all trapped air bubbles, then I roll up the dough, longer side facing me, swiss roll style.  Pinch the open ends to seal them firmly.  With seams facing downwards, place the dough on a greased baking tray and wrap it around a greased Heating Core (totally optional, if you don’t have this, just roughly bend the dough into horse shoe shape on the baking tray).  Leave it covered, place in a draft free place, and let it rise for 45min to 1 hour.

Preheat oven to 170C and bake the bread for 25 to 30 minutes, till golden brown.  Lightly mist the bread with water before putting it into the oven. I learned this trick when baking sourdough style bread, and have since adopted this habit with all of my breads, somewhat like my “lucky charm” for a successful bake.  Try this with your next homemade bread, and see if it works for you too!

When the baking is done, remove heating core and transfer the bread to a wire rack to let it cool completely before slicing/ serving.