Zero Waste Decor for Chinese New Year

Zero Waste Decor for CNY // Mono + Co

So the year of the Rooster is arriving this weekend.  I usually leave much of the festive home decor to the final week and force myself to work with what I already have, as oppose to the easier way out, which is to buy new ones that end up cumulating with the rest in the storage room for the next 12 months when the celebration is over.

Here are some waste free ideas that I have managed to squeeze out of my limited, but ample supply of festive accessories, which I reuse year after year.  Best of all, they all fit inside a lunch box when the holiday is over.

Zero Waste Decor for CNY // Mono + Co

// homebaked goodies are stored in air-tight glass jars, instead of plastic ones, and embellish with simple decorative features like this tassel (a big favorite around my house).  The jars go back to the pantry for storing ingredients or snacks after we are done with the new year goodies.

Zero Waste Decor for CNY // Mono + Co

// Even the standard glass containers for nuts are updated to fit the theme.  Just look out for red/pink/floral accessories around the house.

Zero Waste Decor for CNY // Mono + Co

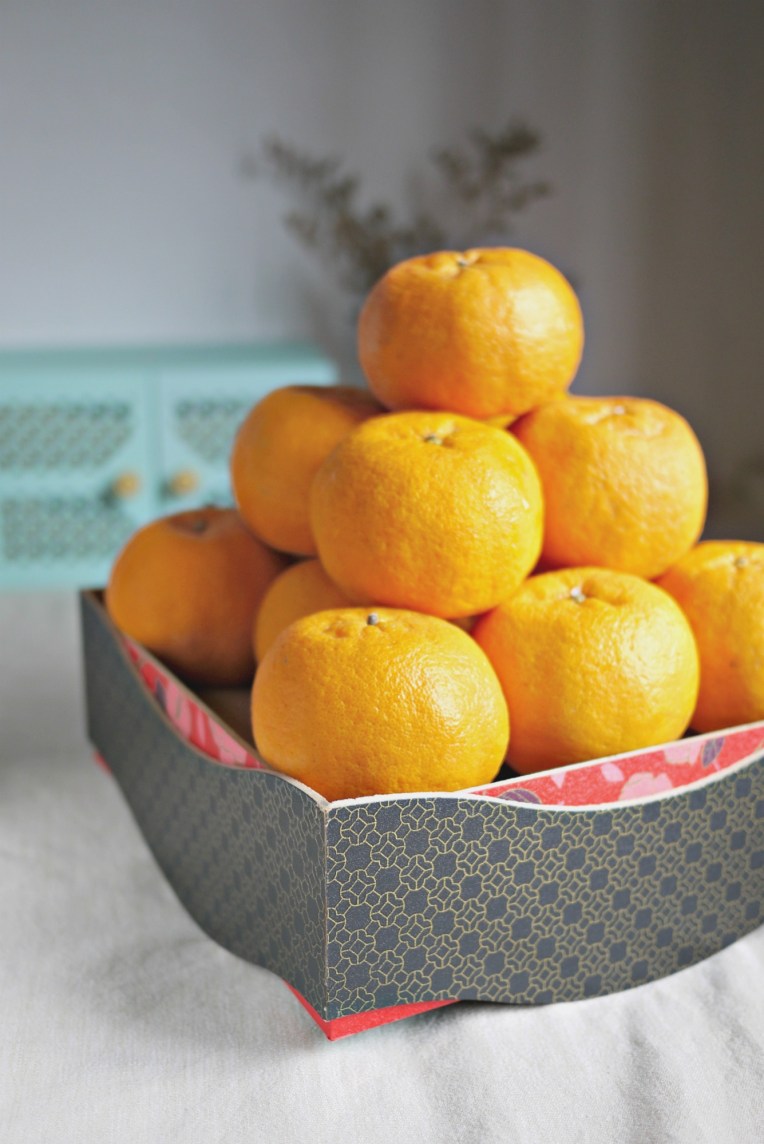
// an old mooncake box made out of chip wood is upcycled into a unique display tray for mandarin oranges.  After the new year, they go back to my craft drawer as a storage box.

Zero Waste Decor for CNY // Mono + Co

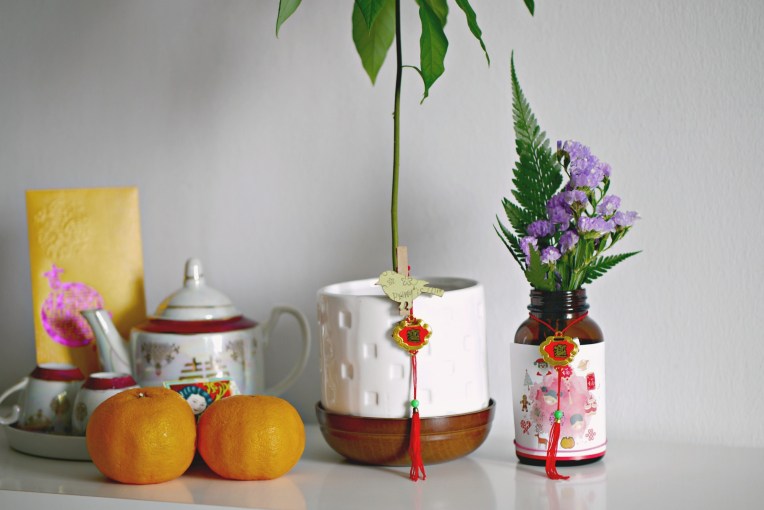
// update indoor planters/vase with dainty tassels.

Zero Waste Decor for CNY // Mono + Co

// another Chinese knot tassel, this one salvaged from a torn cushion is used to update my tiny vase with dried flowers.

Zero Waste Decor for CNY // Mono + Co

// instead of stowing away the Christmas wreath, I swap the neutrals for red color embellishments and display for another month.

Zero Waste Decor for CNY // Mono + Co

// these paper diamonds are so easy to make, and best of all, look contemporary enough as daily decoration, so there is no hurry to put them away even after celebrations are all over.

Save

Save

Save

Save

Save

Save

Save

Save

Save

Save

Save

Natural Starter Potato Boule

Natural Starter Potato Boule // Mono + Co Natural Starter Potato Boule // Mono + Co Natural Starter Potato Boule // Mono + Co

No recipe here, as I am still trying to figure out the best timing for every step in baking a bread with a natural starter:  what time to start, when is the starter most active, how long to wait, and when to bake.  They say every starter is unique, so watch the dough and judge with your eyes, see how the starter rises and falls, how the dough doubles in size, and not be fixated by the clock or recipe instructions.

I tried a few times to “bake by feel” and began to feel confident to use the natural starter for my root vegetable bread recipes.  A few tweaks are still required before I get the amount just right for my pullman loaf.  Until then,  I will just shape them into simple boules if they rise too much or too little to fit into my pan.  This one happens to use 100g of starter, 350g of bread flour and 100g of mashed potatoes, and took me about 15 hours from start to finish.

Save

Pineapple Tarts

Enclosed Pineapple Tart // Mono + Co Enclosed Pineapple Tart // Mono + Co

I am still making my own pineapple jam this way, glad that I had my preparation tips documented last year.  I definitely got into the pineapple tarts baking groove earlier this year, and even have the energy to try another popular 4-ingredients crust recipe besides the one that I always use.  Also realized that Ferrero Rocher chocolate box makes a nice tart container.


Enclosed Pineapple Tart

recipe from here,halved

175g salted butter, room temp
50g condensed milk
1 egg yolk
255g unbleached white flour
for eggwash : yolk and milk mixture
pineapple jam fillings, recipe here

Cream softened butter and condensed milk until the mixture is pale and fluffy with an electric mixer using a paddle hook attachment.

Add egg yolk and mix well.

Add flour and run the mixer on its lowest speed, stop immediately when a dough is formed, with no signs of white flour visible.

Chill the dough for 5 minutes in the chiller if it is too sticky to handle.

Before assembling the tarts, shape pineapple jam into 8g balls, and dough into 12g balls.

Wrap the jam inside the dough, seal, and shape into a round ball, place on a baking tray.  Repeat for the rest.

Score the top of the tarts for attractiveness is optional, egg wash is good enough for me.  But I wanted to distinct this batch from another batch using a different crust recipe.

Apply egg wash.

Bake for 23-25 minutes in a preheated oven at 170C.

Cool completely before storing.

Save

A Dough for 1 Wholemeal Taro Loaf + 4 Buns

Wholemeal Taro Loaf // Mono + Co Wholemeal Taro Loaf // Mono + Co Wholemeal Taro Loaf // Mono + Co Wholemeal Taro Loaf // Mono + Co Wholemeal Taro Loaf // Mono + Co Wholemeal Taro Loaf // Mono + Co

Yes! Another taro loaf recipe.  But I added 100 gram more flour to have some excess dough for 4 buns, 50g of dough for each bun to be exact.  I also filled the buns with cream cheese, with this soft sweet bun recipe, any filling will go with it, just add your favorite.

Wholemeal Taro Loaf // Mono + CoWholemeal Taro Loaf // Mono + Co

I can make three loaves of bread with half a taro bought from the market.  Even after adding an egg, and a generous slab of butter, the bread appears white, not yellowish.  This is what I like about adding taro to Asian style bread recipes.

If you like to bake a loaf for next day’s breakfast and extra four buns for afternoon tea, here’s the recipe:


1 loaf + 4 buns recipe

250g bread flour
50g wholemeal flour
1/4 teaspoon sea salt
2 tablespoons raw sugar
1/2 tablespoon instant yeast
100g steamed taro, mashed
1 egg, 70g with shell
30g water
35g cold butter, cubed

In a mixer bowl, mix well the dry ingredients: bread flour, wholemeal flour, yeast, sea salt, and raw sugar with a hand whisk.  Add cooled mashed taro, egg, and water to the dry ingredients, and knead with a dough hook attachment on the lowest speed (KA 1) until the ingredients come into a ball.  Let the dough stand for 15 minutes, cover the bowl with a clean tea towel if it’s windy in your kitchen.

Start the mixer running on its lowest speed again, and knead the dough for 1 minute, before adding cubed butter, one by one.  Knead until the dough reaches window pane stage, this is when the dough becomes very smooth and elastic, and starts to pull away from the sides of the bowl.  Remove the bowl from mixer, cover with tea towel, and bulk rise for 1 hour.

After an hour, the dough should rise to double its volume, punch it down to release the gas, and transfer to a clean work top.  Flatten the dough to push out gas trapped inside the dough, either by hand or a rolling pin.  Shape the dough and place it in a greased bread tin, seam side facing downwards.  Let this sit in a draft free place to rise for another 50-60 minutes.

Take out 4 x 50g of dough, and shape them into balls on a baking tray.

Shape the remaining dough into a loaf and place it in a greased bread tin, seam side facing downwards.  Let this sit in a draft free place to rise for another 50-60 minutes.  I divided the remaining dough into 3 equal parts and shape them swiss rolls style.

Let bun dough proof for 45 minutes, bake for 25min at 170C.

For Pullman loaf, proof for 50-60 minutes, bake in a preheated oven at 170C for 30 minutes.  Remove the bread from the pan immediately after baking, and let it cool on a rack completely before slicing or serving.

Store in an airtight container if not consumed immediately, to keep the loaf soft and the crumbs from drying out.

Save

Save

Apple Cinnamon Crumble

Apple Cinnamon Crumble // Mono + Co Apple Cinnamon Crumble // Mono + Co Apple Cinnamon Crumble // Mono + Co Apple Cinnamon Crumble // Mono + Co

My girl made this apple crumble the day before, it tasted so nice, we decided to tweak the recipe further to be served this coming Christmas as dessert.  Talk about being last minute!

The original recipe serves 2 with just an apple.  We thought the amount of filling could be increased and thus used 2 apples instead, but maintain the amount of sugar to limit the number of calories.  Adding ground cinnamon to the filling also helps to make the filling taste sweeter without additional sugar.

I bake it in an old baking dish with a blue rim that mimics enamelware design.  This has been with me for quite some time, and sometimes I wished I have bought it in a pair.  I have been making baked rice, baked pasta, and also use it to replace toaster oven tray for heating up quick bites.


Apple Cinnamon Crumble

2 green apples, peeled, cored and diced
50g sugar
50ml water
2 teaspoons ground cinnamon
70g rolled oats
70g wholemeal flour
70g cold salted butter, diced
2 tablespoons sugar

To make the fillings, boil diced green apples, sugar, ground cinnamon and water, in a saucepan over low heat until all the liquid dries up and the apples are cooked.  Set aside to cool.

To make the crumble, rub butter into rolled oats and wholemeal flour until resembling breadcrumbs.  Stir in sugar and mix well.

In an oven safe baking dish/pie dish or any deep round pan, spread the apple fillings evenly.  Top with crumble and flatten slightly with the back of a tablespoon.

Bake for 20 minutes in a preheated oven at 190C.

Save

Save

Save

Soft Taro Milk Loaf

Soft Taro Milk Loaf // Mono + Co Soft Taro Milk Loaf // Mono + Co Soft Taro Milk Loaf // Mono + Co

The first bread loaf that I bake after almost a month long hiatus is this Taro Milk Loaf, exactly the same as this recipe I baked earlier, with milk instead of plain water.  The bread is now good enough to be eaten on its own since I have added a whole egg, butter, and milk as ingredients.  Talk about convenient food!


Soft Taro Milk Loaf

200g bread flour
1/2 tablespoon instant dry yeast
1/4 teaspoon sea salt
2 tablespoons organic raw sugar
100g steamed taro, mashed
1 egg **
55g fresh milk
30g cold unsalted butter, cubed

** I ran out of large eggs and used a 55g egg for this bake.  If a larger egg is used, I will add just 30g milk, and top up if necessary, spoon by spoon, until the ingredients come into a ball.  Otherwise, the dough may end up too wet to be handled or shaped.

In a mixer bowl, mix well the dry ingredients: bread flour, yeast, sea salt, and raw sugar with a hand whisk.  Add cooled mashed taro, egg, and half of the fresh milk to the dry ingredients, and knead with a dough hook attachment on the lowest speed (KA 1).  Slowly add in the remaining of the fresh milk, with the mixer running, until the ingredients come into a ball.  Let the dough stand for 15 minutes, cover the bowl with a clean tea towel if your kitchen is windy.

Start the mixer running on its lowest speed again, and knead the dough for 1 minute, before adding cubed butter, one by one.  Knead until the dough reaches window pane stage, this is when the dough becomes very smooth and elastic, and starts to pull away from the sides of the bowl.  Remove the bowl from mixer, cover with tea towel, and bulk rise for 1 hour.

After an hour, the dough should rise to double its volume, punch it down to release the gas, and transfer to a clean work top.  Flatten the dough to push out gas trapped inside the dough, either by hand or a rolling pin.  Shape the dough and place it in a greased bread tin, seam side facing downwards.  Let this sit in a draft free place to rise for another 50-60 minutes.

Bake in a preheated oven at 170C for 30 minutes.  Remove the bread from the pan immediately after baking, and let it cool on a rack completely before slicing or serving.

Store in an airtight container if not consumed immediately, to keep the loaf soft and the crumbs from drying out.

Save

Save

Save

Simple Pleasures

Simple Pleasures // Mono + Co

// pretty stickers for a new journal.

Simple Pleasures // Mono + Co

// assemble a sewing kit:  finally, all the essentials in one box.

Simple Pleasures // Mono + Co

// handmade and used for 2 whole years.

Simple Pleasures // Mono + Co

// leaving my green garden to fate: the prettiest of the lot came from some unknown seedlings.

Simple Pleasures // Mono + Co

// frozen, because they were all bruised on our way home and there were too many to be eaten at one go.

Save

Save

Save

Save

Save

Simple Pleasures

Simple Pleasures // Mono + Co

// reusing a discontinued plastic membership card into a bookmark, absolutely no step-by-step instructions required.

Simple Pleasures // Mono + Co

// a plastic-free vegetable peeler.

Simple Pleasures // Mono + Co

// mini-adventure : a bus ride to nowhere.

Simple Pleasures // Mono + Co

// while giving away some children’s toys stashed away in the store room, we get reunited with a long forgotten one.

Simple Pleasures // Mono + Co

// simple 10-inch sponge cake sans buttercream fillings and chocolate icing, adapted from 2 x 8-inch recipe here.

Save

Save

Save